HOBART HGF SERIES GAS FRYERS WITH OR WITHOUT FILTER MODELS HGF35 HGF45 HGF65 HGF85 HG35F HG45F HG65F HG85F ML-126994 ML-126995 ML-126996 ML-126997 ML-135536 ML-135537 ML-135538 ML-135539 701 S. RIDGE AVENUE TROY, OHIO 45374-0001 937 332-3000 www.hobartcorp.com FORM 34838 (Nov.
IMPORTANT FOR YOUR SAFETY THIS MANUAL HAS BEEN PREPARED FOR PERSONNEL QUALIFIED TO INSTALL GAS EQUIPMENT, WHO SHOULD PERFORM THE INITIAL FIELD START-UP AND ADJUSTMENTS OF THE EQUIPMENT COVERED BY THIS MANUAL. POST IN A PROMINENT LOCATION THE INSTRUCTIONS TO BE FOLLOWED IN THE EVENT THE SMELL OF GAS IS DETECTED. THIS INFORMATION CAN BE OBTAINED FROM THE LOCAL GAS SUPPLIER.
TABLE OF CONTENTS GENERAL .............................................................................................................................................4 SPECIFICATIONS ..........................................................................................................................4 OPTIONS AND FEATURES (Filter Ready Fryers) ......................................................................4 OPTIONS AND FEATURES (Non-Filter Ready Fryers) ..........................................
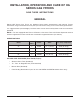
INSTALLATION, OPERATION AND CARE OF HG SERIES GAS FRYERS SAVE THESE INSTRUCTIONS GENERAL Hobart HGF Series Gas Fryers are produced with quality workmanship and material. Proper installation, usage and maintenance of your fryer will result in many years of satisfactory performance. It is suggested that you thoroughly read this entire manual and carefully follow all of the instructions provided.
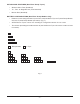
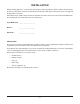
OPTIONS AND FEATURES (Non-Filter Ready Fryers) • Stainless Steel Tank (Standard) • Tri-, Twin- or Single-Basket (Twin Standard) • Manual Pilot (Standard) BATTERY CONFIGURATIONS (Non-Filter Ready Models Only) • Batteries can be configured with any non-filter ready HG Series Fryer or Frymate Dump Station; only one Frymate Dump Station per battery (Fig. 1). • All HGF Series Fryers can be free-standing or arranged in batteries of 2 to 4 units.
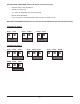
OPTIONS AND FEATURES (Filter-In-A-Drawer Filtration System) • Stainless Steel Tank (Standard) • Basket Lift with Timer • Tri-, Twin- or Single-Basket (Twin Standard) • Manual Pilot (Standard) • Filter-In-A-Drawer Interplumbed Filtration System (F Models Only) BATTERY CONFIGURATIONS (Filter-In-A-Drawer Interplumbed Filtration System Models Only) 2 Cabinets in Battery Fryer Fryer A B Fryer Filter Dump Dump Fryer A B A B Filter Filter 3 Cabinets in Battery Fryer A Fryer Fryer B C Fi
4 Cabinets in Battery (For Gas 35, 45 and Electric 50 Only) Fryer Fryer Fryer A B C Fryer D Dump Fryer A B C Fryer Dump Fryer Fryer A B C D Fryer A B C D Fryer Fryer Dump Fryer A B C D Filter Filter Fryer Fryer Filter Filter Fryer Fryer Dump D Filter The configurations shown are standard (default) locations. Any deviation will result in substantially increased lead times. Check with your sales manager or Hobart customer service for acceptance of different configurations.
FIELD-INSTALLED ACCESSORIES FACTORY-INSTALLED OPTIONS • Casters • Battery Non-Filter Ready Models Only • Twin Baskets • Battery Filter-In-A-Drawer Filtration • Tri-Baskets (65 and 85 models only) System • Single Baskets • Heat Lamp (RO only) • Flex Hose 4' (1.2 m) (gas connection) • Flex hose S/S 5' (1.
INSTALLATION Before installing the fryer, verify that the type of gas (natural or propane) agrees with the specifications on the fryer data plate, which is located on the inside of the door panel. Ensure the fryer is configured for the proper elevation. Record your fryer model, device and serial numbers for future reference in the space provided below. This information can be found on the fryer data plate. Fryer Model No. ____________________ Device ____________________ Serial No.
LOCATION (All Models) The equipment area must be kept free and clear of combustible substances. Minimum clearance from combustible construction is 6" (15 cm) from the sides and 6" (15 cm) from the back of the fryer. Minimum clearance from noncombustible construction is 0" from the sides and 0" from the back. At least 16" (41 cm) of clearance must be between the fryer and any open-top flame units. Adequate clearances for servicing and proper operation must be allowed.
ASSEMBLY When installed, the fryer must be restrained to prevent tipping to avoid the splashing of hot liquid. The means of restraint may be the manner of installation, such as connection to a battery of appliances or installing the fryer in an alcove, or by separate means, such as adequate ties. Fryers Mounted on Legs (Non-Battery Fryers) Fryers serviced from the rear must have a minimum clearance of 18" (46 cm) from the wall when mounted on legs. 1.
GAS CONNECTIONS CAUTION: All gas supply connections and any pipe joint compound must be resistant to the action of propane gases. The gas inlet is located on the lower right rear of the fryer. Codes require that a gas shutoff valve be installed in the gas line ahead of the fryer. The gas supply line must be at least the equivalent of 1/2" iron pipe for single units and 1 1/4" for batteries; if using the optional quick-disconnect flex hose, 3/4" iron pipe for single units, 1 1/4" iron pipe for batteries.
LEVELING FRYER (All Models) 1. Place a level on top of the fryer after gas connections have been made. 2. Adjust the legs to ensure that the fryer is level front to back and side to side in the final installed position. FLUE CONNECTIONS (All Models) The fryer must be located under a hood with adequate connection to an exhaust duct. The hood must extend 6" (15 cm) beyond fryer sides.
OPERATION WARNING: HOT OIL AND PARTS CAN CAUSE BURNS. USE CARE WHEN OPERATING, CLEANING AND SERVICING THE FRYER. WARNING: SPILLING HOT FRYING COMPOUND CAN CAUSE SEVERE BURNS. DO NOT MOVE FRYER WITHOUT DRAINING ALL FRYING COMPOUND FROM THE TANK. BEFORE FIRST USE (All Models) • Clean the protective metal oils from all surface parts and the tank interior using a noncorrosive, grease-dissolving commercial cleaner. Follow the cleaner manufacturer's directions. • Rinse thoroughly and drain.
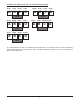
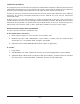
LIGHTING INSTRUCTIONS FOR MANUAL PILOT IGNITION (Non-Filter Ready) CAUTION: Before turning the burners on, the fry tank must be filled with liquid or melted shortening. 1. Turn the thermostat OFF. The thermostat is located behind the door (Fig. 4). Drain Valve Gas Control Valve Knob Thermostat Knob PL-40677-1 Non-Filter Ready Fig. 4 2. Push the gas control valve knob and turn to OFF (Fig. 5). Wait 5 minutes for unburned gas to vent. 3. Push and turn gas control valve on to the "I" in PILOT (Fig. 5). 4.
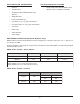
LIGHTING INSTRUCTIONS FOR MANUAL PILOT IGNITION (Filter Ready Models, Fig. 6) CAUTION: Before turning the burners on, the fry tank must be filled with liquid or melted shortening. OFF 250 200 4 0 30 F OF T ILO P ON PL-50293 Fig. 6 1. Turn thermostat knob (located behind the door panel) to OFF. 2. Push gas valve extension arm in and turn arm to OFF. Wait 5 minutes for unburned gas to vent. 3. Push gas valve extension arm in and turn to PILOT. 4.
TURNING THE FRYER OFF 1. Turn the thermostat OFF. 2. To keep the pilot lit: For non-filter ready models, turn the gas control valve knob to "I" in PILOT. For filter-ready models, turn the valve arm to PILOT. 3. To shut off all gas to the system, including the pilot, turn the gas control valve knob to OFF. EXTENDED SHUTDOWN 1. Turn the main gas shutoff valve off. 2. Turn the thermostat knob to OFF. 3. Turn the gas control valve knob to OFF. FRYING FOODS (All Models) • Heat shortening to set temperature.
SHORTENING LIFE (All Models) Shortening life can be extended by following these guidelines: • Do not salt foods over the fryer. • Use good-quality shortening. • Filter shortening daily (at a minimum). • Replace shortening if it becomes poorly flavored. • Keep equipment and surroundings clean. • Set thermostats correctly. • Remove excess moisture and particles from food products before placing in fryer. DAILY FILTERING WARNING: HOT OIL AND PARTS CAN CAUSE BURNS.
Filter-Ready Models (Using Mobile Filter HMF50 or HMF85 Only) For filtering instructions of the filter-ready fryers, refer to the Installation and Operation Manual. This manual is supplied with each mobile filter system. Check tank vessel or accessory shipment box for manual. If manual is not found, contact your local Hobart Office to obtain the manual before operating the filter system. Make sure you use the mobile filter with the correct-size tank to hold the quantity of shortening to be filtered.
CLEANING WARNING: HOT OIL AND PARTS CAN CAUSE BURNS. USE CARE WHEN OPERATING, CLEANING AND SERVICING THE FRYER. DAILY Clean your fryer regularly with a damp cloth and polish with a soft dry cloth. If regular cleaning is neglected, grease will be burned on and discolorations may form. Fingerprints are sometimes a problem on highly polished surfaces of stainless steel. They can be minimized by applying a cleaner that will leave a thin oily or waxy film.