MODEL HGFR GAS-FLAMED ROTISSERIE OVEN MODEL HGFR ML-132078 ML-132079 Natural Gas Propane Gas 701 S. RIDGE AVENUE TROY, OHIO 45374-0001 937 332-3000 www.hobartcorp.com FORM 35504 Rev. A (Mar.
IMPORTANT FOR YOUR SAFETY THIS MANUAL HAS BEEN PREPARED FOR PERSONNEL QUALIFIED TO INSTALL GAS EQUIPMENT, WHO SHOULD PERFORM THE INITIAL FIELD START-UP AND ADJUSTMENTS OF THE EQUIPMENT COVERED BY THIS MANUAL. POST IN A PROMINENT LOCATION THE INSTRUCTIONS TO BE FOLLOWED IN THE EVENT THE SMELL OF GAS IS DETECTED. THIS INFORMATION CAN BE OBTAINED FROM THE LOCAL GAS SUPPLIER.
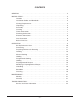
CONTENTS GENERAL ........................................................ 4 INSTALLATION . . . . . . . . . . . . . . . . . . . . . . . . . . . . . . . . . . . . . . . . . . . . . . . . . . . . . . . Location . . . . . . . . . . . . . . . . . . . . . . . . . . . . . . . . . . . . . . . . . . . . . . . . . . . . . . . Installation Codes and Standards . . . . . . . . . . . . . . . . . . . . . . . . . . . . . . . . . . . Venting Requirements . . . . . . . . . . . . . . . . . . . . . . . . . . . . . . . . . .
Installation, Operation and Care of HGFR GAS-FLAMED ROTISSERIE OVEN SAVE THESE INSTRUCTIONS GENERAL The model HGFR Series Gas-Flamed Rotisserie Oven features stainless steel interior and exterior for ease of cleaning. Infrared ceramic gas burners efficiently roast the product. The rotisserie rotates the product on spits as it revolves around the rotisserie oven. The product roasts evenly and self-bastes throughout the cooking process.
INSTALLATION Prior to installation, verify that the electrical service and gas supply (natural or propane) agree with the specifications on the machine data plate located on the right side of the rotisserie oven. LOCATION WARNING: THE ROTISSERIE OVEN SHOULD NOT BE ACCESSIBLE TO THE CUSTOMER; HOT GLASS AND PARTS CAN CAUSE BURNS. The equipment area must be kept free and clear of combustibles. Maintain clearances from combustible and noncombustible construction of 3" (7.6 cm) at the sides and rear.
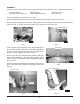
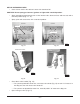
ASSEMBLY Carefully remove and inspect all loose parts packed with the rotisserie oven, including the following: Overflow Tube (1) Removable Rear Panel (1) Skim Tube (1) Door Handle Knobs (2) Ceramic Logs (4) Wire Rack (1) Unwrap foot pedal switch and place on floor. Screw the door handle knobs onto the door handle rods and tighten them firmly (Fig. 1). Hang the upper edge of the removable hanging panel from the hanger strip on the rear wall inside the rotisserie (Fig. 2).
LEVELING If the rotisserie oven is equipped with casters (standard), move the rotisserie oven to its final installed position and lock the front casters; back casters are nonlocking. Casters are nonadjustable; therefore, the floor must be level to avoid experiencing cooking problems. HOLE FOR TETHER If the rotisserie oven is equipped with adjustable feet (optional), move the rotisserie oven to its final installed position.
ELECTRICAL CONNECTION WARNING: ELECTRICAL AND GROUNDING CONNECTIONS MUST COMPLY WITH THE APPLICABLE PORTIONS OF THE NATIONAL ELECTRICAL CODE AND/OR OTHER LOCAL ELECTRICAL CODES. WARNING: THIS MACHINE IS PROVIDED WITH A THREE-PRONG GROUNDING PLUG. THE OUTLET TO WHICH THIS PLUG IS CONNECTED MUST BE PROPERLY GROUNDED. IF THE RECEPTACLE IS NOT THE PROPER GROUNDING TYPE, CONTACT AN ELECTRICIAN. Do not plug in until after the gas connection has been made and checked for leaks.
OPERATION WARNING: HOT GLASS, GREASE AND PARTS CAN CAUSE BURNS. OPERATING, CLEANING AND SERVICING THE ROTISSERIE. USE CARE WHEN CONTROL PANEL FOOT PEDAL SWITCH Fig. 10 Foot switch (Fig. 10) — Press/release to stop/start rotor when Motor switch is on.
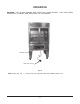
SET UP ROTISSERIE OVEN • Cover center shaft in the rotisserie oven with aluminum foil. CAUTION: Do not spray gas burners, ignitors or lights with nonstick product. • Spray noncooking components such as the interior walls, drum surfaces and wire rack with a nonstick product (Figs. 11, 12). • Spray spits and accessories with a nonstick product. DO SPRAY DO NOT SPRAY PL-41709-1 Fig. 11 Fig. 12 DRAIN VALVE HANDLE WATER VALVE GAS VALVE HANDLE PL-41699-1 PL-41693-1 Fig. 13 • Fig.
PREHEATING • Controller displays rdy . • Turn Lights switch on (Fig. 15). • Turn Motor switch on (Fig. 15). • Turn Show Burner switch on (Fig. 15). • Check to see that Show Burner is lit. • If Burner does not ignite, turn Show Burner switch off then on again. • Preheat rotisserie oven for 15 – 20 minutes with show burner.
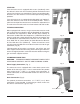
• Bring tie to front, holding the wings to the side of the chicken (Fig. 18). • Insert angle spit (V) neck first (Fig. 19). PL-41697 PL-41696 Fig. 18 Fig. 19 • The flat side of spit must be parallel with breast bone (Fig. 20). • Make sure that the legs and thighs are on the same side as breasts (Fig. 21). PL-41698 Fig. 20 Fig. 21 • The angle spit (Fig. 22) holds five average size chickens weighing approximately 3.3 lbs. Continue loading angle spits until all spits are completed.
LOADING • Insert pointed end of the angle spits into left side of rotor, facing the unit (Fig. 24). CAUTION: Do not jam angle spit into the square hub. • Insert square end of the angle spit in the square hub on the right side of the rotor (Fig. 25). PL-41700 PL-41701 Fig. 24 • Fig. 25 Ensure round end of the angle spit drops down so the square end, on the right side, is properly held in place and fully engaged. Repeat for all angle spits (Fig. 26). NOTE: Stagger loading.
MANUAL COOKING In manual mode Cook Time, Cook Temp and Hold Temp settings are saved in short-term memory only and should be verified each time a manual process begins. Controller cycles top burners on and off. When cooking partial loads or when cooking special glazes, cook with one burner on or with a lower Cook Temp setting.
PROGRAMMED COOKING In programmed mode, preprogrammed recipes stored in long-term memory are used. Controller cycles top burners on and off. When cooking partial loads or when cooking special glazes, cook with one burner on or with a lower Cook Temp setting. HOBART Motor 12 12 Lights 123 123 rdy Temperature 12 12 Burners Show Top Front 1 1 Temperature - Time Controller COOK TEMP COOK TIME READ HOLD TEMP START STOP SAVE Top Rear 12 12 12 12 Fig. 30 • Controller displays rdy .
PREPROGRAMMED RECIPES Twelve recipes, shown below, are preprogrammed at the factory. The table provides an extra space for each recipe so you can pencil in your own settings if you choose to reprogram a recipe.
MODIFYING A PREPROGRAMMED RECIPE HOBART Motor 12 12 Lights 123 123 rdy Temperature 12 12 Burners Show Temperature - Time Controller COOK TEMP COOK TIME READ HOLD TEMP START STOP SAVE 1 1 1 12 12 12 Top Front 12 12 12 Top Rear Fig. 32 Selecting the Recipe • Controller displays rdy . • Press • Press the up or down keys until the desired recipe number is displayed. For example: r03 . • Press • Controller displays prog . READ .
UNLOADING WARNING: PRODUCT WILL BE HOT WHEN UNLOADING ACCESSORIES. USE CARE WHEN UNLOADING THE ROTISSERIE OVEN. • Stop hold cycle, open door and begin unloading. • Step on and hold down the foot switch to stop rotor. • Use a thermometer to check product for doneness (popper can also be an indicator of doneness). Refer to Manual Cooking, above, to set additional time if needed. • Use insulated gloves and remove the angle Vspits (Fig. 33). • Release foot switch.
• Add water to the drip pan until the grease has flowed into the skim tube and down through the drain connection. – For systems plumbed to water line, turn water valve knob on until grease is removed from the drip pan, then turn water valve off (Fig. 35). – For systems not plumbed to water line, manually add water until grease is removed from the drip pan. • Close drain valve. • Remove bucket, if used, and dispose of greasy water.
CAUTION: Excessive water and harsh cleaners will damage control panel. • Clean the control panel with a sponge or clean, soft cloth. • Clean the exterior of the rotisserie oven with warm, soapy water and a soft cloth or sponge. Rinse thoroughly and wipe dry with a soft, clean cloth. • Open drain valve and drain soapy water from drip pan into empty bucket. Rinse with clean water and dry drip pan with a soft cloth. • The bucket may have to be emptied several times.
MAINTENANCE WARNING: DISCONNECT ELECTRICAL POWER SUPPLY BEFORE PERFORMING ANY MAINTENANCE. WARNING: HOT GLASS, GREASE AND PARTS CAN CAUSE BURNS. OPERATING, CLEANING AND SERVICING THE ROTISSERIE OVEN. USE CARE WHEN Light bulbs require replacement periodically. Replace with same size and type. MONTHLY To ensure the show burner is operating efficiently, remove ceramic logs and log holder and clean any debris from the burner openings with a paper clip.
TROUBLESHOOTING Problem Possible Cause Display not illuminated. Rotisserie oven not plugged in. Top burner(s) will not ignite. 1. 2. 3. 4. Temperature and burner switch(es) not on. Controller Cook Temp not set to 600°F (max.). Main gas valve not open. Pan or other object on top of rotisserie oven, restricting proper airflow. Show burner will not ignite 1. Main gas valve not open. 2. Motor switch not on. 3. Pan or other object on top of rotisserie oven, restricting proper airflow.
NOTES – 23 –
NOTES FORM 35504 Rev. A (Mar. 2005) – 24 – PRINTED IN U.S.A.