HQC45 & HQC90 QUICKCHILLERS & HQCF45 QUICKCHILLER-FREEZER MODEL HQC45 HQCF45 HQC90 ML-124066 ML-124067 ML-124068 701 S. RIDGE AVENUE TROY, OHIO 45374-0001 937 332-3000 www.hobartcorp.com FORM 34639 Rev. A (Sept.
Model HQC45 QuickChiller With Legs Model HQCF45 QuickChiller-Freezer With Casters Model HQC90 QuickChiller With Casters TABLE OF CONTENTS GENERAL . . . . . . . . . . . . . . . . . . . . . . . . . . . . . . . . . . . . . . . . . . . . . . . . . . . . . . . . . . . . . . . . 4 INSTALLATION . . . . . . . . . . . . . . . . . . . . . . . . . . . . . . . . . . . . . . . . . . . . . . . . . . . . . . . . . . . . 5 UNCRATING . . . . . . . . . . . . . . . . . . . . . . . . . . . . . . . . . . . . . . . . . . . .
OPERATION . . . . . . . . . . . . . . . . . . . . . . . . . . . . . . . . . . . . . . . . . . . . . . . . . . . . . . . . . . . . . . . . 8 CONTROLS . . . . . . . . . . . . . . . . . . . . . . . . . . . . . . . . . . . . . . . . . . . . . . . . . . . . . . . . . . . . . 8 START-UP . . . . . . . . . . . . . . . . . . . . . . . . . . . . . . . . . . . . . . . . . . . . . . . . . . . . . . . . . . . . . . 8 OVER-TEMPERATURE . . . . . . . . . . . . . . . . . . . . . . . . . . . . . . . . . . . . . . . . . . . .
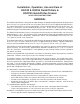
Installation, Operation, Use and Care of HQC45 & HQC90 QuickChillers & HQCF45 QuickChiller-Freezer SAVE THESE INSTRUCTIONS GENERAL The HQC45 QuickChiller is designed for rapid chilling of 45 pounds of food (9 pounds of food per pan in five 12" x 20" x 21⁄2" pans or five 18" x 26" sheet pans) from 150°F to 37°F in approximately 90 minutes. The rapid chilling process preserves food quality, texture and nutritional value for up to 5 days. As many as 5 chill cycles can be handled per 8 hour shift.
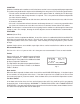
INSTALLATION Before installing, check the electrical service to make sure it agrees with the electrical specifications on the rating plate located inside the cabinet. UNCRATING Immediately after unpacking, check for possible shipping damage. If the chiller is found to be damaged, save the packaging material and contact the carrier within 15 days of delivery. DO NOT LAY THE CHILLER ON ITS FRONT, BACK OR SIDES.
LOCATION Good air circulation at the condenser coil in the lower section is necessary to provide proper operation. The cabinet may be located in any one of the following three ways to assure satisfactory performance. • The unit can be situated so the lower back section is open to room air, allowing free air discharge. No side clearance and no top clearance is required. This is the preferred situation and provides the most effective cooling.
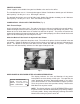
ELECTRICAL CONNECTIONS Line voltage supplied to the cabinet junction box must not be affected by the operation of other electrical equipment. Junction box is located at the rear of the lower section. The rear compressor cover is maintained in place with Velcro. Pull to remove it. WARNING: ELECTRICAL AND GROUNDING CONNECTIONS MUST COMPLY WITH THE APPLICABLE PORTIONS OF THE NATIONAL ELECTRICAL CODE AND/OR OTHER LOCAL ELECTRICAL CODES.
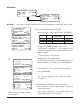
OPERATION CONTROLS (Fig. 4) MAIN MENU BY TEMP BY TIME 08:05:01 BY PROD MORE Fig. 4 Choose a selection from the menu that appears on the control’s display by pressing the button graphically connected to the display prompt. Four buttons are arranged on the left and four on the right. For example, to select By Temp, press the second button on the left. START-UP SmartChill HQC90 INITIALIZING VERSION 1.00 The screen at left is displayed when the chiller is first turned on.
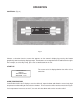
PRINTER SUPPLIES Printer supplies are available from your local Hobart sales and service office. The standard printer uses 21/4" thermal printer paper, Hobart Part Number 434409, per roll. Minimum order quantity: 50 rolls per 1 case. Roll length is 80 feet. The optional label printer uses peel-off label stock, Hobart Part Number 434408, per roll. Minimum order quantity: 50 rolls per 1 case. Each roll contains 225 labels. LOADING ROLL STOCK ONTO THE PRINTERS (Fig.
MAIN MENU MAIN MENU BY TEMP BY TIME 08:05:01 BY PROD MAIN MENU HOLD PROD DEFROST BACK MORE 08:06:01 PRINT SETUP BY TEMP — Chill Cycle is complete when any (or all) product probe(s) reaches the Target Temp. BY TEMPERATURE TYPE: CHILL ↓TARGET TEMP: 37 °F↑ MAIN START From the Main Menu, select BY TEMP. • BY TEMPERATURE TYPE: SOFT CHILL ↓TARGET TEMP: 37 °F↑ MAIN START Select the Type: CHILL, SOFT CHILL or FREEZE*.
CHILLING AIR: 14 °F 1 41 °F DONE 3 2 44 °F 1:16:01 ADD/REMOVE • Press ADD/ REMOVE. • If all probes are ‘done,’ the display goes to HOLDING. SELECT PROBE: 1 41 °F DONE 3 2 44 °F 1:16:08 CONTINUE • Select the ‘done’ probe’s number to remove it. • Remove all product associated with the ‘done’ probe. • Select any other probe’s number to stop cycle and remove it. Answer YES or NO.
MAIN MENU MAIN MENU BY TEMP BY TIME 08:05:01 BY PROD MAIN MENU HOLD PROD DEFROST BACK MORE 08:06:01 PRINT SETUP BY TIME — Timer counts down until cycle is done. BY TIME TYPE: CHILL ↓CYCLE TIME: 01:30↑ MAIN START From the Main Menu, select BY TIME.
HOLDING AIR: 14 °F 1 39 °F 42 °F 3 2 44 °F 0:00:11 STOP/RESET • The total time since the cycle was finished is displayed — Hr: Min: Sec. • Remove all chilled product. • Press STOP/ RESET. • Select NONE to continue without printing. • Select RECORD to print a Chill Report. If equipped with the optional label printer, refer to the alternate Print menu below. NOTE: Chilling BY TIME does not retain Product Probe temperature data in memory and will not print TEMP vs. TIME information.
MAIN MENU MAIN MENU BY TEMP BY TIME 08:05:01 BY PROD MAIN MENU HOLD PROD DEFROST BACK MORE 08:06:01 PRINT SETUP BY PROD — Recalls programmed chill parameters for the product, either BY TEMP or BY TIME. From the Main Menu, select BY PROD. SELECT USER: ↓TIM SMITH BACK • If two or more users have been entered, use the ↓ or ↑ keys until the users name is displayed. Then press SELECT. • The two products displayed are the most recently chilled products.
If the selected product was set to chill BY TEMP: • CHILLING AIR: 14 °F 1 159 °F 3 2 154 °F 0:00:03 ADD/REMOVE Follow the cycle run information on pages 10 – 11 beginning at ❄. If the selected product was set to chill BY TIME: CHILLING AIR: 14 °F 1 159 °F 156 °F 3 2 154 °F 1:29:57 STOP/RESET • Follow the cycle run information on pages 12 – 13 beginning at ❆. NOTE: If the chill parameters for the product you selected do not chill the way you want, the product’s chill settings need to be edited.
PRODUCT LIST Any product from the PRODUCT LIST can be chilled using the BY PROD mode, once it has been enabled in Setup Products (page 19). Only CHICKEN PARTS and SOUP VEGETABLE are initially enabled as preset at the factory. NOTE: All products are initially set in the BY TEMP – CHILL mode with a Target Temp of 37°F and Hold Temp of 37°F.
HOLD PROD — After Chilling or when selected, runs the chiller like a regular refrigerator. MAIN MENU BY TEMP BY TIME 08:05:01 BY PROD MAIN MENU HOLD PROD DEFROST BACK MORE 08:06:01 PRINT SETUP From the Main Menu, select MORE and HOLD PROD. SELECT HOLD MODE: REFRIGERATOR FREEZER BACK HOLDING 1 37 °F 2 37 °F 0:00:04 AIR: 34 °F 37 °F 3 EXIT • Select REFRIGERATOR or FREEZER mode, if available. (BACK returns to the Main Menu.) (Temperatures are indicated for air and probes.
DEFROST MAIN MENU BY TEMP BY TIME NOTE: DEFROST starts automatically after 6 hours of chilling but only if operating in Holding mode. 08:05:01 BY PROD MAIN MENU HOLD PROD DEFROST BACK MORE 08:06:01 PRINT SETUP From the Main Menu, select MORE and DEFROST. READY TO DEFROST REMOVE FOOD CANCEL • (CANCEL returns to the Main Menu.) START DEFROSTING COIL 12 °F TIME REMAINING 19:52 EXIT DEFROST NOT REQUIRED To begin Defrosting, remove food and select START.
SETUP From the Main Menu, select MORE and SETUP. MAIN MENU BY TEMP BY TIME 08:05:01 BY PROD MORE MAIN MENU HOLD PROD DEFROST BACK 08:06:01 PRINT SETUP SELECT SUPERVISOR: ↓PRESET SUPERVISOR↑ ↓PASSWORD (PIN): 00↑ CANCEL ENTER • When you first enter SETUP, only Preset Supervisor is available. On the PASSWORD (PIN) line, use the ↓ or ↑ keys until 57 is displayed as the Preset Supervisor’s Personal Identification Number. Press ENTER.
SETUP From the Main Menu, select MORE and SETUP. MAIN MENU BY TEMP BY TIME 08:05:01 BY PROD MAIN MENU HOLD PROD DEFROST BACK MORE 08:06:01 PRINT SETUP SELECT SUPERVISOR: ↓PRESET SUPERVISOR↑ ↓PASSWORD (PIN): 00↑ CANCEL ENTER • When you first enter SETUP, only Preset Supervisor is available. On the PASSWORD (PIN) line, use the ↓ or ↑ keys until 57 is displayed as the Preset Supervisor’s Personal Identification Number. Press ENTER.
SYS PAR • MAIN MENU BY TEMP BY TIME From the Main Menu, select MORE and SETUP. 08:05:01 BY PROD MAIN MENU HOLD PROD DEFROST BACK MORE SELECT SUPERVISOR: ↓PRESET SUPERVISOR↑ ↓PASSWORD (PIN): 00↑ CANCEL ENTER SELECT SUPERVISOR: ↓TIM SMITH ↑ ↓PASSWORD (PIN): 07↑ CANCEL ENTER SETUP PRODUCTS USERS MAIN MENU 08:06:01 PRINT SETUP • When you first enter SETUP, only Preset Supervisor is available.
• SYS PAR 1 09:07:31 CLOCK TEMPS IN °F PROBES LOGGING SETUP MENU MORE Access the Sys Par 1 menu as shown on page 21. SYS PAR 2 09:08:41 REMOTE ALARM MODE ALARMS BUZZER BACK FAC PRESETS • From Sys Par 1, select CLOCK. • Set the Month using the ↓ or ↑ keys. • Select NEXT to move to the Day field. • Set the Day using the ↓ or ↑ keys. • Select NEXT to move to the Year field.
• Access the Sys Par 1 menu as shown on page 21. SYS PAR 1 09:07:31 CLOCK TEMPS IN °F PROBES LOGGING SETUP MENU MORE • SYS PAR 2 09:08:41 REMOTE ALARM MODE ALARMS BUZZER BACK FAC PRESETS From Sys Par 1, select PROBES. PROBES (Probe #’s 1 – 3 should be ON.) (Probe 4 is marked N/A; Not Available.) SELECT PROBE: 1 ON ON 3 2 ON N/A 4 CANCEL ENTER • Select any probes marked OFF to turn them ON. • Select ENTER to save any changes. (CANCEL returns to SYS PAR 1 without saving any changes.
• Access the Sys Par 2 menu as shown on page 21. SYS PAR 1 09:07:31 CLOCK TEMPS IN °F PROBES LOGGING SETUP MENU MORE SYS PAR 2 09:08:41 REMOTE ALARM MODE ALARMS BUZZER BACK FAC PRESETS • From Sys Par 2, select REMOTE ALARM. • Yes closes the Remote Alarm circuit in the event of a printer error. (Use to change No to Yes, etc.) • Press • Yes closes the Remote Alarm circuit when the cycle ends. (Use to change No to Yes, etc.
• Access the Sys Par 2 menu as shown on page 21. SYS PAR 1 09:07:31 CLOCK TEMPS IN °F PROBES LOGGING SETUP MENU MORE SYS PAR 2 09:08:41 REMOTE ALARM MODE ALARMS BUZZER BACK FAC PRESETS • From Sys Par 2, select ALARMS. • Use the ↓ or ↑ keys to adjust the DOOR OPEN setting. Range = 0, 30, 60, 90, 120, 150, 180, 210, 240 seconds. Refer to page 24. • Use the ↓ or ↑ keys to adjust the CLEAN COIL setting. Range = 30, 35, 40, 45, 50, 55, 60, 65, 70, 75, 80, 85, 90 days.
• Access the Sys Par 2 menu as shown on page 21. SYS PAR 1 09:07:31 CLOCK TEMPS IN °F PROBES LOGGING SETUP MENU MORE SYS PAR 2 09:08:41 REMOTE ALARM MODE ALARMS BUZZER BACK FAC PRESETS • From Sys Par 2, select MODE. • From Mode Parameters, select CHILL. MODE MODE PARAMETERS CHILL FREEZE SOFT CHILL BACK (BACK returns to SYS PAR 2.
• SYS PAR 1 09:07:31 CLOCK TEMPS IN °F PROBES LOGGING SETUP MENU MORE Access the Sys Par 2 menu as shown on page 21. SYS PAR 2 09:08:41 REMOTE ALARM MODE ALARMS BUZZER BACK FAC PRESETS • From Sys Par 2, select MODE. • From Mode Parameters, select SOFT CHILL. MODE MODE PARAMETERS CHILL FREEZE SOFT CHILL BACK (BACK returns to SYS PAR 2.) SOFT CHILL — Assures against freezing by reducing air flow at end of cycle or by increasing air temp. [ % ] x Chill Time = Time when reduced air flow occurs.
• SYS PAR 1 09:07:31 CLOCK TEMPS IN °F PROBES LOGGING SETUP MENU MORE Access the Sys Par 2 menu as shown on page 21. SYS PAR 2 09:08:41 REMOTE ALARM MODE ALARMS BUZZER BACK FAC PRESETS • From Sys Par 2, select MODE. • From Mode Parameters, select FREEZE. MODE MODE PARAMETERS CHILL FREEZE SOFT CHILL BACK (BACK returns to SYS PAR 2.
• SYS PAR 1 09:07:31 CLOCK TEMPS IN °F PROBES LOGGING SETUP MENU MORE Access the Sys Par 2 menu as shown on page 21. SYS PAR 2 09:08:41 REMOTE ALARM MODE ALARMS BUZZER BACK FAC PRESETS • From Sys Par 2, select BUZZER. • Set the Volume [0 – 9 ] using the ↓ or ↑ keys. • Set the Tone [ 1 – 8 ] using the ↓ or ↑ keys. • Select ENTER to accept the displayed values and return to SYS PAR 2. • From Sys Par 2, select FAC PRESETS.
GLOSSARY Alarms — Sets the buzzer intervals after Door is Open or when to be notified that the Compressor needs to be Cleaned. Buzzer — The control’s buzzer can have its volume and tone adjusted in the System Parameters. By Temp — Chill cycle that terminates when the probes reach the Target Temperature. By Time — Chill cycle that terminates after a set amount of time has lapsed.
Oper — An Operator is a user who is allowed to operate the chiller and make reports of chill cycles performed. Print — Allows a report of any Chill Cycle and probe to be printed. Chillers equipped with the optional second printer can print the condensed ‘Label’ type of report. All Chillers can print the ‘Record’ type of report. Probe # — Each probe is numbered and its temperature vs.
MAINTENANCE CLEANING Wash, rinse and sanitize the product probes before and after use as you would any food-contact utensil that measures temperature. Chiller surfaces of stainless steel should be wiped clean with a damp cloth or mild cleaning solution. DO NOT flush with running water. Avoid the use of solvents around plastic or painted areas; clean these with a damp cloth moistened with a solution of mild detergent and warm water. Clean hinge hardware with a chrome cleaner.