MODEL SR24H MODEL SR24 SERIES DISHWASHERS MODELS SR24C ML-130021 SR24H ML-130022 R 701 S. RIDGE AVENUE TROY, OHIO 45374-0001 937 332-3000 www.hobartcorp.com FORM 35309 Rev. B (Jan.
TABLE OF CONTENTS General . . . . . . . . . . . . . . . . . . . . . . . . . . . . . . . . . . . . . . . . . . . . . . . . . . . . 3 Installation . . . . . . . . . . . . . . . . . . . . . . . . . . . . . . . . . . . . . . . . . . . . . . . . . Unpacking . . . . . . . . . . . . . . . . . . . . . . . . . . . . . . . . . . . . . . . . . . . . . . Panel Assembly . . . . . . . . . . . . . . . . . . . . . . . . . . . . . . . . . . . . . . . . . Location. . . . . . . . . . . . . . . . . . . . . . . . . . . . . . .
Installation, Operation and Care of MODEL SR24 SERIES DISHWASHERS SAVE THESE INSTRUCTIONS GENERAL The SR24 Series Dishwashers are fully automatic, front-loading machines that are equipped with a 1/ 2 H.P. electric motor. Standard equipment includes two standard 20" x 20" racks, dial thermometers for both rinse and wash cycles, synchronous timer, pilot light and lower front trim panel. An over temperature light is standard on model SR24H only.
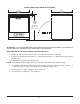
LOCATION Prior to installation, test the electrical service to make sure that it agrees with the specifications on the machine data plate, located on the top of the door. Place the machine in its operating location. Before any connections are made, the machine must be level. Use the tank seam at the top of the sump inside the tank as a reference. To level the machine, pour enough water in the tank to reach the seam and then thread the adjustable feet in or out until the water level is even with the seam.
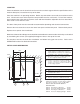
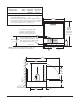
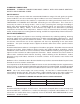
Machine Type & Specification Rated AMPS Minimum Supply CKT Conductor Ampacity Maximum Overcurrent Protective Device 9 15 15 SR24C 120/60/1 SR24H 120/240 (3W)/60/1 37.6 50 50 * or 120/208 (3W)/60/1 42.0 50 50 * * These are 3-wire systems that require (3) #8 AWG copper wires (90°C) including a current carrying neutral. In addition, a fourth wire must be provided for machine ground. Do not connect these machines to a 120 VAC circuit. 237/8" Overall Height Without Top Panel 345/8" min. 355/8" max.
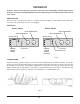
MODELS SR24C AND SR24H WITH PANELS 2315/16" 237/8" Top Panel Top Panel 1 3/16" Overall Height With Top Panel 3513/16" min. 3613/16" max. W A R N I N G : NOT RECOMMENDED FOR INSTALLATION WITHIN WOODEN, PLYWOOD OR OTHER SIMILAR, NONMOISTURE-RESISTANT FRAMEWORK. MACHINE INSTALLATION CONNECTIONS AND DETAILS 1. Single fill and rinse pipe connection. A 6-foot flexible hose is supplied. 2. Location of electrical connection: 3/ 4" electrical connector (1 1/ 8" diameter hole) provided, SR24H only. 3.
PLUMBING CONNECTIONS W A R N I N G : PLUMBING CONNECTIONS MUST COMPLY WITH APPLICABLE SANITARY, SAFETY AND PLUMBING CODES. WATER SUPPLY The water supply must be within the recommended hardness range of 4 to 6 grains per gallon. Lower hardness can cause corrosion; higher hardness can cause formation of lime scale. The plumber who connects this machine is responsible for making certain that water lines are THOROUGHLY FLUSHED OUT BEFORE connecting to the dishwasher.
ELECTRICAL CONNECTIONS WARNING: ELECTRICAL AND GROUNDING CONNECTIONS MUST COMPLY WITH THE APPLICABLE PORTION OF THE NATIONAL ELECTRICAL CODE AND/OR OTHER LOCAL ELECTRICAL CODES. WARNING: DISCONNECT THE ELECTRICAL POWER TO THE MACHINE AND FOLLOW LOCKOUT / TAGOUT PROCEDURES. BRANCH CIRCUIT SIZE AND PROTECTION (DUAL ELEMENT TIME-DELAY FUSE) Model Volts Phase Machine Amps. Minimum Circuit Ampacity SR24C SR24H SR24H 120 120/208 (3W) 120/240 (3W) 1 1 1 9.0 37.6 42.
INITIAL FILLING (MODEL SR24H ONLY) After electrical and plumbing connections have been made make sure the water service valve is open and add a cup of water to the sump to help lubricate the seal. Close the door and turn the On-Off switch (Fig. 3 on page 10) to the on position. Cycle the machine through three wash cycles to charge the detergent delivery system and fill the booster. PRIMING THE BOOSTER First time start-up: 1. Turn on the water supply and circuit breaker. 2.
OPERATION Caution: Items such as pewter, aluminum and silver are attacked by sodium hypochlorite (bleach). Therefore, the Model SR24C Chemical Sanitizing unit should not be used to wash such items. PREPARATION Check to make sure that the strainer is in place and free of debris. Check both wash arms to be sure that they spin freely and are not clogged.
Use only commercial-grade detergents recommended by your chemical professional. Do not use detergents formulated for residential dishwashers. Chemical dispensing pumps (if so equipped) are factory set to provide proper concentration of each chemical. If adjustments are required, contact your local Hobart Service Office. When the door is opened, the cycle light will come on during a brief reset period.
CLEANING This machine must be cleaned at least once each working day. 1. Turn the On-Off switch to the off position (Figs. 2 and 3 on page 10). 2. Open the door and remove the wash arms and the strainer assembly (Fig.5). 3. To remove the lower wash arm, remove the retaining screw (Fig. 5), grasp the wash arm at the center (Fig. 6) and pull it up and out of the machine. Fig. 5 4. Lift strainer assembly out of sump, over wash arm shaft. 5.
MAINTENANCE DELIMING The dishwasher should be delimed on a regular basis as required. The frequency will depend on the mineral content of the supply water. Inspect the machine interior for lime deposits. If deliming is necessary, a deliming agent (such as Lime Away or LSR) should be used for best results. Depending on the model of your machine, carefully follow the appropriate procedure outlined below.
DELIMING MODEL SR24H (HOT WATER SANITIZING MODEL) Delime as follows: 1. Remove rack from machine. 2. Close the door. 3. Allow machine to fill for 10 to 15 seconds. 4. Partially open the door and wait 5 seconds. 5. Open door; add deliming agent (carefully follow supplier's instructions). NOTE: The sump holds 1.4 gallons of water. 6. Close the door and allow the machine to complete the wash/rinse cycle. 7. Inspect the interior of the machine for lime deposits. necessary.
TROUBLESHOOTING This section outlines various symptoms and possible causes that may be encountered if abnormal machine operation occurs. If symptoms persist after possible causes have been checked, service may be required. SYMPTOM POSSIBLE CAUSE Machine does not operate. 1. On-Off switch is in the off position. 2. Blown fuse or circuit breaker off at power supply. 3. Power cord unplugged. Dishes not clean. 1. Strainer clogged, causing inadequate water supply to pump. 2. Obstruction in wash arm(s).
CHEMICAL SENSING MODULE — OPERATION AND START-UP Operate the chemical dispensing pumps (refer to page 11) to make sure that liquid chemical is present in the tubing going through the sensors in the chemical sensing module. Once the dishwasher is switched on, LED indicator lights are lit continuously to indicate that liquid chemical is present in the tube(s). A flashing indicator light and a periodic, audible alarm indicate that liquid chemical has been depleted and needs to be replenished.