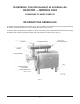
MODEL 4822 CHOPPER ML-136125 ML-136126 701 S. RIDGE AVENUE TROY, OHIO 45374-0001 937 332-3000 www.hobartcorp.com F-35109 Rev.
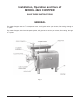
Installation, Operation and Care of MODEL 4822 CHOPPER SAVE THESE INSTRUCTIONS GENERAL The 4822 Chopper uses a 11/2 horsepower motor. It will grind 16 lbs. per minute, first cutting, through a 1 /8" plate. The 4822 Chopper, with funnel-shaped cylinder, will grind 20 to 22 lbs. per minute, first cutting, through a 1/8" plate. Fig.
INSTALLATION UNPACKING Remove the carton from around the machine. Remove the four bolts holding the machine to the skid. Unpack the chopper cylinder assembly. Immediately after unpacking the chopper, check for possible shipping damage. If this machine is found to be damaged after unpacking, save the packaging material and contact the carrier within 15 days of delivery. Prior to installation, test the electrical service to make sure that it agrees with the specifications on the machine data plate.
CLEANING Unplug chopper power cord before cleaning. The chopper must be thoroughly cleaned and sanitized after installation and before being placed into service.
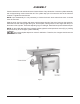
ASSEMBLY Check to assure the hub and hub drive are clean and clear of any obstruction. Insert the cylinder assembly with a slight twisting motion toward the left. The cylinder stop pin will contact the side of the hole that receives it. Tighten the thumb screw. NOTE: Upon disassembly it is only necessary to loosen the thumb screw about three turns. It should never be removed. Slide the worm into the cylinder and rotate until the square shank of the worm locks into the hub drive.
OPERATION Cut the meat into strips, turn the machine ON and feed the meat strips into the chopper, using the feed stomper only as needed. If the strips are cut to proper size, they will feed without assistance from the feed stomper, allowing both hands of the operator free to feed meat. When running meat through the chopper a second time, more speed is attained by feeding small quantities at a time than by trying to force large amounts with the feed stomper.
M O D E D' E M P L O I HACHOIR MODÈLE 4822 ML-136125 ML-136126 701 S. RIDGE AVENUE TROY, OHIO 45374-0001 937 332-3000 www.hobartcorp.com F-35109 Rév.
Installation, fonctionnement et entretien du HACHOIR — MODÈLE 4822 CONSERVEZ CE MODE D’EMPLOI INFORMATIONS GÉNÉRALES Le hachoir 4822 est équipé d’un moteur de 1½ HP (1,12 kW). Il peut hacher 16 lb (7,25 kg) de produit à la minute en première coupe avec une plaque à trous de 1/8 po (3 mm). Le hachoir 4822, si équipé d’un cylindre en forme d’entonnoir, pourra traiter entre 20 et 22 lb (9 et 10 kg) de produit à la minute en première coupe avec une plaque à trous de 1/8 po (3 mm).
INSTALLATION DÉBALLAGE Retirez le carton autour de l’appareil. Dévissez les quatre boulons retenant le hachoir à la palette. Déballez l’ensemble du cylindre de hachage. Aussitôt le déballage terminé, assurez-vous que le hachoir n’a pas subi de dommages pendant l’expédition. Si vous décelez des dommages à la machine après son déballage, conservez le matériel d’emballage et contactez le transporteur dans les 15 jours suivant la livraison.
NETTOYAGE Débranchez le cordon d’alimentation avant le nettoyage. Le hachoir doit être nettoyé soigneusement et désinfecté après l’installation et avant sa mise en service. MATÉRIEL DE NETTOYAGE (NON LIVRÉ) Le matériel de nettoyage et de désinfection recommandé comprend: • Une brosse de nylon à manche de 12 po (300 mm) pouvant traverser le cylindre. • Un seau à deux compartiments pour les solutions de nettoyage. • Un seau pour la solution de désinfection.
MISE EN PLACE Assurez-vous que le moyeu et son entraînement sont propres et libres de toute obstruction. Insérez le cylindre avec un léger mouvement de rotation vers la gauche. La goupille de butée du cylindre entrera en contact avec le côté du trou de réception. Serrez la vis moletée. REMARQUE: lors du désassemblage, il suffit de desserrer la vis moletée d’à peu près trois tours. Elle ne devrait jamais être retirée.
FONCTIONNEMENT Coupez la viande en bandes, mettez le hachoir en MARCHE et alimentez-le en vous servant du poussoir seulement si c’est nécessaire. Si les bandes ont été coupées à la bonne taille, elles vont s’introduire d’elles mêmes sans l’aide du poussoir, ce qui laissera les deux mains de l’opérateur libres pour alimenter la machine.