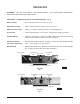
ELECTRIC FRYERS MODEL HCK & HDK SERIES ELECTRIC FRYERS MODELS HCK40 HCK42 HCK91 HCK92 HCKO HDK40 HDK42 HDK91 HDK92 HDKO ML-52525 ML-52526 ML-52527 ML-52528 ML-52529 ML-52536 ML-52537 ML-52540 ML-52541 ML-52531 EXECUTIVE OFFICES 701 RIDGE AVENUE TROY, OHIO 45374-0001 FORM 19225 (1-95)
Installation, Operation and Care of MODELS HCK40, HCK42, HCK91, HCK92, HDK40, HDK42, HDK91 & HDK92 HOBART ELECTRIC FRYERS SAVE THESE INSTRUCTIONS FOR FUTURE USE GENERAL Standard features include stainless steel fry tank and front, a high limit device, twin baskets, and on Models HCK40, HCK42, HDK40 and HDK42, a lift-out fry tank which is easily removed for cleaning. HCK40, HCK91, HDK40 and HDK91 floor model fryers are equipped with 6" adjustable legs.
INSTALLATION Before installing the fryer, verify that the electrical supply agrees with the specifications on the fryer data plate which is located on the inside of the door panel on floor model fryers and on the lower front cover on countertop models. UNPACKING Immediately after unpacking the fryer, check it for possible shipping damage. If the fryer is found to be damaged, save the packaging material and contact the carrier within 15 days of delivery.
Position the fryer in its final location. Select the size and type of wire in accordance with National Electrical Code suitable for carrying the fryer's rated amps and voltage. Use wires suitable for 75°C on fryers carrying more than 80 amps. 1. Bring conduit containing the proper supply wire to the fryer. On HCK40/42 and HDK40/42, bring the conduit in through the clearance hole in the back and terminate on the terminal block housing mounted in the back of the breaker box.
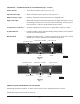
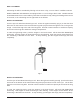
OPERATION WARNING: HOT OIL AND PARTS CAN CAUSE BURNS. CLEANING AND SERVICING THE FRYER. USE CARE WHEN OPERATING, CONTROLS — MODELS HCK40/42 and HCK91/92 (Fig's. 1 & 2) Power Switch — Turns electric power to the fryer on or off. ON Indicator Light — (Red) Indicates electric power to the fryer is on. HEAT Indicator Light — (Amber) Indicates heating elements are supplying heat. Thermostat — Controls temperature of oil in tank. Temperature range is 0-400°F. Fry/Melt Switch — (Optional - Not shown.
CONTROLS — MODELS HDK40/42 and HDK91/92 (Fig's. 3 and 4) Power Switch — Turns electric power to the fryer on or off. ON Indicator Light — (Red) Indicates electric power to the fryer is on. HEAT Indicator Light — (Amber) Indicates heating elements are supplying heat. High Limit Light — When ON, indicates that the oil temperature is higher than 400°F, or that the heating elements are not covered with shortening, and the system has shut down. Call your local Hobart Service Office.
1. Push power switch to OFF and allow fryer to cool. 2. Remove the fryer basket(s) and support rack (support rack in HCK91/92 / HDK91/92 only). 3. Leave the heating elements in the tank (HCK40/42 and HDK40/42). 4. HCK40/42 / HDK40/42: Pour 30-35 pounds of shortening into the fryer tank. HCK91/92 / HDK91/92: Pour 78-82 pounds of shortening into the fryer tank. 5. Replace the rack support (HCK91/92 and HDK91/92 only) and fryer basket(s) inside the tank. 6.
FRYING Place the ON-OFF switch to the ON position. The red ON indicator light will come on. Turn thermostat or temperature controller to desired temperature. The amber HEAT indicator light will come on. When the shortening temperature reaches the set temperature, the amber HEAT light will go off. The heating elements (and the amber HEAT light) will cycle on and off to maintain the set temperature. Pieces of product to be fried should be about the same size to ensure uniform doneness.
DAILY FILTERING Shortening life will be extended by filtering at least once a day, or more often if conditions warrant. Models HCK91/92 and HDK91/92 are equipped with a 1/4 turn ball type drain valve. Models HCK40/ 42 and HDK40/42 have a removable fry tank that can be lifted out by raising the heating elements out of the tank, or the shortening can be syphoned out as follows: Models HCK40/HDK40 Turn the fryer off and allow shortening to cool. Place the syphon assembly (Fig.
Models HCK91/92 and HDK91/92 1. Turn the fryer off and allow shortening to cool. 2. Slowly remove the baskets to prevent splashing. 3. Open the fryer door and place a metal container of sufficient capacity below the drain pipe. 4. If a filter bag is used, tie it securely to the drain pipe. If other filter medium is used, place it in the metal container. 5. Open the drain valve carefully so the oil stream is directed through the filter. 6.
2. Close the drain valve (Models HCK91/92 and HDK91/92 only). 3. Fill the tank with a non-corrosive, grease-dissolving commercial cleaner, following the manufacturer's instructions. 4. Turn the fryer on and set the thermostat or temperature controller at a temperature recommended by the manufacturer of the commercial cleaner. Boil the solution for 15 to 20 minutes. If cleaner is a water based chemical, temperature may be 190-212°F. Set the temperature as low as possible; monitor boiling to prevent overflow.
MAINTENANCE WARNING: HOT OIL AND PARTS CAN CAUSE BURNS. CLEANING AND SERVICING THE FRYER. USE CARE WHEN OPERATING, WARNING: SPILLING HOT FRYING COMPOUND CAN CAUSE SEVERE BURNS. DO NOT MOVE FRYER WITHOUT DRAINING ALL FRYING COMPOUND FROM THE TANK. LUBRICATION The motors in all HCK/HDK Series Fryers are permanently lubricated and no lubrication is required. FORM 19225 (1-95) – 12 – PRINTED IN U.S.A.