Instruction Manual • Bedienungsanleitung • Manuel d’utilisation • Manuale di Istruzioni ®
EN 2 NOTICE All instructions, warranties and other collateral documents are subject to change at the sole discretion of Horizon Hobby, Inc. For up-todate product literature, visit www.horizonhobby.com and click on the support tab for this product.
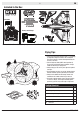
EN 3 Included in the Box Transmitter Battery and Charger For more information and to register your product online, visit www.hobbyzonerc.com Flying Tips 600 feet (183 m) –7 mph Wind 0 /h) m k (0–11 Fly in this area (upwind of pilot) Stand here • Sensor Assisted Flight Envelope (SAFE™) technology is designed as flight assistance, not an autopilot. The pilot is always in control and required to fly the aircraft at all times. • Start in Beginner mode (SAFE switch position 0).
EN 4 Charging the Flight Battery Caution: When connecting the battery to the battery charger, make sure the connectors are aligned as shown. Failure to connect the battery properly could cause the terminals to short and result in fire, personal injury and/or property damage. Flashing (Charging) Solid (Charged) 1 hour Charger Specifications • Input power: 10–14V • Max output voltage: 8.4V • Fixed charge current: 1.
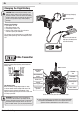
EN 5 Setup for Optional Transmitter Your Delta Ray should already be bound to your included DX4E TX. IF you ever need to rebind, follow the step listed below in the Binding Procedure Reference Table.
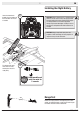
EN 6 Wingtip and Vertical Fin Installation X4 X2 Double sided tape Wing Fin X2 Clear tape X8 X4 X4 Clear tape X2 X1 X8 X8 X4 Clear tape X1 X1 X8 Double sided tape X1 Firebird Delta Ray
EN 7 Installing the Flight Battery Lower the throttle and throttle trim, then power on the transmitter for at least 5 seconds. 1 CAUTION: Always disconnect the Li-Po flight battery from the aircraft receiver when not flying to avoid over-discharging the battery. Batteries discharged to a voltage lower than the lowest approved voltage may become damaged, resulting in loss of performance and potential fire when batteries are charged. CAUTION: Always keep hands away from the propellers.
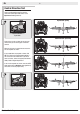
EN 8 Control Direction Test Perform the Control Direction Test with the transmitter’s SAFE flight mode switch set to Experienced mode (position 2). Up Elevator (climb) CH 5 CH 5 CH 5 Experienced SAFE Flight Mode Down Elevator (descend) Restrain the aircraft so it does not escape your control while you are testing your transmitter controls. Move the sticks on the transmitter to ensure the aircraft responds as shown.
EN 9 Takeoff Hand Launch Hand launch in Beginner mode for first flights. Get help to hand launch your aircraft so you can concentrate on flying. If you must hand launch the aircraft alone, hold the model in your dominant hand and the transmitter in your other hand. An optional neck strap (SPMP610, sold separately) can help you hold the transmitter.
EN 10 Flying • In Beginner mode, when properly trimmed, your aircraft will climb at full throttle without use of the elevator stick. • Make small and steady control stick movements for smooth control of your aircraft. • Let the aircraft climb at full throttle, into the wind, until the aircraft gets about 150 feet (46 meters) above the ground, then decrease the throttle to half (50%). • Flying with the nose pointed toward you is one of the hardest things to do when learning to fly.
EN 11 Landing CH 5 CH 5 CH 5 Land the aircraft in Beginner mode. CAUTION: Never catch a flying aircraft in your hands. Doing so could cause personal injury and damage to the aircraft. Easy Landing Descends at 0% throttle Landing is easier if you hold the Panic Recovery button. Line up for your landing, decrease the throttle to 0% and press and hold the Panic Recovery button. The aircraft will glide down wings level with the nose up (flared) for landing.
EN 12 Adjusting Trim in Flight Trim the elevator at 50%-60% throttle. When the elevator is trimmed correctly, your aircraft will fly level at half throttle, climb steadily above half throttle and descend below half throttle. • If the aircraft’s nose drifts up or down while the elevator stick is at neutral (centered) position, move the elevator trim slider by one or two “click” increments in the SAME direction as the drift. Aileron trim: When trimmed correctly, your aircraft flies with wings level.
EN 13 Troubleshooting Guide Problem Possible Cause Flying over recommended airspeed Damaged propeller or spinner Motor vibration Oscillation Loose receiver Loose aircraft controls Worn parts Trim is at extreme and aircraft does not fly Trim is not at neutral straight or level Throttle not at lowest position or throttle Aircraft will not retrim too high spond to throttle but responds to other Throttle channel is reversed controls Motors disconnected from ESCs Damaged propeller and spinner, collet Extra
EN 14 Service and Repair Thanks to the Z-Foam™ material in the wing and fuselage of this aircraft, repairs to the foam can be made using virtually any adhesive (hot glue, regular CA [cyanoacrylate adhesive], epoxy, etc). When parts are not repairable, see the Replacement Parts List for ordering by item number. For a listing of all replacement and optional parts, refer to the list at the back of this manual. CAUTION: DO NOT handle a propeller, motor or ESC while the flight battery is connected to the ESC.
Limited Warranty What this Warranty Covers Horizon Hobby, Inc., (Horizon) warrants to the original purchaser that the product purchased (the “Product”) will be free from defects in materials and workmanship at the date of purchase.
EN 16 Non-Warranty Service Should your service not be covered by warranty, service will be completed and payment will be required without notification or estimate of the expense unless the expense exceeds 50% of the retail purchase cost. By submitting the item for service you are agreeing to payment of the service without notification. Service estimates are available upon request. You must include this request with your item submitted for service.
Compliance Information for the European Union AT EE IE PL IS BE BG ES FI IT LT PT RO LI NO CZ CY DE DK FR GR HR HU LU LV MT NL SE SI SK UK CH Declaration of Conformity Declaration of Conformity No. HH2013071101 No.
65 Replacement Parts • Ersatzteile • Pièces de rechange • Pezzi di ricambio Part # | Nummer Description Numéro | Codice Beschreibung Description Descrizione HobbyZone Firebird Delta Ray: Finnenset Motor Fairing Set: Delta HobbyZone Firebird Delta Ray: Ray Motorverkleidung Bare Fuselage: Firebird HobbyZone Firebird Delta Ray: Delta Ray Rumpf o.
© 2013 Horizon Hobby, Inc. HobbyZone, the HobbyZone logo, Delta Ray, SAFE, the SAFE logo, Z-Foam, DSM, DSM2, DSMX, EC2, Celectra and the Horizon Hobby logo are trademarks or registered trademarks of Horizon Hobby, Inc. The outline and trim scheme of the Firebird Delta Ray were designed by Quique Somenzini in cooperation with Mirco Pecorari of Aircraft Studio Design. The Spektrum trademark is used with permission of Bachmann Industries, Inc. Patents Pending www.hobbyzonerc.