
User Manual


Step 7: fitment to MiniCP
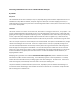
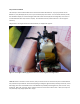
The final step! Here we will deal with the size issue of the smaller HK-5320 servo. If you just put them on the
MiniCP as is, they will simply fall out; there is just too much play in the mounts. You can fix this however you like,
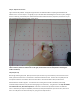
but I decided to simply run a bead of hot glue down each end of the servo (by the mounting tabs). Run a 1mm or
so thick bead down each side, and let it cool/dry. Put it back into the heli, and see how it fits. Use more glue if
necessary.
The goal here is not to glue the servo to the heli frame, it’s simply to fill up space.
Figure 7: use hot glue to fill the gap between the servo and the original mounting brackets
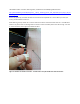
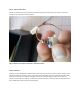
That’s it! Power on the heli to center the servo, then put the servo horn on and screw into place. Reassemble the
heli, and reattach your ball links. Check that everything is moving the right direction (it should), and test fly. I have
been flying mine with 1 stock walkera servo and 2 HK5320s for probably 2 dozen flights now, with no issues. They
work great. Best of all, at $4 each, there’s really no need to do a servo saver mod on them. I have yet to strip one
out, but if they strip, simply replace them. Enjoy!