ENGLISH es esp paÑ Ño oll DEUTSCH f r a n ç a is INSTRUCTION MANUAL • This is not a toy! Not suitable for children under 14 years old without adult supervision. • Ceci n’est pas un jouet. Ne convient pas aux enfants de moins de 14 ans sans la surveillance d’un adulte. • Kein Spielzeug. Nichte geeignet für Kinder unter 14 Jahren ohne Aufsicht Erwachsener. •No es un juguete. No recomendado para niños menores de 14 años.
tools required not Included in the kit / outillage requis non inclus dans le kit EX 421970 HT 421900 Hex wrench complety set (1,5-2-2,5-3mm) Coffret de tournevis allen EX 421984 Aluminium Multi-tool for Shocks Outil multifonction pour amortisseur Phillips screwdriver Tournevis cruciforme Turnbuckle wrench Clé de réglage biellette 4.0MM 5.0MM 6.
WARRANTY AND SERVICE INFORMATIONS COMPONENT WARRANTY PERIOD PlEASE read Please READ the ThE following FOllOWINg information INFORMATION carefully CAREFullY ! WARRANTY CLAIM Please contact your dealer with the warranty claim and / or repair. Your dealer and Hobbytech will make an proper decision that will help you as soon as possible. For invalid warranty claims you may be charged for the processing costs before the parts are returned.
IMPORTANT - READ THIS BEFORE RUNNING Please read all instructions and familiarize yourself with the products and control before operation. This product is not a toy. It is a high performance model product. It is important to familiarize yourself with the model, its manual, and its construction before assembly and operation.
even if this car is a ready to run kit, you still have some little things to do to familiarize with your product. please follow these steps. Battery Installation Supplied with 4 x 1.5V AA Batteries, KT2S can be operated a few hours. Installation: ❶ Remove the battery compartment cover as shown below. ❷ Install the batteries observing the polarity marked on battery compartment. ❸ Then reinstall the battery compartment cover as the Picture shown below.
KT2S TRANSMITTER FUNCTIONS Steering Wheel : Control direction (Left / Right) of the RC model Throttle Trigger : Control speed and direction (Forward/ Brake/Backward) of the driving model. Antenna : Transmit signal to the model Power ON / OFF : Power ON / OFF the transmitter ENGLISH SYNC & Battery Indicator : Top Green LED light indicates synchronization status and/or adequate battery power supply. Power Indicator : LED light indicates power “ON”.
Programming the End-points Throttle End-points programming 1) Steering End-points programming • To set the Right End point of Steering: - During normal operation, hold the Steering wheel at right-most, and then hold the BIND key over 1 sec - LED will become solid red color, and the Right End-point will be reset to max value - Next, use the steering wheel to let the steering servo point at the expected right most location.
A Shake and push the foam inside the bags around 10 times B Open the plastic bag and take out the air filter foam DEUTSCH f r a n ç a is ENGLISH INSTALL THE AIR FILTER FOAM C espaÑol Remove the plastic air filter cap Install the double air filter foam on it’s holder with the provided wrench INSTALL THE ENGINE GLOW PLUG (not provided) A Remove the engine cover sticker C Use the wrench to screw the glow plugs carefully into the engine burn room 8 D B Install the glow plugs on the cross wre
A ENGLISH FILLING UP THE FUEL TANK B Fill up the fuel tank untill the top f r a n ç a is Put some fuel in your fuel bottle DEUTSCH PRIME AND STARTING THE ENGINE B C Use the proper way to charge your glow starter A P ut your finger over the exhaust and pull the pull start until you see fuel enter in the carburator espaÑol A B C lamp the glowstarter over the glow plug and pull the pullstarter with short quick pulse Engine starts! Let’s have some fun...
Garantie de 90 jours f r a n ç a is ENGLISH Merci de lire attentivement les lignes ci-dessous : A partir de la date d’achat, le produit est couvert par une garantie de 90 jours couvrant les composants. Si durant cette période, une des pièces composant votre produit (hormis les pièces de transmission) possède un défaut de fabrication réellement constaté par notre service technique, la pièce sera réparée ou échangée.
IMPORTANT - LIRE AVANT DE DéMARRER LiRE ces instructions et SE familiariser avec le produit avant de S’en servir. Ce produit n’est pas un jouet. C’est un modèle réduit de haute performance. Il est important de se familiariser avec le modèle, son manuel et sa construction avant l’assemblage et le fonctionnement. La surveillance d’un adulte est nécessaire. CONSIGNES DE SéCURITé - Ne pas faire fonctionner le modèle au milieu d’enfants ou de la foule.
Même si ce modèle est livré prêt-à-rouler, il reste tout de même certaines opérations à effectuer, en profiter pour SE familiariser avec le modèle. SuivRE les étapes pas à pas. Installation des batteries de l’émetteur Fourni avec 4 piles 1.5V AA, le KT2S peut marcher plusieurs heures.
FONCTIONS DE L’ÉMETTEUR Volant de direction : Contrôle de la direction (Gauche/Droite) du modèle Gâchette des gaz : Contrôle de la vitesse ( Marche avant / Frein / Indicateur de marche : La LED indique que l’émetteur est allumé fin de course Trim de direction Trim des gaz Volant de direction direction (ATV) ST. Trim : Ajuste la position neutre du servo de Gâchette des gaz direction lorsque les roues du modèle sont droites Bind / Bouton «Setup» TH.
Programmation des FINS DE COURSE Programmation des points d’extrémité des gaz • Pour définir le point d’extrémité avant : De la même manière, tenir la gachette des gaz au point d’extrémité avant voulu, puis rester appuyé sur «setup» pendant 1 seconde Programmation du point... • Pour définir le point d’extrémité arrière : De la même manière, tenir la gachette des gaz au point d’extrémité arrière voulu, puis rester appuyé sur «setup» pendant 1 seconde Programmation du point...
A Ouvrir ensuite le sachet à l’aide d’un cutter ou de ciseaux et en sortir la mousse. l’aide de la clé allen fournie, dévisser entièrement le support à de la mousse de filtre. D Glisser la mousse de filtre sur son support, puis revisser, toujours à l’aide de la clé allen fournie. Mise en place de la bougie A Retirer l’autocollant de protection «WARNING» se situant sur le moteur. C Amener la clé à bougie jusqu’au pas de vis situé dans la culasse du moteur sans en faire tomber la bougie.
A B Remplir la pipette de carburant Remplir le réservoir de carburant jusqu’au bord démarrage du moteur es p a Ñ o l DEUTSCH f r a n ç a is ENGLISH remplissage du carburant A B Charger correctement le chauffe-bougie en respectant les consignes de charges A A morcer le moteur en bouchant la sortie d’échappement et en tirant sur la tirette jusqu’à ce constatation de l’arrivée de carburant au carburateur par la durite d’essence C B C lipper le chauffe bougie sur la bougie du moteur et démarrer
GARANTIE UND SERVICE INFORMATIONEN GARANTIEZEITRAUM DER KOMPONENTEN Bitte lesen Sie erst die folgenden Ausführungen ! GARANTIEANSPRUCH Mit einem Garantieanspruch -, Reparaturen wenden Sie sich bitte an Ihren Fachhändler. Dieser wird sich mit Hobbytech kurzschließen, um eine sachgerechte Entscheidung zu fällen, die Ihnen schnellst möglich hilft. Für ungültige Garantieansprüche werden Ihnen vor der Rücksendung möglicherweise Bearbeitungskosten in Rechnung gestellt.
WICHTIG - LESEN SIE DIESE ANLEITUNG VOR DER VERWENDUNG DURCH ! Bitte lesen Sie alle Anweisungen und machen Sie sich mit den Produkten vor der Inbetriebnahme vertraut. Dieses Produkt ist kein Spielzeug. Es ist ein hochentwickeltes Hobby Produkt. Es ist wichtig, sich mit dem Modell, dem Handbuch und seiner Konstruktion vor der Montage und dem Betrieb vertraut zu machen. Die Beaufsichtigung durch Erwachsene ist erforderlich.
Auch wenn dieses Auto schon fahrfertig ist, müssen Sie trotzdem noch einige kleine Dinge tun, um sich mit Ihrem Product vertraut zu machen. Befolgen Sie bitte die Schritte . INSTALLIEREN SIE DIE BATTERIEN IN DEN SENDER Installation: ❶ Entfernen Sie das Batteriefach wie unten gezeigt. ❸ Dann installieren Sie die Batteriefachabdeckung wie im Bild unten gezeigt. ❷ Installieren Sie die Batterien entsprechend der Polarität wie im Batteriefach markiert.
Funktionen Lenkrad : Steuer Richtung (links / rechts) des RCModell Gashebel : Steuer Geschwindigkeit und Richtung (Vorwärts / Bremse / Rückwärts) des fahrenden RC-Modell Antenne : Sendesignal zum RC-Modell ENGLISH f r a n ç a is Betriebsanzeige Power ON / OFF SYNC und Batterie-Anzeige : Top Green LED Licht zeigt Synchronisationsstatus und / oder ausreichende Batterie-Stromversorgung Betriebsanzeige : LED-Licht zeigt Energie «AN» ATV : Einstellbare Lenkung mit ATV Wahl Gas Rückwärts ST.
Programmierung des Endpunktes Gas Endpunkt Programmierung • Um den Umkehr Endpunkt fest zu legen:, ebenso halten Sie das Gas an die Umkehr Position, halten Sie die Setup-Taste über 1 Sekunde, um die Umkehr Endpunkt Programmierung einzugeben ... f r a n ç a is STEUERUNG IHRES MODELLS DEUTSCH NEUTRAL LINKS RECHTS Wenn die Räder in die entgegengesetzten Richtung arbeiten, dann bedienen Sie den Servo- rückwärts-Schalter (ST in NOR Position).
A Schütteln und Drücken Sie den Schaumstoff in der Tasche 10mal rundherum B Öffnen Sie den Plastikbeutel und nehmen Sie den Schaumstoff Luftfilter heraus espaÑol DEUTSCH f r a n ç a is ENGLISH INSTALLIEREN DES SCHAUMSTOFF LUFTFILTER C Entfernen Sie den Plastik Luftfilterdeckel Installieren Sie den doppelte Luftfilterschaumstoff auf seine Halterung mit dem mitgelieferten Schlüssel INSTALLIEREN DER MOTOR GLÜHKERZEN (nicht im Lieferumfang) A Aufkleber der Motorabdeckung entfernen C Verwenden Si
A ENGLISH AUFFÜLLEN DES TANKS B Füllen Sie etwas Kraftstoff in Ihre Brennstoffflasche Füllen Sie den Kraftstofftank bis zum Rand DEUTSCH f r a n ç a is PRIME AND STARTING THE ENGINE B C Verwenden Sie den richtigen Weg, um Ihren Glühstarter aufzuladen A L egen Sie Ihre Finger über den Auspuff und ziehen Sie den Zugstarter bis Sie den Kraftstoffeintrag im Vergaser sehen B K lemmen Sie den Glühstarter über die Glühkerze und ziehen Sie den Seilzugstarter mit kurzen, schnellen Impuls espaÑol A
DEUTSCH f r a n ç a is ENGLISH ATENCION : • Este coche no es un juguete. El comprador de este producto reconoce y comprende que asume la responsabilidad sobre los danos personales o materiales que pueda causar por El uso de este producto. • El usuario es el unico responsable del correcto uso de este producto. El fabricante o el vendedor no tienen ninguna responsabilidad sobre los posibles danos producidos por su mal uso.
IMPORTANTE - LEER ANTES DE ARRANCAR LEER ESTAS INSTRUCCIONES Y ACOSTUMBRARSE CON LOS PRODUCTOS ANTES DE UTILIZARLOS. Este producto no es un juguete es un modele reduzido y hay que aprender poco a poco bajo los consejos de un adulto. CUIDADO Estos modelos pueden alcanzar una velocidad de mas de 40KM/H. ❶ Nunca conducir el modelo en carreteras y en la caille porque podrian provocar accidentes ❷ No hay que rodar cerca de personas o de animales.
Leer cuidadosamente este manual de instrucciones antes de comenzar el rodaje : INSTALACION BATERIAS DE EMISORA ❶ Retire la tapa ❷ I nstale 4 pilas alcalinas AA tal y como muestra el dibujo ❸ Cierre la tapa y coloquela en su lugar Precaucion: Esta bateria es ùnicamente para modelos de RC.
KT2S TRANSMITTER FUNCTIONS model Throttle Trigger : Control speed and direction (Forward/ Brake/Backward) of the driving model. Antenna : Transmit signal to the model Power ON / OFF : Power ON / OFF the transmitter SYNC & Battery Indicator : Top Green LED light indicates synchronization status and/or adequate battery power supply. Power Indicator : LED light indicates power “ON”.
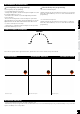
COMPROBACION DE LA DIRECCION NEUTRAL DERECHA Muevar el volante de la emisora para verificar que se mueve de forma corecta NEUTRO DEUTSCH f r a n ç a is ENGLISH IZQUIERDA MAXIMO GAZ FRENO ❷ ❸ es p a Ñ o l ❶ Abierto 1mm maximo Apertura del carburador maxima Abierto 1mm maximo INDICADOR LED NIVEL DE BATERIA - Duante una operacion normal, la LED verde se queda encendida. - Cuando la tension bajo 3.8V, la LED se vuelve roja y parpadea lentamente. Cambiar las baterias urgentemente.
A Abrimos la bolsa con cuidado de no cortar la espuma de filtro Retirar la tapa del filtro D Colocar la espuma de filtro y volver a colocar la tapa con su tornillo MONTAJE DE LA BUJIA SOBRE EL MOTOR A Retirar la protección del motor C Procedemos con cuidado a roscar la bujía al motor es p a Ñ o l C DEUTSCH f r a n ç a is Proceder a «apretar la espuma del filtro para su correcta lubricación» B ENGLISH MONTAJE DE LA ESPUMA DE FILTRO B Colocar la bujía en la llave de bujía D La bujía tiene
A B Llenamos el biberón de combustible Llenamos el deposito con el biberón ARANCAR EL MOTOR es p a Ñ o l DEUTSCH f r a n ç a is ENGLISH RELLENAR EL DEPOSITO DE CARBURANTE A C B Cargar corectamente el chispometro respetando el uso del cargador A T apando la salida del escape cebamos el circuito de gasolina tirando del arranque del motor B C olocamos el chispometro debidamente cargado y procedemos a tirar del arrancador con tirones secos pero no excesivamente largos IMPORTANTE - REGLAJE DE
REFERENCE GUIDE ITEM PARTS NAME ITEM PARTS NAME ITEM PARTS NAME STR-009 Fuel tank post set Plots de fixation de réservoir Center Diff Mount Paliers de Différentiel central Brake Disc Disques de frein STR-084 Brake Plate Plaquettes de frein F / R Brake Cam Cames de frein Avant et Arrière Brake cam level Leviers de frein Servo Saver Shaft Axes de sauve-servo Servo Saver Pipe Corps de sauve-servo Servo Saver Spring Ressort de sauve-servo Servo Saver Spring Adjuster Ecrou de réglage de sauve-servo Stee
STRX-092 STR-088 HT-598100 HT 501601 FRONT/REAR SHOCK SET HT-598106 HT 50 HT-580109 HT-595010 HT-590005 HT-595014 STRX-015 HT 510018 HT 520001 HT-510006 HT-585008 HT-598103 KN-0713 HT-585006 HT-598114 HT 510006 STRX-011 STRX-088 STRX-209 XT 130543 HT 4950 STR-086 HT-598121 HT-595009 HT 501154 STR-056 HT-598104 KN-1312 HT-598105 HT-595014 STRX-014 XT 6.
EXPLODED VIEW SPIRIT NXT GP # 1.SPIRIT.NXT.GP HT 501235 STR-099 STRX-135 01227 STR-098 STRX-108 STR-048 STRX-306 STR-061 STR-066 HT 598100 STR-062 STR-064 STR-035 HT 595015 STR-067 STRX-301 NITRO ENGINE STR-037 STR-032 STR-061 STR-067 024.
OPTION PARTS 34 CA-281 Carrosserie Pit Bull Spirit / X2 en lexan PC Spirit/X2 clear body Pit Bull Style AFA-DC-E028009 Bouchon de carter pour moteur ALPHA 21, nécessaire pour l'utilisation du banc de démarrage Rear Cover For ALPHA 21 engine, required for using a starter box HT-108 Filtre carburant gros volume alu Aluminium Big Daddy Fuel Filter Orange HT-410350 Banc de démarrage universel 1/10 ou 1/8ème piste ou Tout terrain 1/10 and 1/8 universal starter box (x2 550 motor) HT-495200 Embrayage Xtrem a
STRS-102A Axes filetés inférieurs de triangle avant 75mm Uprade F / R Arm Hinge Pin 75mm STRS-102B Axes inférieurs filetés de triangles 4mm Upgrade Steering Hinge Pin 40mm STRS-102C Axes filetés de fixation étriers arrière 51mm Upgrade Rear Hub Hinge Pin 51mm STRS-118 Set Couronne + pignon d'attaque Hélicoïdal 43T. + 13T. set Spiral gear CNC machined hard treatment STRS-120 Couronne centrale allégée 46 Dents 46T.
info@hobbytech-rc.com Specification are subject to change without notice. Photograph shows model after assembly and painting. Les spécificités peuvent changer sans information préalable. Les photos sont non contractuelles. General information Spezifikation können ohne vorherige Ankündigung ändern. Effektive Abbildung zeigt das Modell in Montage und Lackierung. El fabricante puede modificar los kits sin previsio aviso. Las fotos no son contractuales.