7047_HBZ(FBS.manual).qxd 10/5/04 9:30 AM Page 36 HobbyZone ® products are distributed exclusively by Horizon Hobby, Inc. 4105 Fieldstone Road Champaign, IL 61822 www.horizonhobby.com ©2004 Horizon Hobby, Inc.
7047_HBZ(FBS.manual).qxd 10/5/04 9:30 AM Page 2 Welcome to the World of Congratulations on your purchase of the HobbyZone® Firebird Scout™—a radio-controlled airplane that allows you to have success as a complete beginner. The Firebird Scout will also allow you to expand to more advanced maneuvers as your flying abilities improve. Before your first flight, read these instructions thoroughly. Also, make certain to watch the included VCD.
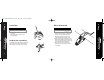
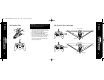
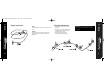
Transmitter Needed for Step 1 Needed for Step 2 9V (1 pre-installed) Rubber Bands (x4) 1. Your transmitter comes with the 9V battery pre-installed. 2. To test, switch on the transmitter. The LED should glow brightly. Landing Gear Installation Your Firebird Scout™ includes landing gear. Simply slide the landing gear into the allotted slot in the fuselage. Once this is done, you are ready to attach the wing. 4 Wing Attachment Step 2 Step 1 7047_HBZ(FBS.manual).
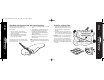
Motor Test and Battery Discharge Adult Supervision Required WARNING: Keep everything clear of the propeller and hold the plane securely. A moving propeller can cause severe injury. 1. Turn the transmitter on. 2. Install the battery in the fuselage slot and plug in the connector. 3. Move the transmitter’s left stick all the way down and hold for one second. This will arm the motor. 4. Move the transmitter’s left stick up. Since most batteries come partially charged, the prop should spin at high speed.
Tail Control Test WATCH OUT! Be sure to keep everything clear of the propeller before starting the control test, in the event that you accidentally turn on the motor. 1. Switch on the transmitter. Check the LED. Do not touch the sticks for 2 seconds while the transmitter automatically calibrates the controls. 2. Install the battery in the fuselage slot and plug in the connector. Do not arm the motor. 3. Move the right stick side to side. The flaps should move as on the following page.
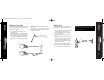
10 Checking and Adjusting the Tail Control Surfaces Choosing a Flying Field Before making your first flight, confirm that the two control surfaces are level with rest of tail. To do this simply: • A large, open grass field is required to fly. The Firebird Scout™ flies approximately 15–20 mph, so it covers ground fast. The bigger the field, the better! • It is absolutely essential to have a minimum of 300 feet of clear space in all directions from the pilot.
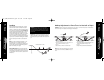
Range Test Choose a Calm Day You want to fly! If you wait until the day is right, you will have a successful flight. On your first flights, do not fly if the wind is more than 5 mph! 1. Tie the included red flag to the end of your transmitter antenna. 2. Hold the transmitter flat so the antenna is parallel to the ground and note how much the flag moves in the wind. If the flag hangs down, you’re good to fly.
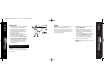
Taking Off Flying 1. Your Firebird Scout will need to be hand-launched. On first flights, have a second person (adult recommended) launch your Firebird Scout while the pilot controls with the transmitter. Adult assistance is always recommended for pilots 12 years of age or younger. 2. Make sure the battery is fully charged. 3. While holding transmitter in one hand, push throttle stick to full-on (up) with thumb. 4. Take a couple of steps and launch the model directly into the wind. Keep the wings level.
Flying continued Throttle Adjustment Turning Hold the right stick in the direction you want the model to turn. Trimming The model should fly straight with the control stick at neutral. See page 20 for information regarding tail adjustments. 16 1. Climb to an altitude of 50 feet or more with full throttle. 2. To achieve a level “cruising” altitude, reduce power by moving the throttle stick down to approximately 50% of full-on. 3. To reduce altitude, reduce throttle. 4.
Landing Making Adjustments—Plane Turns to the Left or Right When you notice that your Firebird Scout no longer climbs well under full power (normally after approximately 8–10 minutes), the battery is getting low and it’s time to land. Line the model up, heading directly into the wind toward the desired landing spot. At 10 feet of altitude, gradually reduce the throttle stick to turn off the motor. The Firebird Scout will glide in for a landing.
20 Making Adjustments to the Climb Rate Entering Expert Mode A. If the Firebird Scout (with a fully charged battery) does not climb fast enough with full throttle, you can adjust the climb rate by: 1. Flexing both trim tabs up about 1/16” from current position. 2. Test fly. 3. Repeat until the Firebird Scout achieves desired climb rate. Once you have mastered the Smart-Trak™ Standard Mode of the Firebird Scout™, you can activate the Expert Mode to disable the software portion of SmartTrak.
Step 16 7047_HBZ(FBS.manual).qxd 10/5/04 9:30 AM Page 22 Expert Mode continued If a Crash Occurs Testing the Mode (Optional) You may check to see what mode you are in after power up, but before pulling the throttle back to arm the motor. 1. Push and hold the throttle stick forward. (The motor should not run since it is not armed.) 2. While holding the throttle stick forward, push the right stick all the way to the right and hold it there. 1.
7047_HBZ(FBS.manual).qxd 10/5/04 9:30 AM Page 24 Warnings and Safety 1. Read and follow this manual and included video completely, observing all instructions and safety directions. Otherwise, serious injury and damage can occur. Think safety first. 2. Keep the propeller away from body parts, even when it isn’t spinning as it could be turned on by accident. Beware of hair becoming entangled in the propeller, especially while launching the Firebird Scout™ on a windy day, or injury may occur. 3.
7047_HBZ(FBS.manual).qxd 10/5/04 9:30 AM Page 26 Success Tips 1. A must for beginners: Don’t fly in winds over 5 mph! 2. Important: Choose a flying field carefully—grass and soft ground with 600-foot diameter is optimal to fly and will lengthen the life of the Firebird Scout™. 3. Watch out! Holding the right stick full-over for too long may cause the Firebird Scout to spiral dive and crash, especially at low altitudes.
7047_HBZ(FBS.manual).qxd 10/5/04 9:30 AM Page 28 Replacement and Optional Parts More Fun with the Firebird Scout Keep that Firebird Scout flying! Spare parts are available from your dealer or from Horizon Hobby direct (www.horizonhobby.com). Please check with your dealer first—by supporting your dealer, they’ll be there when you need them. To locate your local dealer, go to www.hobbyzonesports.com.
7047_HBZ(FBS.manual).qxd 10/5/04 9:30 AM Page 30 HobbyZone Accessories HBZ1026 DC Peak Charger Charge your battery from your car in about 40 minutes with our DC Peak Charger, including adapter to charge most HobbyZone® Aircraft and ZigZag™ boat batteries. HBZ4545 6V 300mAh Battery Keep your Firebird Scout™ in the air by purchasing an additional battery pack. 30 Please go to hobbyzonesports.