
User Manual


AeroScout S 2 1.1m Trainer
EN
9
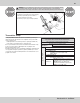
Transmitter and Receiver Binding
CAUTION: Connecting the battery to the ESC with reversed polarity
will cause damage to the ESC, the battery or both. Damage caused by
incorrectly connecting the battery is not covered under warranty.
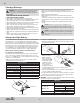
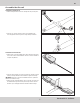
An extension is installed in the receiver bind port so binding may be done
through the battery hatch at the front of the aircraft without having to remove
the wing assembly. Simply insert the bind plug in the open end of the extension
to enter bind mode.
The transmitter included with the RTF model is bound to the aircraft at the factory. If
you need to re-bind for any reason, follow the binding procedure as shown.
The BNF version of this aircraft requires a Spektrum
™
DSM2
®
/DSMX
®
technology
equipped aircraft transmitter for proper operation.
Refer to your transmitter instructions for binding to a receiver.
If you encounter problems after following the binding instructions, contact the
appropriate Horizon Product Support office.
Binding Procedure
1. Make sure the transmitter is powered off.
2. Make sure the transmitter controls are neutral, the throttle is at the lowest
position*, the throttle trim is centered and the aircraft is immobile.
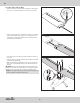
3. Install a bind plug in the receiver bind port extension.
4. Connect the flight battery to the ESC. The ESC will produce three
ascending tones and the receiver LED will begin to flash rapidly.
5. Refer to your transmitter manual for specific instructions to place the
transmitter in bind mode.
6. When the receiver binds to the transmitter, the receiver LED will glow
solid and the aircraft will begin the initialization process, indicated by the
control surfaces cycling.
7. Remove the bind plug from the bind port extension and store in a safe
place. The receiver should retain the binding instructions received from
the transmitter until another binding is done.
* The throttle will not arm if the transmitter’s throttle stick is not set to the
lowest position.
Install the Flight Battery
1. Power on the transmitter.
2. Turn on the THROTTLE CUT switch (motor power inactive).
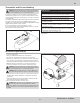
3. Lift at the rear of the battery hatch to remove it from the fuselage.
4. Attach a piece of adhesive-back loop material to the bottom of the battery.
5. Place the battery, loop material down, on the battery tray. The placement of
the battery can be adjusted forward or backward to help balance the aircraft.
6. When the battery is properly placed, secure it with the hook and loop.
7. Connect the IC3 battery connector to the ESC, noting proper polarity.
CAUTION: Connecting the battery to the ESC with reversed polarity
will cause damage to the ESC, the battery or both. Damage caused by
incorrectly connecting the battery is not covered under warranty.
CAUTION: Always keep hands away from the propeller. When armed,
the motor will turn the propeller in response to any throttle movement.
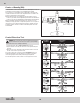
8. Place the aircraft on a flat, level surface. The control surfaces will cycle as
the SAFE system initializes. Initialization is complete when the surfaces
stop moving.
9. Replace the battery hatch on the fuselage by first inserting the front tab
then lowering the back until the magnet catches.
10. Turn off the Throttle Cut switch to power the motor.
CAUTION: Always disconnect the Li-Po flight battery from the aircraft
when not flying to avoid over-discharging the battery. Batteries
discharged to a voltage lower than the lowest approved voltage may become
damaged, resulting in loss of performance and potential fire when batteries
are charged.