HobbyZone ® products are distributed exclusively by Horizon Hobby, Inc. 4105 Fieldstone Road Champaign, IL 61822 ©2004 Horizon Hobby, Inc. HBZ3412 6 05482 14372 8 hobbyzonesports.
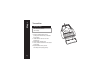
TM ™ Instruction Manual Instruction
Get ready to have a BLAST with your ZIG ZAG RACER 2™ —the high-performance, highly maneuverable, self-righting speedboat from HobbyZone®. You'll have hours of fun zipping across the water, racing with friends and playing Zig Zag Water Soccer. But before the fun begins, it’s very important that you read this manual completely and follow the directions carefully. That way you'll be sure your Zig Zag fun is safe and successful.
Welcome to the World of Crash damage is not covered under the warranty. Be sure to read the warranty on page 26 and "Warnings and Safety" on page 24 before you proceed to Step 1.
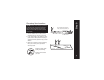
Step 1 Transmitter Needed for Step 1 "AA" Heavy-Duty Batteries (x8 included) 1. Remove transmitter back cover by pushing down with thumbs, as indicated by the arrows. 2. Install batteries. Use fresh 1.5V “AA” batteries only. 3. Watch polarity. Replace cover. 4. To test, switch on transmitter—LED should glow brightly. 5. Replace batteries when you hear low-battery alarm (beeping sound).
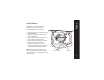
Step 2 Install Battery IMPORTANT – Prior to installing battery, the transmitter must be turned on and your Zig Zag boat placed on the included stand. 1. Lift canopy slightly and turn sideways to uncover battery compartment. 2. Attach battery to connector in boat and place battery in compartment. 3. To secure battery, stretch rubber band over the top of the battery and connect to hook. 4. Make sure battery and connectors do not interfere with movement of wire pushrod. 5.
Step 3 6 Motor Test and Battery Discharge CAUTION: Keep everything clear of the propeller. A moving propeller can cause injury. 1. The small lever next to the throttle stick (left stick on transmitter) is called a throttle trim lever. With your boat on the stand, transmitter turned on, and battery installed, make sure the throttle trim lever is in the center (neutral) position. 2. If motor is running, gradually move the trim Throttle Stick lever down until the motor stops. 3.
Step 4 Charging the Zig Zag Battery Note: Never charge a hot battery or a battery that is already charged. Always discharge before every charge. See Step 3 for instructions on discharging. See "Warnings and Safety" on page 24. 1. The charger supplied with the Zig Zag Racer 2™ has a built-in timer. Plug the battery into the charger, and then plug the charger into the wall. The LED indicator should glow constantly. After about 3 hours, the LED will turn off.
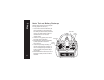
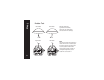
Step 5 8 Rudder Test Back of Boat Back of Boat Right Rudder Left Rudder Move the rudder stick (right stick on transmitter) side to side. The rudder should move as shown in the drawings. NOTE: The small lever under the rudder stick is called a trim lever and is used to adjust the "neutral" point of your control stick. To do this, place the rudder stick in neutral (center) position. If rudder is not aligned straight ahead, use the rudder trim lever to center it.
CAUTION: Parents, do not allow young children to go the lake or pool unsupervised. Be safe and stay away from steep grades near shorelines where you or those with you could slip and fall into the water. Do not operate your boat near moss, grass, weeds, brush, etc. Step 6 Choosing Your Location 1. Choose a location that is not being used by swimmers when you are running your boat. 2.
Step 7 10 Range Test You will need two people to do the range test: one to hold the transmitter and one to hold the Zig Zag Racer 2™. WATCH OUT! The person holding the boat should hold it so that the propeller does not come in contact with any part of their body. 1. One person holds the transmitter; the other person walks 100 paces away with the boat. 2. Extend the transmitter antenna completely and turn the transmitter on. 3. Plug in the battery and close the hatch cover. 4.
Before launching, make sure no one in the area is operating another radio control vehicle on the same frequency. Your frequency is marked on the back of your transmitter and under the boat canopy. Left Turn Right Turn Step 8 Launching and Running 1. To launch your Zig Zag Racer 2™, turn transmitter on, install charged battery and place and release the boat in the water. 2. Advance throttle (left) stick partially so boat moves slowly. Move rudder (right) stick to right to turn the boat to the right.
Step 8 Launching and Running (continued) • Your Zig Zag Racer 2™ has no reverse. Be sure to plan ahead while driving so you don’t get your boat stuck in a dead end. • Running time with a fully charged battery will be approximately 10–15 minutes, depending on your driving speed. NOTE: When you notice your boat running much slower even at full throttle, it’s time to bring your boat to shore.
• After launching your boat, check to see that it is running straight. • If your Zig Zag Racer 2™ always turns to the right when rudder stick is at neutral (centered), move the trim lever below the stick to the left until it drives straight. See drawing #1. • If the boat always turns to the left when the rudder stick is at neutral, move the trim lever to the right until it drives straight. See drawing #2.
RACING AND GAMES WITH THE ZIG ZAG The Zig Zag Racer 2TM is available on six different frequencies (channels). This means that up to six people can race at the same time. 4 To mark the course, use two or three buoys set in a line or in the shape of a triangle. You You can use the orange buoys that come with should allow 20 to 30 feet between them if your Zig Zag Racer 2 to set up a racecourse. possible. See drawings below. Vary the racecourse shape to sharpen your skills. 1.
Racing Options 1. After you've set up your course, drivers launch their boats and then stand in a line on the shore a minimum of 6 feet apart. Do not walk between a driver and his boat or you may cause radio interference. 2. To start, boats should be launched and lined up together near the racecourse (see drawing A), ready for the starter's "Go!" 3. Another way to start is for each driver to hold his or her boat at water’s edge. At "Go,” drivers release boats and head for the first buoy (see drawing B).
Zig Zag Water Soccer Setup When you can consistently maneuver your Zig Zag Racer 2™ at both low and high speeds, you can add to your racing fun by playing Zig Zag Water Soccer. Here’s how you set up your boat and "playing field." 1. Attach bumper to front of boat using the three screws provided. Secure the screws but do not over-tighten. 2. To set up your playing field, place two buoys (with anchor attached) in water approximately 50 feet apart to mark the two goal lines.
Playing Zig Zag Water Soccer If neither team scores, there is a third 1-minute playing period. After one minute, the team NOTE: For best results, it is easiest to move the ball when the throttle is in low position. Team #1 Drivers 3 Orange ball 50 feet 4 5 6 Goal line marker buoy 2 • Game begins by tossing the third orange ball (w/o anchor) into the middle of the "playing field." • Each team tries to score by using their bumper to push the ball past the goal line.
Retrieving Buoys The bumper provided for Water Soccer can also be used to retrieve the orange buoys. Remember—do not swim to retrieve the buoys. 1. Attach bumper to front of boat using the three screws provided. Secure the screws but do not over-tighten. 2. Re-launch your Zig Zag and steer it to catch a buoy in the bumper. 3. Carefully pull the buoy towards shore. The anchor will create some drag that will slow your speed and hamper maneuverability. CAUTION: Do not swim to retrieve the buoys.
Maintaining the Zig Zag Racer 2 • The Zig Zag Racer 2TM is designed to be selfrighting if it is tipped over during racing or while playing water soccer, as long as the canopy is fitted properly to the hull. If the canopy is knocked out of place, immediately drive to shore, empty any water from the boat and put the canopy back into place. • Be careful not to hit other boats or objects broadside at full throttle with the nose of your Zig Zag or you can damage the canopy.
I Propeller/Shaft Replacement If you damage the propeller, you may need to purchase a replacement propeller/propeller shaft. Follow these steps to replace the propeller. Adult supervision is recommended. 20 1. Remove the canopy by unhooking the rubber band that attaches the canopy to the hull. 2. Use a small flathead screwdriver to loosen the black set screw that secures the rudder. 3. Remove rudder carefully and make certain not to lose the two spacers that allow the rudder to move freely. 4.
Propeller/Shaft Replacement (continued) Follow these steps to replace the prop/prop shaft: 1. Remove prop/prop shaft from cap by unscrewing it. 2. Slide propeller and shaft out of drive tube. 3. Locate the new prop/prop shaft. 4. Slide the new prop/prop shaft into the boat. 5. Thread the prop/prop shaft into the threaded cap. It may be necessary to use small pliers to hold cap while shaft is being tightened. 6. Slide rubber coupler back onto motor cap. 7.
Troubleshooting Guide PROBLEM Unit doesn’t operate The boat will not drive straight when the steering stick is centered 22 POSSIBLE CAUSE SOLUTION 1. Transmitter “AA” batteries are depleted or installed incorrectly. 1. Check that the batteries are installed as per the illustration inside the transmitter back (see page 5). Replace the batteries with new fresh “AA”s. The LED indicator on the transmitter will be bright if the batteries are good and installed correctly. 2.
Troubleshooting Guide (continued) PROBLEM The boat goes much slower than normal The radio has poor or no range POSSIBLE CAUSE SOLUTION 1. The battery isn’t charged. 1. Fully charge the battery per the instructions (see page 4). 2. Weeds, moss, or trash may be caught on the prop or rudder. 2. Take the boat out of the water. Unplug the battery inside the boat to make sure the prop is not running. Remove the item from the prop or rudder. 3. The motor or battery is old and wearing out. 3.
Warnings and Safety 1. Read and follow this manual completely, observing all instructions, Warnings, Notes, Cautions, and safety directions; otherwise serious injury and damage can occur. Think: Safety First. 2. Keep propeller away from body parts, even when it isn’t spinning, as you or someone else might turn the boat on by accident. Beware of hair becoming entangled in the propeller, especially when launching the Zig Zag Racer 2™, or injury may occur. 3. NEVER SWIM to retrieve your boat or buoys.
Replacement Parts Item Description HBZ1012 HBZ2519 HBZ3315 HBZ3317 HBZ3319 HBZ3323 HBZ3324 HBZ3325 HBZ3327 HBZ3328 HBZ3329 HBZ3412 HBZ3413 HBZ3418 HBZ3419 HBZ3414 HBZ3415 HBZ3416 HBZ3417 HBZ3351 HBZ3352 HBZ3353 HBZ3354 HBZ3355 HBZ3356 HBZ1058 HBZ1060 7.
Warranty & Non-Warranty Replacement Parts Warranty: Horizon Hobby, Inc. guarantees this kit to be free of defects in material and workmanship at the date of purchase. This warranty does not cover any parts damaged by use, crashes or modification. In the event that you’re requesting Horizon to replace Zig Zag Racer 2TM parts, please follow the instructions below. 1. Make sure the battery is unplugged from the Zig Zag Racer 2.
Warranty & Non-Warranty Replacement Parts (continued) Mail your Zig Zag Racer 2TM to: Horizon Service Center ATTN: HobbyZone Dept.