® ® www.Hodedah.com Support@Hodedah.
® www.Hodedah.com Support@Hodedah.
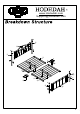
® www.Hodedah.com Support@Hodedah.com ® Parts ① Head Foot ② Head Foot ③ Tail Foot 1 un. ⑤ Head Board 1 un. ⑥ Foot Board ④ Tail Foot 1 un. ⑦ Platform 1 un. 1 un. 1 un. ⑧ Connector 2 un. 2 un. ⑨ Support Leg 4 un. Hardware A Bolt B Bolt C Bolt D Bolt 4 un. 4 un. 8 un. 16 un. 1/4*60mm 1/4*30mm 1/4*23mm 1/4*19mm E Bolt F Allen Key G Decorative ball 8 un. 2 un. 15*1/4*15mm 1/4 4 un.
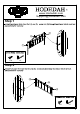
® ® www.Hodedah.com Support@Hodedah.com Step 1 · Attach head board (5) to head foot (1) and (2), screw bolt (D) through head board attach head foot. (see pictures for example) ② HARDWARE REQUIRED 6*D 1*F Step 2 · Attach foot board (6) to tail foot (3) and (4), screw bolt (D) through foot board attach tail foot.
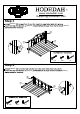
® www.Hodedah.com Support@Hodedah.com ® Step 3 · Attach platform (7) to head foot (1) and (2), insert the small steel plate into groove. · Insert bolt (D) into the hole on platform, thread bolt (A) through head foot to attach (see pictures for example) platform. ② ⑦ HARDWARE REQUIRED 2*A 2*D 1*F Step 4 · Attach platform (7) to tail foot (3) and (4), insert the small steel plate into groove.
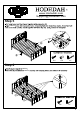
® ® www.Hodedah.com Support@Hodedah.com Step 5 · Put head board and foot board together with connector (8). · Align platform holes with connector holes, thread bolt (C) into holes from inside, thread bolt (E) into holes from outside, attach together with allen key (F). (see pictures for example) F C C F E E ⑧ ⑧ HARDWARE REQUIRED ⑧ 8*C 8*E 2*F Step 6 · Attach support leg (9) to platform. · Insert bolt (B) into holes of platform from top after aligning holes.
® www.Hodedah.com Support@Hodedah.com ® Step 7 · Screw the decorative ball ( G) on top of bed stock. (see pictures for example) G G G G G HARDWARE REQUIRED 4*G Step 8 · Tighten all bolts with allen key (F) after making sure they are in the right position. Job Complete ! In the interest of our environment please dispose of all packaging thoughtfully.