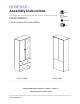
Assembly Instructions 2 people This instruction booklet contains important safety information, please read and keep for future reference. 60mins ITEM # HI882-A 1 YR LTD 2 DOOR WARDROBE WITH MIRROR 1 Box BACK VIEW FRONT VIEW Product Dimensions: Height 72” x Width 32” x Depth 17” Weight Capacity Per Drawer 20 lbs. 1|Page www.Hodedah.
Phone Website Email Mon – Fri | 9:30 am to 5pm EST Send us an email 1 - 855 – HODEDAH Support@Hodedah.com Visit our website to open a case www.Hodedah.
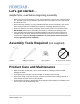
Let’s get started… Helpful hints, read before beginning assembly Make sure you receive all boxes. If your item is packed in one box, box count will read 1 of 1, likewise if your item is packed in two boxes, box count will read 1 of 2 and second box will read 2 of 2. Read each step carefully. It is very important that each step is performed in the correct order. If these steps are not followed in sequence, assembly difficulties will occur.
Hardware List A PVC Dowel D QTY 31Pcs B 52Pcs E Screw M3.5x16mm G 1Pc 12Pcs F H Hinges 2/8 K V – Bracket QTY 28Pcs Screw M4x45mm 30Pcs Nail 6Pcs Handle (96mm) 4Pcs M C Screw M3.5x21mm Aluminum Pipe (760x19mm) J Minifix QTY 6Sets I 2sets Drawer Slide (300mm) 2Pcs L 14Pcs Sticker 5Pcs Nail Leg Important 1. Before you throw the package, please use the Check Box to identify the parts and hardware to ensure that you have everything you need. 2.
Parts List 1Top Panel 800x425x15mm 4 Front Strengthening Panel QTY 1Pc 2 Left Side Panel 1Pc 5 Back 1Pc 8 Partition Panel 2Pcs 11 Drawer - Left 766x70x15mm 7 Kick Panel 766x100x15mm 10 Drawer Front Panel 780x238x15mm 13 Drawer End Panel 1450x396x2.
The Breakdown… 1 16 4 16 3 18 5 9 2 12 13 8 17 11 14 6 10 15 7 12 13 11 10 14 15 6|Page www.Hodedah.
In hardware list, you will find two bundles of drawer slide (I), here you need to differentiate left and right as shown in picture below. Left Drawer Slide(I) Flat Shaped - Left "L" Shaped - Left Right Drawer Slide(I) "L" Shaped - Right Flat Shaped - Right 7|Page www.Hodedah.
Step 1 *Insert PVC dowel (A) to panel 2, 3, 4, 5, 6, 7, 8, 11, 12 and 17's into the holes as shown, using hammer to gently tap them in. 4 3 5 2 8 12 17 11 12 11 6 7 8|Page www.Hodedah.
Step 2 Place the flat shaped - right of the drawer slide (I) at the predrilled holes on the panel 3 as shown. Then tighten each drawer slide (I) with 3 screws (D). D I 3 Fasten V-Bracket (K) on panel 2 and 3 as shown by using 2 screws (D). K 2 I Place the flat shaped - left of the drawer slide (I) at the panel 2 as shown. Then tighten each drawer slide(I) with 3 screws (D). 9|Page www.Hodedah.
Step 3 *Place and fix panel 4, 5, 6, 7, 8 and 17 onto panel 2 by inserting the (Left) dowels onto the non-thru holes at panel 2 by slightly tapping them with hammer. *Insert and fasten screws (C) (Using predrilled holes on Panel 2) into the panel 4, 5, 6, 7, 8 and 17. 4 8 17 7 5 2 6 10 | P a g e www.Hodedah.
Step 4 *Fix panel 3 onto panels 4, 5, 6, 7, 8 and 17 by inserting the (Right) dowels onto non-thru holes on panel 3 by slightly tapping them with hammer. *Fasten screws (C) from outside of panel 3, using the predrilled holes to attach panels 4, 5, 6, 7, 8 and 17. *Place the nail leg (M) on the two sides of panel 2 and panel 3. M 4 8 17 7 5 3 6 11 | P a g e www.Hodedah.
Step 5 *Fix panel 1 onto panel 2 and 3 and align properly by inserting 5 dowels on panel 2, 3 & 4 onto the non-thru holes of panel 1. *Gently tap panel 1 on panels 2, 3 & 4 dowels. *Fasten 4 screws (C) on panel 1 to attach panels 2 & 3. 2 4 3 1 12 | P a g e www.Hodedah.
Step 6 * Fix approximately 30 pieces of nails (F) into panel 16 using a hammer. *Cover all the screws (C)' head with sticker (L) provided by stick up onto hole of screw (C)' heads one by one. 16 16 F 13 | P a g e www.Hodedah.
Step 7 *Insert 4 hinges (J) onto panel 9 and 18's predrilled holes, then fasten screws (D) into hinges (J). 1. Panels 9 and 18 doors can be used for both right side and left side. 18 9 2. Fasten 2 screws (E) from inner side of door panel 9 and 18 into the handle (H) holes. 14 | P a g e www.Hodedah.
Step 8 Assembly Of Drawer: 2 Drawers *Insert the minifix (B) 10 X2 *Insert Panels 11,12 and 15 on to panel 10 by slightly hammering the dowels. *Insert Panel 14 into the drawer and align properly. (As shown) 14 15 11 12 X2 10 *Insert the mini fix (B)(nuts) with the cross arrow mark facing upwards and aim to panel 11,12 and 15 's top thru holes.(As shown) 15 | P a g e www.Hodedah.
*Place panel 13 on each side of panel 11 and 12 as shown. *Then, tighten screws (C) to panel 11's upper thru holes to fix them onto panel 13. *Next tighten screws (C) to panel 12's upper thru holes to fix up to the panel 13. *Tighten screws (C) to panel 13's upper thru holes to fix up to the panel 15. 11 15 X2 12 *Flip the drawer over. *Tighten 2 screws (E) from inner side of panel 10 into the handle (H) holes. 10 X2 16 | P a g e www.Hodedah.
Place the “L” shaped drawer slide (I) with the small white roller facing outwards and should be in parallel with drawer front panel 10. Then tighten 3 screws (D) on each drawer slide (I). "L" shaped - left of the drawer slide stick to the end of drawer front panel 10. I D 11 10 I D I X2 D I I 12 "L" shaped - right of the drawer slide stick to the end of drawer front panel 10. 17 | P a g e www.Hodedah.
Step 9 Almost there *Place hanger (G) onto panel 2 and 3's V-bracket. K 18 9 Fasten 4 screws (D) on hinges (J). You can align and adjust the door panels by tightening and loosening the screw. 18 | P a g e www.Hodedah.
Step 10 *Take all drawers, and slide them (the white rollers at drawer slide at both side of drawers are to go into the track of the slide at each side panel.)All the way gently, one drawer by one drawer starting from bottom to the top accordingly. 10 10 19 | P a g e www.Hodedah.
| P a g e www.Hodedah.
Job Complete… 18 9 10 10 Enjoy & Thank you for purchasing from Hodedah! 21 | P a g e www.Hodedah.