nca 450-RM NCA 200 Watt 4-Channel Amplifier F o r U s e O n Ru s h m o r e p l at f o r m b i k e s installation Manual
Thank you for choosing the Hogtunes NCA 450-RM Amplifier for 2014+ Rushmore Platform Bikes. Since positive word of mouth is the best way to grow our business, we want your new system to work as well as it was designed to. If you have any questions or concerns, we are here to help. I MPORTANT: The NCA 450-RM makes its best power when powering 2 ohm (Ω) speakers.
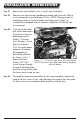
installation instructions Step #1: Remove the seat and both wires (+ and -) from the battery. Step #2: Remove your outer fairing/headlamp assembly and set aside. Refer to a service manual if you need help with this. NOTE: Placing a towel or something similar on the front fender can help prevent “dings” or scratches from dropped tools or fasteners.
Step #5: Sit the supplied silver plate on top of the radio as shown in Fig 1.2. Locate and install one of the supplied “star” washers on each factory screw and re-install the screw/washer through the silver plate, through the factory black plate and into the top of the radio. Locate the main power harness and plug it into the matching “pig-tail” on the side of the amp. There are two options for the way the amp will be used. Please identify which one you will use before proceeding. Figure 1.
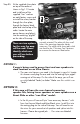
• You will see a “fader/no fader” switch on the side of the amp. In this option you will put the amp to the “no fader” setting. Also on the side of the amp is a switch to adjust the volume of the rear channels (compare to the volume of the front speakers) In most cases, you will leave this adjustment at the +3 setting.
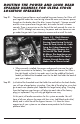
Routing the power and long rear speaker harness for Ultra stock location speakers Step #1: The power/ground harness and supplied long rear harness for Ultras will pass together under the inner fairing where the main wire harness passes through on the brake side of the bike. Loosen the tank’s “chrome console” and run wires up and over the gas tank, but under the tank’s chrome console. There is a provision on the front of the tank console for wires to pass.
Step #3: Attach the amp’s red wire to the positive (+) battery terminal and the amp’s black wire to the negative (-) battery terminal. The factory battery wires are also re-installed at this point. When attaching the power and ground wires, it is always a good practice to do the negative first. When the positive connector touches the battery, some sparking is normal. This is a function of the capacitors in the amplifier charging up.
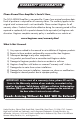
Adjusting Your System-Please Read! In order to make your new system perform as good as it was designed, please take a minute to understand and follow these tips: 1) Set your “Automatic Volume Control” (AVC) to 3 bars. After extensive on-road testing, we found that this AVC position works and sounds best. Your new amplifier has been specifically set-up for this radio setting. 2) Your Hogtunes system is designed specifically for a motorcycle at speed.
Warranty Information Please Record Your Amplifier’s Serial # Here_________________________ The NCA 450-RM Amplifier is warranted for 3 years from original purchase date. Proof of purchase is required for all warranty claims. The warranty applies to the original retail customer and is not transferable. Please contact Hogtunes for all warranty claims. Products found to be defective during the warranty period will be repaired or replaced (with a product deemed to be equivalent) at Hogtunes sole discretion.
Hogtunes products will play much louder than the Original Equipment, which can be a distraction to the rider and/or passenger. Please use caution when adjusting or playing your stereo at high volume, especially in traffic. You are a valued customer so please: Ride Alert Arrive Alive! www.hogtunes.