
Installation Guide


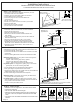

Fill void with silicone.
Push towards walls
after curb is set in place.
(X2)
(X2)
Installation Instructions
Models: SESD180, DESD180 with Buttress
1/4" Semi-Frameless Door and 3/8" In-Line Panel
#1
#23
#21
#22
#4
#4
#4
#1
#1
#5
#5
#5
#6
#6
Mark Centerline
location for reference
(outside
of unit)
Drawing not
proportioned
Pieces are cut
to size based off
your order
STEP 1 - Curb Installation (#1)
* Measure the wall to face of buttress wall where you want
the center of the unit to be installed.
* Subtract 1/16" from this. Mark location for reference.
* Cut the Stall Curb #1 to this length.
* Insert foam plug into each end of the Stall Curb.
and recess 1/8"
* Fill 1/8” void with silicone.
* Set the curb in place centered over where you marked.
* Secure with blue tape.
* Weep holes are to inside of shower.
* Do not screw the curb to threshold.
STEP 3 - Wall Channel (#4)
* Set Vert. Wall Channel #6 on top of curb filler #2
on face of buttress and plumb channel with a level.
* Mark the hole locations onto the wall.
* Remove the channel and drill marked locations with
3/16" drill bit.
* Insert 2 - Wall Anchors #22 (may have to razor heads off
anchors flush to wall).
* Re-insert channel and secure with 2 - #21 screws.
* Follow with the Horizontal Channel and tape in place.
* Set Wall Channel #4 on top of the horizontal channel,
plumb with a level. Mark the hole locations onto the wall.
* Drill with a 3/16 bit. Secure with 2 - #21 screws and 3 -
#22 Wall Anchors.
Measure
Detail
Front
View
3/8
Panel
Flush
Flush
STEP 4 - 3/8” Glass Panel (#18)
* Wet Glaze Option Only - If using silicone to bond the
glass to the wall channel and sill:
- Install 2 - #28 Centering Clips evenly spaced
into Panel Sill, offset from Setting Blocks
- Insert 3 - #28 Centering Clips into the Wall channel.
* Dry Glaze Option - If using push-in glazing vinyl to set
the 3/8” glass panel, do not use Centering Clips #28
* Insert two Setting Blocks #27 into Panel Sill #5.
* Set the 3/8” Glass Panel into the Horiz. Panel Sill #5
and Wall Channel #4.
* Flush the exposed edges of the 3/8 panel with the
longest point of the Panel Sill and the top of the Wall
Channel. Ensure vertical edge of 3/8” Glass Panel is
plumb. Adjust as necessary with Setting Blocks.
Wet Glaze Option - Temporarily, but securely fix Glass
Panel into position with blue painter’s tape.
Dry Glaze Option - Holding the glass panel in position,
roll or press the Glazing Bead #29 into both sides of sill
and wall channel using a roller or smooth block of wood.
Check to ensure panel didn’t move.
#26
Wet Glazing
parts detail
#2 / #1
Cross-section
#5 / #1
Cross-section
w/ setting block
Outside
Outside
#27
Dry Glaze
Glazing Bead
Silicone
Bead
STEP 2 - Curb Filler (#2)
* Measure from the face of the buttress wall to the Door
side wall.
* Cut the Curb Filler #2 to this length.
* With the two forks pointing down and the vertical leg to
the front of the unit, snap the Curb Filler into the Stall
Curb. The slope of the Curb filler should be to the inside
of the shower.
Page 7
*** If using the Dry Seal, once the push in vinyl has been installed, it
cannot be easily removed without being replaced.
#2
#2