
Installation Guide


Measure then
cut curb filler #2
Fill void with silicone.
Push towards walls
after curb is set in place.
(X3)
*Your installation may
be reversed
Installation Instructions
Models: SESD180, DESD180
1/4" Semi-Frameless Door and 3/8" In-Line Panel
#1
#21
#19
#20
#26
Wet Glazing
parts detail
#16
#2
Measure and then subtract 1/16"
Mark location for reference
#4
#1 (outside
of unit)
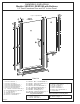
#2 / #1
Cross-section
#5 / #1
Cross-section
w/ setting block
Outside
Outside
Step 5
Measure then
cut Clear-Poly
Latch #6
Door-Side
Wall
#27
Dry Glaze
Glazing Bead
Silicone
Bead
#1
#4
#5
#26
#26
#26
#26
STEP 1 - Curb Installation (#1)
* Measure the wall to wall where you want the center of
the unit to be installed, subtract 1/16" from this.
* Mark location for reference.
* Cut the Stall Curb #1 to this length.
* Insert foam plug #21 into each end of the Stall Curb
and recess 1/8".
* Fill 1/8” void with silicone.
* Set the curb in place centered over where you measured,
secure with blue tape.
* Orient weep holes are to inside of shower.
* Do not screw the curb to threshold.
STEP 2 - Wall Channel (#4)
* Insert Wall Channel #4 into curb, on side of fixed panel.
* Plumb channel with a level.
* Mark the hole locations onto the wall.
* Remove the channel
* Drill marked locations with 3/16" drill bit
* Insert 3 - Wall Anchors #20 (may have to razor heads of
anchors flush to wall).
* Re-insert channel and secure with 3 - #19 screws.
STEP 3 - Panel Sill (#5) and 3/8” Fixed Panel (#16)
* Measure width of 3/8” Fixed Panel and subtract 3/8”.
* Cut the Panel Sill #5, to this length.
* Set the Panel Sill #5 into the Stall Curb #1 and butt to
the Wall Channel #4.
* Insert two Setting Blocks #25 into Panel Sill.
Wet Glaze Option Only - If using silicone to bond the
glass to the wall channel and sill:
- Install 2 - #26 Centering Clips evenly spaced
into Panel Sill, offset from Setting Blocks.
- Insert 3 - #26 Centering Clips into the Wall channel.
Dry Glaze Option - If using push-in glazing vinyl to set
the 3/8” glass panel, do not use Centering Clips #26.
* Set 3/8” Glass Panel into Panel Sill and Wall Channel.
* Flush glass edge to exposed end of Panel Sill #5.
* Adjust top of glass flush to top of Wall Channel, place
additional setting blocks under glass if needed.
* Ensure vertical edge of 3/8” Glass Panel is plumb.
Wet Glaze Option - Temporarily, but securely fix Glass
Panel into position with blue painter’s tape.
Dry Glaze Option - Holding the glass panel in position,
roll or press the Glazing Bead into both sides of sill and
wall channel using a roller or smooth block of wood.
* Check to ensure panel didn’t move.
STEP 4 - Curb Filler (#2)
* Measure from the edge of the 3/8” Glass Panel to the
Door side wall.
* Cut the Curb Filler #2 to this length.
* With the two forks pointing down and the vertical leg to
the front of the unit, snap the Curb Filler into the Stall
Curb.
* The slope of the Curb filler should be to the inside of the
shower.
Page 4
*** If using the Dry Seal, once the push in vinyl has been installed, it
cannot be easily removed without being replaced.