
Installation Guide

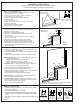

1/16" Gap
Measure
(see previous
figure too)
#6
#7, #8 (not shown)
outside of unit
Outside
Top View
#3#3
Outside
#2
#1
Side
against
Wall
Slide door
over wall channel
Door-to-Latch
Gap (1/16” to 1/8”)
S
3 - screws
ecure with
Strike Plate #8
Magnetic Catch #23
Measure from edge of glass
to outside of hinge rail
Hinge
Rail
Notched
Side
Drip Deflector
on inside
Inside
Handle
#18
Style Washers
are Optional
Magnet Catch
centered on
handle
#16
#2
#1
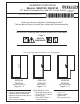
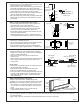
STEP 5 - Clear-Poly Latch Jamb (#6)
* Measure from top of 3/8” Glass Panel #16 to top of the
sloped surface of the Curb Filler #2.
* Take Clear-Poly Latch Jamb assembly, and remove the
Bulb Seal and Strike Plate, set aside for later step.
* Cut Clear-Poly Latch #6 to above dimension using a 24
tooth hatch-saw. Power saw may damage latch.
Recommended: notch the Clear-Poly Latch at bottom to
clear the Panel Sill #5 (trim legs up 3/16”).
* Apply the Clear-Poly Latch Jamb on edge of Glass with
latch inside unit ensuring it is flush with the top of the
Fixed panel.
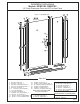
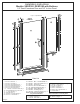
STEP 6 - Attach Door-Side Wall Channel (#3)
* Set door-side Wall Channel #3 in place against the
door side wall, on top of the Curb Filler.
* Gap the bottom of the wall channel 1/16" from the
vertical water dam of the Curb Filler (This will allow
the room for the Door assembly to slide over.)
* Plumb Wall Channel, mark the hole locations on wall
and remove Wall Channel.
* Drill holes with 3/16" bit, insert 3 - #20 Wall Anchors,
re-install Wall channel and secure with 3 - #19 Screws.
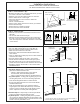
STEP 7 - Door Assembly / Pre-Hanging Prep
* Attach Pull - Handle #18 to Door.
* Dry run the position of Magnetic Catch Assembly, #23,
#24 and mark location with marker on glass.
* Apply small bead of silicone inside Catch Assembly
and work onto edge of glass at mark. Let silicone dry.
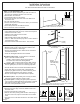
STEP 8 - Hang Door Assembly
* Slide door assembly over the Wall Channel (Step 6).
* Adjust door until top edge of the door is level and flush
with top of 3/8” Glass Panel.
* Also ensure door-to-latch gap is consistent from
bottom to top.
* When aligned, secure Door Assembly to Wall Channel
with 3 - #22 screws using factory pilot holes in the
Hinge Jamb.
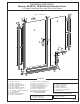
Finish Latch
* Temporarily slide Strike Plate #8 into Clear-Poly Latch
#6, align with Mag Catch #23.
* Mark top and bottom of Strike Plate onto Latch.
* Marks and cut Bulb Seal #7 to proper length.
* From top of latch, re-insert bottom bulb seal, strike and
top seal. Dabs of silicone may be required to secure
Bulb Seals and Strike in place. Hold with Painters
tape while drying.
STEP 8 - Bottom Sweep Fitting (#17)
* Measure the Door Glass including Hinge Rail.
* Subtract 1/16" and cut the Bottom sweep to this length.
IMPORTANT: The sweep is notch on both ends. You
must leave the notch that goes under the Hinge Rail
for your door. Cut off the end with the notch you don't
need.
* Trim the inside deflector 3/8" so it will clear the
Latch Jamb when door is closed.
STEP 10 - Final Sealing / Siliconing the Unit (let dry for 24 hours before use)
* On the outside of the unit, run a bead of silicone down both walls and across the bottom where the metal meets
the walls and base.
* Apply a dab of silicone at the bottom of the latch jamb where it meets the Curb Filler.
Page 5