
Installation Guide

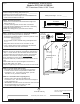
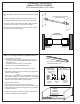


STEP 9 - Mount Header Tube:
* Slide the Header Tube into wall collar with stoppers pointed
up.
* Slide the loose Wall Collar off the Header Tube and onto
the opposite Wall Puck taking care the tube does not fall.
* Center the Header tube within both Wall Collars and align
the Panel Fixers so they are facing to the outside.
* Secure tube by tightening the set screws on each collar in
the order shown (for best results).
Slide wall collar to right and
tighten set screws
Set Screw
Tightening Order
#1
#2
W
A
L
L
#4
#3
Cone Point
on Puck side
Cone Point
on Puck side
#1
#2
W
A
L
L
#4
#3
Cone Point
on Puck side
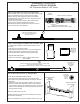
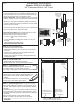
STEP 10 - Preparing and Positioning Bottom Channel:
* Prepare Bottom Channel (9):
- The Bottom Channel (9), may already be cut to size.
- If not, measure the width of the Fixed Glass Panel (15)
and subtract 3/4".
- Cut the EX.1018 Panel Sill, (9) to this length.
- Insert two 1/8" Clear Setting Blocks (8b).
* NOTE: Choose the Bottom Channel glazing method:
- DRY SEAL: Will use two pieces of Snap Vinyl after Glass
Panel is in final position.
OR
- WET SEAL: In addition to the Setting Blocks, also insert
three Centering Clips (8c) into the sill between setting blocks.
You will have to silicone glaze both sides of the panel to the
Bottom Channel after Panel is in final position.
* Position Bottom Channel:
- Butt bottom channel to wall in front of Centerline.
- Securely tape into position with blue painter’s tape on the
inside and outside to ensure it channel does not slip when
you put the panel in.
- NOTE: You will have to adjust the position of the channel
forward or backward during installation.
Cut the EX.1018 Panel Sill
Fixed Panel Width - 3/4”
Silicone
Bead
Centering
Clip (8c)
SP.2221
Wet Glazing
Parts Detail
Dry Glaze
Glazing Vinyl Detail
Snap Vinyl
Clip (10)
VN.4031
Setting
Blocks
(8b)
Choose Glazing Method
Bottom
Channel
Location:
butted to wall
in front of
Centerline
Installation Instructions
Models: ECTE180 / ECSE180
3/8" Frameless Slider & 180° Panel
Page 6