
Installation Guide

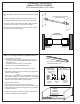


STEP 14 - Hanging and Adjusting the Sliding Panel:
* From inside of the shower, carefully lift Sliding Panel (14)
onto the Header Tube (11) and into the Center Guide (5).
* Move each Bumper Stop (3) towards the walls.
* Shower Head Wall: bring the Sliding Panel to the closed
position, leaving an even 1/4”gap at the shower head wall.
* NOTE: you may have to individually adjust the rollers up
or down if wall and the edge of panel does not have equal
reveal from top to bottom.
* Secure bumper stop by tightening set screw located at the
top of the bumper stop. Tighten this well!
* Stationary Panel Wall: slide the sliding panel (14) to the
open position behind stationary panel (15).
* Slide the bumper stop to stop the roller:
- at least 1” from center of handle holes
OR
- so the back edge of sliding panel is 5/8” or more from
the wall.
- WHICHEVER HAPPENS FIRST
* Tighten second bumper stop well!
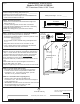
STEP 15 - Anti Jump Posts (2):
* Install Anti Jump Posts as shown.
* Adjust posts until they come within 1/16” of the bottom
of the bar.
* NOTE: Test to make sure the anti-jumps restrict the
rollers from coming off the tube.
* Tighten Anti-Jumb post securely, holding the back cap
in adjusted location.
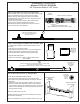
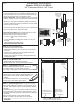
STEP 17 - Final Glazing/Silicone: GE1200 Recommended
* Run a bead of Silicone vertically to seal the panel (15) to
the wall. Blue Painters tape is recommended to assist in
this step
* Install Snap Vinyl (10) or run a bead of Silicone along the
horizontial edge of the of bottom channel where it meets
the glass panel, and along the entire inside and outside of
threshold.
* Silicone gaps between center guide and glass.
* NOTE: Let silicone dry and tape cure for 24 hours
before use.
STEP 17 - Install Bumper Seal (13):
* Measure sliding panel top to bottem, deduct 1/8”
* Cut bumper seal (13) to this length and tap it
onto edge of sliding panel (14) on shower head side.
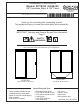
Installation Instructions
Models: ECTE180 / ECSE180
3/8" Frameless Slider & 180° Panel
Page 8
Rotate inside
plate on roller
to adjust up
or down
Tighten roller
by turning
back cap
Rotate
back cap to
adjust up
or down
Tighten
Anti-Jump
turning post.
STEP 16 - Install Handle (16):
* Install handle with instructions provided.
* Ensure handle does not hit stationary glass panel.
STEP 18 - Soft Sill (12):
* Measure from center guide to wall and deduct 1/16”
* Clean adhesion area under Soft Sill with alcohol
and dry.
* Cut Soft Sill to dimension. Peel the backing
off the tape on the sill and stick in place.
1/16”
gap
Outside
Bumper
Sea (13)
Handle
(16)
Soft Sill (12)
Fill 1/8” gap between stationary
panel and wall with silicone
Install Snap Vinyl
or silicone each side
of bottom channel
Silicone each side of bottom channel
and soft sill where it contacts threshold.
Silicone gaps
between center
guide and glass