
Installation Guide


Page 5
Installation Instructions
All Models
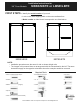
Illustration #5
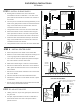
STEP 6 - SECURE SECOND HEADER BLOCK
NOTE: Assistance is recommended for this step.
a. Hold the unsecured Header Block on the opposite wall
directly across from the secured Header Block.
b. Insert Header Bar into the cavities of the two Header Blocks.
c. Using a level, position the loose Header Block until the
Header Bar is level and the Header Block is centered on the
centerline. Mark outline of the Header Block.
d. Set Header Bar aside. With the Header Block aligned in the
outline, mark the center of the slot location on the wall.
e. Remove the Header Block. Drill a hole at this mark with a ¼”
drill bit and insert a M5 Wall Anchor.
f. Insert Stoppers into the Header Block, be sure to follow the
orientation shown in Illustration 3.
g. Temporarily secure the Header Block with one M5 X 60mm
THPH Screw (ITEM #3b).
h. Place the Header Bar back into the cavities of the Header
Blocks and check if it is level. If needed, adjust the Header
Block using the center slot. If needed mark the new location.
I. Remove the Header Bar and mark the locations of the outer
Header Block holes on the wall.
j. Remove the Header Block. Drill a hole at these marks with a
¼” drill bit and insert M5 Wall Anchors.
k. Secure the Header Block with two M5 X 60mm FHPH Screws.
Secured
Header Block
Unsecured
Header Block
Place Header
Bar into unsecured
Header Block
and level along
centerline
Unit Centerline
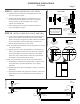
DO NOT CUT
THROUGH
SPACER
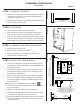
Header Bar (Top View)
Trim bar at each end
to fit length in STEP 5
STEP 5 - CHECK HEADER BAR LENGTH
a. Your Header Bar may already be cut to size. To check,
measure wall to wall just below the Header Block and
subtract ¾”. If your header is not this length, find the
difference between the overall length of the Header Bar and
your measurement. Remove half of this difference from
each end of the Header Bar (Illustration 4).
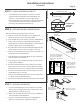
Tighten 4 set screws
with an allen wrench
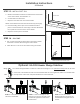
Illustration #4Illustration #6
Header Bracing Plate
Insert Header
Bracing Plate into slot
in Header Block
First secure Header Block
with one screw (ITEM #3b).
Use the slot to adjust the
height until the Header Bar
is level.
Once level, use two
screws (ITEM #3a)
in the outer holes
to fully secure the
Header Block to the
wall.
STEP 7 - SECURE HEADER BAR
a. Insert the Header Bar back into the cavities of the Header
Blocks. So the spacing from the end of the bar to the wall is
approximately the same at each end.
b. Refer to the included instruction sheet on how to install the
optional Header Wedge Stabilizers.
c. Insert the Header Bracing Plates in the Header Blocks.
Tighten set screws with the supplied hex wrench.