
Installation Manual


12
Figure 15 Figure 16
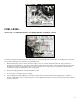
3. Remove the clip retaining the diaphragm plunger to the secondary throttle lever using a small flat-blade screwdriver (Figure 17).
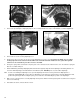
Figure 17 Figure 18
4. Remove the four screws securing diaphragm cover.
5. Gently remove the cover. Take care as not to tear the diaphragm or loose the check ball (Figure 18). NOTE: Your secondary
housing may have a brass restriction inserted where the check ball should be. If that is the case, please disregard all
references to the check ball as yours does not use a check ball.
6. Change the spring. Make sure that the new spring seats on the stud cast into the underside of the cover. The stiffer the spring, the
later the secondaries will open.
7. When reassembling secondary diaphragm parts, exercise care to properly align the vacuum passage in the casting with the “cut
out” in the rubber diaphragm, and make sure the check ball is in place. DO NOT pinch or tear the rubber diaphragm.
TIP: To make reassembling the diaphragm easier, push the diaphragm arm into the housing and form the diaphragm into a
“mushroom” shape (Figure 19). Then position the diaphragm over the bolt holes and vacuum port. Hold the diaphragm in that
position with your fingers while inserting the spring, cover, and bolts to avoid disturbing the position of the diaphragm.
8. Make sure the cork gasket in the secondary diaphragm housing mates with the main body casting and reassemble the housing and
choke to the main body.
9. Reinstall the air cleaner, and test drive the vehicle.