GM-305 Personal Navigator Explorer User’s Guide Version: 1.03 EI Date: Mar. 07, 2001 Vertrieb Deutschland o. j. imports, Sascha Schwalbe Alt-Gatow 33 b, 14089 Berlin Telefon: 030-36 35 362 Fax: 030-364 00 722 E-Mail:info@holux-gps.de Web: www.holux-gps.
Thank You! Thank you for choosing HOLUX Explorer Handheld GPS as your personal navigator. We hope it will be useful to you for a long time. Warranty This Explorer is warranted to be free from defects in material and functions for one year from the date of purchase. Any failure of this product within this period under normal operation will be repaired at no charge to you. Please refer to the Warranty Card in the package. HOLUX Technology, Inc.
Table of Contents Chapter 1 QUICK REFERENCE ……………………………………………… 4 Chapter 2 BEFORE OPERATING …………………………………………….. 7 …………………………………………………………………………… 7 I. NAME II. ALL MODELS …………………………………………………………………… 7 …………………………………………………… 8 III. OPTIONAL ACCESSORIES ………………………………………………………… 9 IV. STANDARD PACKAGE ……………………………………………………………………… 10 V. CAUTIONS VI. ACTIVE ANTENNA DISMANTLE & ASSEMBLE …………………………….. 11 Chapter 3 OPERATING DETAIL ……………………………………………… 12 ……………………………………………………….. 12 I.
Chapter 1 QUICK REFERENCE I. CAUTIONS A. Please select cold start mode under the following situations: (i) Initial use. (ii) Moving more than 500 km without performing satellite acquiring. (iii) Unused for more than one month regardless of looking up map. B. Environment and antenna position (i) Outdoors without shade. (ii) Have the built-in antenna paralleled the ground (i.e. the angle between Explorer and ground is 30º) and faced up to the sky. C.
VI. MAJOR NAVIGATION FUNCTION KEYS A. MENU “ ” The gate key to operate all functions. B. PAGE “ ” (i) Switch among pages of satellite, map, status and compass. (ii) Press for 2 seconds to change screen orientation, either horizontal or vertical. C. ZOOM IN “ ” / ZOOM OUT “ ” (i) Enlarge/narrow down map scale. (ii) In map page, press “ ” for 2 seconds to erase/redisplay the data in the right down corner. (iii) Also in map page, press “ ” for 2 seconds to erase/redisplay road lines. D.
I. Adjust time Go to Change Time from the status page for changing to daylight saving time or the real time in the area across more than one time zone. J. Adjust contrast Press “ ” or ” ” key in satellite page to adjust contrast. K. Waypoints Creating a waypoint: either go to Waypoints from Main Menu or press ” in map page. ” for 2 seconds (i) GM-305-WT: Various icons available for Bank, Gas Station, School,……etc. (ii) GM-305-DT, GM-305-HT: One icon only.
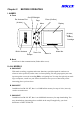
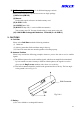
Chapter 2 BEFORE OPERATING I. NAMES A. Front On-Off/ Blcklight Ext. Antenna Port (At side) Enter (Confirm) Page Menu Display (At side) Battery Cartridge Built-in Antenna Zoom-Out Escape Model No. Zoom-In B. Back Serial Port for data communication (Under rubber cover). II. ALL MODELS A. GM-305-WT With track recording, waypoints and routes functions, special designed for outdoors use wherever in the open field, on the water or when exploring.
III. OPTIONAL ACCESSORIES A. Single Item (i) Explorer Holder (A-30501) When using the unit in a car, stick the holder on the dashboard with enclosed 3M adhesive pad. you may have the unit held with the antenna facing up to the sky for better signal receiving and reading. (ii) Data Cable (A-30502) To up load / down load map, data or to upgrade system. (iii) Active Antenna When using Explorer in a RV car, truck or bus, connect an extensional active antenna to get better satellite signals.
(xii) Antenna Bracket (A-30511) For holding antenna rod on bike or motorcycle. (xiii) Travelling Bag (A-30512) To receive all accessories and main unit for travelling or storage. (xiv) Antenna Rod Supporting Strip (A-30513) For holding antenna rod to support A-30503 when mountaineering or hiking. (xv) Optional Map Mountaineering map, sea map, recreation area map or street map.
B. Full Package (GM-305-??) (?? for different language version) Details please refer above Optional Accessories or single package. (i) Main Unit (GM-305) (ii) Manual Packed with a quick reference card and warranty card. (iii) A-30501 Holder (v) A-30502 Data Cable (vi) M-305-?? Map CD (?? varies in different countries) Your country map CD. You may download any or some areas to the unit. (vii) 4 AA NI-MH rechargeable batteries, 1300mAH (2 x A-100B13) V. CAUTIONS A.
(ii) Use a certified charger to ensure batteries are full charged. (iii) Remove batteries from the cartridge when not use more than 30 days. VI. EXTENSION ANTENNA ASSEMBLE & DISASSEMBLE A. Remove rubber cover at right top side as Fig.2-4-1. B. Connect active antenna with SMA connector to the unit.
Chapter 3 OPERATING DETAILS The Explorer Handheld GPS is a miniature computer, composed of a CPU, memory IC and operation system (OS), called HOLUX OS. It is designed to receive the satellite signals once every 100 milli-second, i.e. 10 times per second, and to calculate all the retrieved data in the CPU. In that case, there will be some delay after you press a button. Also its processing speed is not as quick as a desktop computer for the sake of low power consumption. I. ON/OFF & BACKLIGHT A.
Poor GPS Signal Select Cold Start ˇ In fact, You do not need to operate Cold Start. But you must improve satelliteacquiring environment unless incorrect satellite data stored in the system. II. SIMULATION This function is for looking up a map or setting up waypoints and routes regardless of acquiring satellite signals. It may save power and respond quicker. Fig 3-2-1 Fig 3-2-2 A. Press “ ”. ”. B. Select Stop Navigation as Fig. 3-2-1, and press ” C.
(ii)Press and hold ” ” for 2 seconds to change screen orientation, horizontal or vertical as Fig. 3-3-2 and Fig. 3-3-3. (iii) Satellite Page In this page, you may see battery level, backlight and what & how many satellites are acquired. Once a satellite is acquired and fixed, the signal bar will turn dark. Moreover, strength of satellite signal will be told by length of signal bar as Fig. 3-1-2. Press direction key “ ” or ” ” to enter and adjust the contrast of screen as Fig.
20km, 50km, 100km, 200km, 500km, 12 levels in total. (ii) Press and hold “ down corner. ” for 2 seconds to display/clear scale, map mode and area size in right (iii)Press and hold “ ” for 2 seconds to display/clear roads to check routes or track logs. (For GM-305-DT and GM-305-HT only) (iv) When zooming in/out map, a black dot in the right down square changes size and related position accordingly as Fig. 3-3-9. The dot denotes the map displayed in the screen and the square denotes the whole map.
position. Before position fixed, “ ” is your last position or the center position when downloading map in last operation. The “ ” is fixed and can’t be moved. (a) Click any direction key once to scroll map 1/2 page. (b) Hold a direction key to move cursor ”Û”. When the cursor goes to the edge of screen, the map still moves accordingly until you release the key. (c) The cursor stops at any position. If you change to other pages, it will still be at the same position as in last map page.
Chapter 4 FUNCTION DETAIL IN PAGES I. SATELLITE PAGE A. Adjust Contrast (i) Press direction key “ ” or ” ” to adjust the contrast of screen as Fig. 3-3-4, “ lighter and ” ” for darker. (ii) Press “ ” to confirm or “ ” to escape. ” for B. Cold Start This function is to clear obsolete or incorrect satellite data stored in its memory. If you cannot receive satellite signals to identify your position after turning on for a few minutes, you may turn off and turn on again.
E. NMEA Output The Explorer provides NMEA 0183 output to enable you to use this unit as an ordinary GPS receiver for linking to a notebook PC or other devices for navigation or other applications. (i) Press “ ” (ii) Select NMEA output On/Off and press “ ” You may output all satellite positioning information through the serial port cable A-30502. The default of output is: (i) Update rate: once per second. (ii) Baud rate: 4,800 bps.
(i) Select Search Object, and press “ ”. (ii) Move marked field to select a region as Fig. 4-2-2 and press “ ”. (iii) Move marked field to select a type, e.g. City, as Fig. 4-2-3 and press “ ” as Fig. 4-2-4. (iv) Press “ ” to move marked field to top level to start searching a City name by alphabet sequence as Fig. 4-2-4. Press “ ” or “ “ to change character, press “ ” or ” ” to change column. You may select up to 4 columns. When you change the alphabet, the City in the screen will change accordingly.
hold to roll the page. C. Show Map Information (For GM-305-DT and GM-305-HT only) (i) Move cursor to tough a road or an interesting point, then press “ ”. (ii) Move marked field to Show MapInfo, press “ ” to show map information. (iii) When cursor is not touching a road or an interesting point, the Show MapInfo will be not active (grayed). D. Shortest Way From present position to the selected object directly is the shortcut as Fig. 4-2-6. (i) Select an object by Search Object or Screen Search function. ”.
selection and return to the map Page or press ” ” to ignore and return to the former page. (ii) Move the cursor to ? and press “ ” to check out the meaning of every icon as Fig. ”. You may 4-2-9, 4-2-10 and 4-2-11. Switch pages by selecting Ð and Ï and press ” press ” ” to ignore and return to the former page. F. Cursor Speed (For GM-305-DT and GM-305-H only) ” to select suitable cursor speed. Select Low/High Speed and press “ G. Distance Measuring (i) Select Show Dist On and press ” ”.
Fig.4-3-1 Fig.4-3-2 Fig.4-3-3 Fig.4-3-4 A. Time Adjustment (i) Prior to changing the time, make sure of the actual difference between the time stored in the Explorer and your local time. You only need to change the hours. The date and minutes can’t be changed. ” as Fig. 4-3-3. (ii) Select Change Time and press “ (iii) Move the marked field to Minus/Plus and press “ ” as Fig.4-3-4, 4-3-5. (iv) Move the marked field to Hour and press “ ”.
Chapter 5 SYSTEM MENU Press “ ” in any page to select Main Menu as Fig.5-1-1 (for GM-305-DT, GM-305-HT only) and press “ ”. There are Waypoints, Routes, Track Logs, Pw Savings On/Off and UpLoad and DownpLoad for options as Fig. 5-1-2. I. WAYPOINTS Explorer can hold up to 500 waypoints. Fig. 5-1-1 Fig. 5-1-2 Fig. 5-1-3 Select Waypoints and press ” ”. You may see name, distance, waypoints and a set of figures, 2/2/500 at the bottom as Fig.5-1-3.
(b) Press direction keys “ ” and “ “ to change data, “ (c) Press “ ” when set up complete. ” or ” ” to change column. The functions of direction keys: “ ” : Select alphabet, number or symbol. The order is …D, C, B, A, ….. “ ": Select alphabet, number or symbol. The order is ….A, B, C…… “ ” and ” ”: change column. The order for all alphabets, numbers and symbols are ”A B C…a b c…. 0 1 2 …..9 . : ; ! ? + - = * / # “( )”. There are 52 alphabets, 10 numbers and 14 symbols. B.
(i) Move the cursor “Û” to the objective in map page. (ii) Press and hold ” ” for one second to turn the page as Fig. 5-1-5. (iii) Follow the steps as Method 1. (iv) The time and date is your present one. Note: If you have not changed the coordinate, the waypoint you created is: (a) Method 1: At present address at “ ”. (b) Method 2: At the cursor “Û” in the map. If there is no cursor in the map, it is at “ ”. C. Edit Waypoints (i) Go back to previous page or go to Waypoints from main menu as Fig. 5-1-3.
II. ROUTES The Explorer can hold 20 routes, 30 waypoints each. 1: Number of Routes set in the system. 20: Maximum Routes available in the *:The route is set for navigation 2: Number of waypoints set in R001. Fig. 5-2-1 30: Maximum waypoints for each Fig. 5-2-2 A. Route Page (i) Select Routes from Main Menu and press “ ” as Fig. 5-2-1. The created routes are displayed in routes column. The definitions of figures outside the routes and waypoints columns are explained as Fig.5-2-1.
(2) Move the marked field to the list of waypoints and press “ ”. (3) Select a waypoint and press “ ”. (4) Move marked field to “ˇ” and press “ ”. The waypoint is now selected into the route. (5) To append second waypoint, just press “ ” and duplicate the above steps (1) – (4). (6) Move marked field to “ˇ” and press “ ” to complete creating a new route.. (7) Press ” ” to go back to former page. Note! In Waypoint, the name and distance field defines the displaying column. Please refer to P. 22 Waypoint A.
(iii) Please refer to Waypoints in page 22 for editing. (iv) When complete, move marked field to“ˇ” and press “ ” to return to previous page. Then press ” ” to return to former page. D. Delete a Route (i) Go to the page as Fig. 5-2-1 or select from Main MENU. (ii) Select the route to be deleted. (iii) Press “ ”. (iv) Select Delete and press “ (v) Press ” ” when complete. ” to erase the route. Note! (a) The route can not be deleted if a navigation route existing.
A. Start to Track Fig. 5-3-2 Fig. 5-3-3 Fig. 5-3-4 ” (i) Move marked field to Off/Fill/Wrap, press “ (ii) Select Fill or Wrap and press “ ”. (iii) Press “ ”, select Recording Mode as Fig. 5-3-2 and press “ ” as Fig. 5-3-3 to set your recording mode. There are two parameters-- time and distance. You may set either one or both as recording criteria. (a) Distance Move the marked field to Dist Interval and press “ ”. Interval options include 20, 50, 100, 200, 500m, 1, 2 and 5km.
OK You are recommended to take following actions: (a) Press “ ” or “ ” to clear the message. (b) Follow the steps in next paragraph to save or clear current track log. Otherwise, the message will show again once you turn on the Explorer. B. Further Operation on Tracking As Fig. 5-3-1 Press “ ”. Options are Clear Tracking, Save Tracking, Delete, Show Off/On, Edit and Recording Mode. (i) Clear Tracking This function erases current track logs in use. (a) Select Clear Tracking and press “ ”.
(c) Press “ ”. ” to display/hide.. (d) Select Show On/Off and press “ (e) Move the marked field to “ˇ” and press “ ” or press “ ” to return to former page. Note: you may pick up more than one tracking logs to display at the same time. (v) Edit Return to the page as Fig. 5-3-1 to do as follows: (a) Move the marked field to saved track logs and press “ (b) Select the tracking log to be edited and press “ ”. (c) Press “ ”. ”. ”.
A. Before Operation Connect Explorer and PC’s serial port with data cable, A-30502. Note! Be sure to check the power supply sufficiently to complete the uploading B. Operation in Explorer Fig. 5-5-1 Fig. 5-5-2 Fig. 5-5-3 Fig. 5-5-4 (i) Select Upload from Main Menu as Fig. 5-5-1 and press “ ” as Fig. 5-5-2. (ii) Press “ ” as Fig. 5-5-3, select Waypoint & Route or Track Log and press “ ”.
(viii) When complete, the screen shows File Length: ?????? bytes File Uploaded Successfully! (ix) Press “ ” to load another or Press “ ” to return. Note: Be sure to select file type (*.tki) When up load Track log. V. Downloading This function is for downloading Map, Waypoint&Route, Track Logs and Font from PC to Explorer. A. Before Operation Connect Explorer and PC’s serial port with data cable, A-30502. Note! Be sure to check the power supply sufficiently to complete the uploading B.
File Length: ?????? When downloading map file to GM-305-DT \ GM-305-HT, the map size must be smaller than the memory size built-in the unit. If the map size is too big, the screen will show: Map size too big, Over xxxx bytes the overage to the built-in memory size (vi) Click Transfer and Download. The screen shows: File Length: ??????? bytes Transferring data to Explorer ??% completed (vii) When complete, it will say: File Downloaded Successfully! (viii) Press “ ” to load another or Press “ ” to return.
VII. Operation System (HOLUX O.S.) Upgrading This function is for upgrading your Explorer O.S.. You may get the newest version of Explorer O.S. from our web site or your local distributor free of charge within 1 year from the date of purchase. A. Before Operation Connect Explorer and PC’s serial port with data cable, A-30502. Note! Be sure to check the power supply sufficiently to complete the uploading B. Operation in Explorer ** (i) Turn off the unit.
(iv) Click Transfer and Download. The screen will show File Length: ?????bytes Transferring data to Explorer ??% complete (v) When complete, it will say: File Download Successfully! (vi) will turn off automatically. Note: It is vital that the cable will not become disconnected during download.
Chapter 6 SPECIFICATION I. MAP A. Display Scale: (i) Screen width: 400m ~ 3,000km. (ii) Map layer: 12 levels for zooming in/out. B. Map Memory: (i) GM-305-WT: 0 Byte. (ii) GM-305-DT: 2M Byte. (iii) GM-305-HT: 8M Byte. II. NAVIGATION A. Waypoints: 500 maximum, including name, symbol, comment and display. B. Routes: 20 maximum, up to 30 waypoints each. C. Track logs: 6 maximum -- 5 in back up and 1 in use. Up to 2,500 points each. III. FUNCTION A. Receiving and tracking 12 satellites. B.
VII. ANTENNA A. Built-in: patch antenna. B. Optional: External antenna with SMA connector. XIII. PHYSICAL A. Size: 153 x 60 x 34 mm. B. Weight: 170g without battery. C. Battery: 4 AA battery, 0.15 – 0.66W. IX. DISPLAY A. 4-gray, Black & White. B. Size: 6.0 x 3.8 cm. C. Backlight: high contrast electroluminescent. D. Resolution: 100 x 160 dots. X. MISC. A. Operation keys: 6 function, 1 on/off and 1 rocking pad for 8 directions. B. Temperature: Operation: -10~60°C. Storage: -40~85°C.
I. BASIC SETTING A. Power saving: ON B. Display (GM-305-DT, GM-305-HT only): (i) Interesting point: Waypoint only (ii) Road: All Roads C. Cursor speed: Low Speed D. Distance measuring: OFF E. Map orientation: North Up F. Time: Greenwich Time G. Navigation: ON H. Datum: WGS 1984 I. NMEA output: OFF J. Waypoints: Starts from W001 K. Routes: Starts from R001 L. Waypoints & Routes Saved in built-in memory. Will remain in memory when downloading new map. M. Track log: OFF Saved in built-in memory.
Chapter 8 TROUBLE SHOOTING Q1: What should I do when I press ” “ for several times but fail in turning on the unit? A: 1. Be sure to press and hold ” “ for two seconds. To ensure that the unit is not turned on accidentally, the unit is designed to turn on after the “ “ being pressed for two seconds. If it doesn’t work, please refer to the following. 2. Remove the batteries for 5 seconds and then re-fill or replace with new ones.
A: The waypoint you created may not be at Yellow Stone. It is your current position. You have to create waypoint by Method 2 of “Create new waypoint”. It is to press “ ” for one second to have the page as Fig. 5-1-5 show up and then press “ practice creating a waypoint by both Method 1 and Method 2. ”. Please Q7: I find my destination and have the shortcut on but fail to return to the previous position. What should I do? A: Press “ ”.
Appendix A DATUM The Explorer supports 219 datums. You may change it by following Change Datum step by step on page. 15 in Chapter 4. Its setting is WGS-84 when you use the unit initially. Note: dX, dY and dZ are the 3 dimension tolerance with WGS-84 (scale: meter). Datum dX dY dZ 0 0 0 Ellipsoid WGS 84 Clarke 1880 Clarke 1880 Clarke 1880 Clarke 1880 1. 2. 3. 4. 5. WGS-84 Adindan Adindan Adindan Adindan -118 -14 218 -134 -2 210 -165 -11 206 -123 -20 220 6.
1966 Australian Geodetic 33. 1984 34. Ayabelle Lighthouse -2 151 -263 6 175 -38 113 International 1924 -134 229 -206 172 -29 International 1924 -6 International 1924 -83 37 124 Clarke 1880 50. Deception Island 260 12 -147 Clarke 1880 51. Djakarta (Batavia) -377 681 -50 Bessel 1841 52. DOS 1968 230 -199 -752 International 1924 53. Easter Island 1967 Estonia Coordinate 54. System 1937 55. European 1950 56.
67. European 1950 -103 -106 -141 International 1924 68. European 1950 69. European 1950 -112 -77 -145 International 1924 -84 -107 -120 International 1924 70. European 1979 -86 -98 -119 International 1924 71. Fort Thomas 1955 -7 215 225 Clarke 1880 -133 -321 50 International 1924 72. Gan 1970 73. Geodetic Datum 1949 84 -22 209 International 1924 74. 75. 76. 77. 78. 79. 80. 81. 82. 83. 84. 85. 86.
106.Mahe 1971 107.Massawa 108.Merchich 109.Midway Astro 1961 110.Minna 111.Minna Montserrat Island 112. Astro 1958 -220 -134 Clarke 1880 639 405 60 Bessel 1841 113.Nahrwan -247 -148 369 Clarke 1880 114.Nahrwan -243 -192 477 Clarke 1880 115.Nahrwan -249 -156 381 Clarke 1880 116.Naparima BWI -10 375 165 International 1924 117.North American 1927 -5 135 172 Clarke 1866 118.North American 1927 -2 152 149 Clarke 1866 119.North American 1927 2 204 105 Clarke 1866 120.
135.North American 1927 -8 159 175 Clarke 1866 136.North American 1927 -12 130 190 Clarke 1866 137.North American 1983 0 0 0 GRS 80 138.North American 1983 -2 0 4 GRS 80 139.North American 1983 140.North American 1983 141.North American 1983 0 0 0 0 1 1 GRS 80 0 GRS 80 -1 GRS 80 142.North American 1983 0 0 0 143.North Sahara 1959 Observatorio 144. Meteorologico 1939 145.Old Egyptian 1907 146.Old Hawaiian 147.Old Hawaiian 148.Old Hawaiian 149.Old Hawaiian 150.Old Hawaiian 151.
Provisional South American 1956 Provisional South 167. American 1956 166. Provisional South 168. American 1956 Provisional South American 1956 Provisional South 170. American 1956 169.
202.South American 1969, -58 0 -44 South American 1969 Peru 203.South American 1969, -45 12 -33 South American 1969 Trinidad & Tobago 204.South American 1969, -45 8 -33 South American 1969 Venezuela 205.South Asia Tananarive 206. Observatory 1925 Singapore S-Amer’69- Peru S-Amer’69Trinidad,Tobago S-Amer’69Venezuela South Asia -189 -242 -91 International 1924 Madagascar Tananarive Observ’25 Brunei; E.