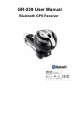
GR-239 User Manual Bluetooth GPS Receiver
About This Manual Thank you for choosing Holux GR-239 Bluetooth GPS Receiver. This manual helps you to familiarize yourself with this product to best suit your needs. Keep this manual for future reference. Warranty The GPR-239 Bluetooth GPS Receiver is warranted to be free from defects in material and functions for a period of one year from the date of purchase. If there is a product failure of within this period (under normal conditions), a replacement will be provided at no charge to the customer.
Table of Contents 1. Product Overview.......................................................................1 2. Package Contents ......................................................................2 3. Main Features .............................................................................3 4. Getting Started ...........................................................................4 4.1. Hardware Overview..............................................................4 4.2.
1. Product Overview The HOLUX GR-239 Bluetooth GPS Receiver is a complete GPS solution featuring Bluetooth and UART interface for high sensitivity to tracking signals. The GR-239 design is based on SiRF Star III Single Chip Architecture and is powered directly from a cigarette lighter, which saves the trouble of charging the device. The GR-239 is a dual-function GPS receiver.
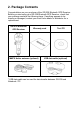
2. Package Contents Congratulations on your purchase of the GR-239 Bluetooth GPS Receiver. Before you start using your GR-239 Bluetooth GPS Receiver, check that your package contains the following items. If anything appears to be missing or damaged, contact your local Holux dealer or distributor for a replacement. GR-239 Bluetooth GPS Receiver Warranty card MMCX Active antenna (optional) Tool CD USB data cable (optional) * USB data cable can be used for data transfer between GR-239 and Notebook / PC.
3. Main Features • Compact design integrated with cigarette lighter adapter for easy use in car. • 20 parallel satellite-tracking channels for fast acquisition and reacquisition. *c • Supports NMEA0183 v2.2 data protocol or SiRF binary code. • 100% compatible with Bluetooth™ Serial Port Profile (SPP). • Designed with SiRF Star III Single Chip architecture which draws power from car battery; no power adapter required.
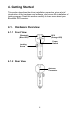
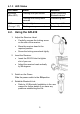
4. Getting Started This section describes the driver installation procedure, gives a brief introduction of the hardware and software, and covers the installation of testing program. Read this section carefully to learn more about your Bluetooth GPS receiver. 4.1. Hardware Overview 4.1.1 Front View Bluetooth (Blue LED) GPS (Orange LED) Power Switch Locking Screw 4.1.
4.1.3 LED Status LED Name Bluetooth (Blue LED) Status Flashing once per second GPS (Orange LED) Definition Offline/ Searching Bluetooth device Flashing once every three seconds Transferring data Constant light on Acquiring satellites Flashing once per second Position fixed 4.2. Using the GR-239 1. Adjust the Receiver Head. • Carefully unscrew the locking screw on the side of the receiver. • Move the receiver head to the required position. • Screw the locking screw back tightly. 2.
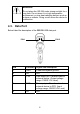
WARNING: Do not place the GR-239 under strong sunlight for a long time. Do not place it in a high temperature environment, or near heat radiating devices such as a stove or radiator. Doing so will cause the device to malfunction. 4.3. Data Port Below listed the description of the GR-239 USB data port. PIN 1 PIN 5 PIN Function Signal and description 1 GND Power and system ground. 2 NC N/A 3 TXD Data output pin. Transfers data to external device. (Output voltage range: CMOS 3.
4.4. Connecting the Antenna Connect the MMCX Active antenna to the antenna connector as shown. 4.5. Bluetooth Installation Follow the instructions below to link your GR-239 Bluetooth GPS Receiver to a PDA (Personal Digital Assistant). 1. Activate “Bluetooth Manager” on your pocket PC. Tap New, Connect, to access other devices via Bluetooth.
2. Search Bluetooth device “Holux GR-239”. Select Explore a Bluetooth device, and tap Next. 3. Search for the Bluetooth device. Tap Next, and then select Holux GR-239.
4. To establish Bluetooth link, select Connect to SPP Slave, tap Next and then Finish. 5. Tap Holux GR-239: SPP slave, and select Connect from the dropdown menu. The installation has been completed.
4.6. Installing the Testing Program You can install the GPS viewer program from the supplied CD to check current positioning and satellite signal reception. To install Microsoft Active Sync to your PC, refer to your Pocket PC manual for installation procedures. 1. Connect your Pocket PC cradle to the UART port on your PC. The Microsoft ActiveSync will detect your Pocket PC automatically. 2. Double-click the GPSViewer.exe on your PC. The Holux GPSViewer.exe program will install automatically.
3. Click Start, Programs, GPSViewer on your PDA.
4. The following screen appears after GPSViewer is opened. 5. Set Baud rate to 38400. Click the Scan button to scan for COM Port. Select your COM Port (COM1~COM10), and click Open GPS.
6. Select GPS Status to view the satellite diagrams as shown below.
4.7. Connecting to a Notebook Connect your GR-239 Bluetooth GPS Receiver to your Notebook for data transfer as shown below.
4.8. Driver Installation You need to install a driver for the USB data cable before using it to connect to your notebook or PC for data transfer. System Requirement CPU: IBM, Pentium, or other compatible PC Memory: 16 MB or above System: Windows 98/ME/2000/XP Installation: 1. Copy the driver file from
Notes: 1. The “#” represents the virtual COM port number. The default value for general UPS device is COM1. You need to configure the COM Port number in your navigation software in accordance with the USB COM port number generated by your computer. Failure to do so will result in the navigation software not being able to receive satellite signals. 2. It is prohibited to operate this system while driving your car. 3.
5. Troubleshooting Problems No position output but the timer is counting. Reasons Weak or no GPS signal can be received at the current location. Connect an external antenna (optional) to the connector on top of your GR-239, and then run the GPSViewer with cold start again. When outdoors, GPS signal is blocked by building or car roof. Go to an open space and run GPSViewer Cold start function and try again, or connect an external antenna to improve signal reception. Bluetooth function unstable.
6. Specifications Item Specification Receiver L1, C/A code Update Rate 1 Hz Acquisition Time *c Reacquisition: Hot Start: Warm Start: Cold Start: Position Accuracy *c Non DGPS (differential GPS) Position Velocity Time 0.1 sec. averaged 1 sec. averaged 38 sec. averaged 42 sec. averaged 5-25 m CEP without SA 0.1 m/sec. 1 µ sec. sync. GPS Time EGNOS/WAAS < 2.
Operating humidity 5% to 95% non condensing Protocol and interface NMEA output protocol: V2.2 Standard Baud rate Data bit Parity Stop bit Format Optional Format 38400 bps 8 N 1 GGA(1), GSA(5), GSV(5), RMC(1), VTG(1) GLL, SiRF binary Interface Compatible with Bluetooth device with Serial Port Profile (SPP) Bluetooth™ version 1.2 compliant Bluetooth™ Class 2 operation (10 meters) Frequency: 2.400 to 2.
0