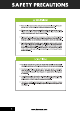
SAFETY PRECAUTIONS ® Power tools can cause serous damage if not professionally used. Safety gear must be wom before installation to prevent unexpected injuries. @ Pick an area free of hazardous condition before you start on the project. Please uss fools and power tools responsibly any loss of control and accident deaths may scour due to abuse of tools. @ Please make sure all hardware is secured on to the door is sufficiently tight. Diners with loose hardware may result in unexpected serious injuries.
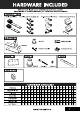
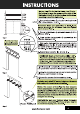
HARDWARE INCLUDED Different track length comes with different hardware quantity. Please be sure to check the hardware you should have before installation, lt Steel Hanger/Roller (2) Hex Bf (4), Com Nut (4), Washer (8) Anti-Jump Pad (2), Floor Guide {1) Door Stopper (2), Hex Wrench (1) Noo Noo Spacer (1) Erma sor Bracket (2) = Ne Bracket & Track Bolt (1) & Bracket Connector spn 0 Lag Bolt {1} Washer (1) | HARDWARE CHECKLIST Part Name AFT |A5FT! SFT |5.5FT| 6FT |6.6FT, 7FT (7.
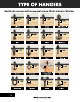
TYPE OF HANGERS Please follow the measurement stated below, measuring from the top of the door to the center of the first hole. www.homacer.
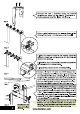
Notice: Line (1 is for the first track; Line(2 is for the bottom hole on the wall-mounting side of the U-Bracket; Line 3) is for the top hole on the wall mounting side of the U Bracket. 1. Draw & horizontal line (D using the following formula (1/2” + Door Height + 1 1/2). Reminder; Make sure you floor is level If not, please measure the distance from the highest point of your floor. 2. Draw a horizontal line (@ parallel from line (D at the distance 27/8" 3.
Connect the two L brackets using the bracket connectors as shown in the picture The shorter L bracket goes on top of the longer L bracket. Attach all the brackets onto the wall as shown in the picture. The shorter L bracket goes onto the wall. 1.Attach the second track to the bracket using the bracket & track belt and spacer for the first hole as shown in the picture. 2. install the door stoppers on a approximate position where you want the doors to stop. 3. Repeat the process for the remaining holes.
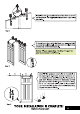
Install the anti-jump pads on top of the door as shown on the picture, it is suggested to mount them right below the track. Step-2 To mount your doors onto the track, you will have to lift your door at a slight angle and rest both wheel grooves onto the top of the track carefully. Notice: Please repent Step 7 to Step 11 again for your second door installation.
ROMANCER SLIDING HARDWARE / BARN DOORS High Quality Exquisite Design Outstanding Services ABOUT US At Homemaker, our goal is to provide the finest sliding barn door hardware products and services for our valued customers. We keep polishing our products to make their quality better, prices lower and installation easier. We make it possible for you to get everything you dean from us when you think about installing sliding barn doors. CONTACT US £ ices. Office #: 1{770) 864-5437 Website: www.