
Instructions / Assembly
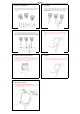

1
Remove the Try-Me Button
2
Assembling the Scarecrow Head and Controller
to the Stake
Remove the packing and take out the product carefully. Place all parts flat
on the ground. Disconnect the plug on the Try-Me Button (C) from the
controller .
Insert the non-pointed end of the Stake (D) into the connecting hole at the
bottom of each Scarecrow Head (A) and the Controller (B) until firmly
tight. Note: Handle the handle Scarecrow Head (A) with care while
performing this task.
3 Anchoring the Ground Stakes 4 Accessing Battery compartment on Controller
Insert the Ground Stakes (D) into the ground by grasping the Ground
Stake in the middle then firmly pushing into the ground. Note: Do not push
down on the top of the Scarecrow Head. This could cause breakage. Hint:
If the ground is hard use water to moisten the ground for an easier install.
Loosen the screws on the cover on the back side of the Controller (B).
Remove the back cover of the Controller away from the body of the
Controller.
5 Installing and Replacing the Batteries 6
Securing the Battery compartment cover on
Controller
Fit the batteries, requires 3 AA Batteries (sold separately), one after
another, into the Battery Compartment of the (Controller). Make sure the
Batteries are placed in the correct direction with the polarity matching
what is indicated on the inside of the Battery box.
Place the cover on the back side of the Controller. Place the screws into
the screw holes and tighten firmly taking care not to strip the threads.
7 Operating the Controller
On the back side of the Speaker is a power switch.
Move the switch to ON. This will activate the built in sound sensor. When
the sound sensor is activated the speaker will play phrases and the
Scarecrows mouths will move.
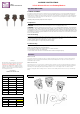
ASSEMBLY
A
D
B
B
D
C