
Instructions / Assembly

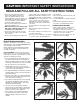

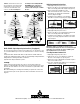


Fig. 1 Fig. 2
Fig. 3 Fig. 4
Fig. 5 Fig. 6
Branch Shaping Instructions
Available on the Customer Service page of our website
(www.nationaltree.com) are tree assembly videos that
show shaping procedures in detail.
Branch shaping is best performed during assembly
procedure but can be done, if preferred, when tree
assembly is completed.
PRE-LIT TREE NOTE: If your tree is pre-lit, and not a
PowerConnect
™
tree, it is recommended that the light
plugs between sections be connected prior to or at the
same time as shaping is performed.
1. Trees are shipped from the factory with the tips of
each branch compressed to the center (Figure 1).
Branches should be shaped one row at a time. Make
sure that all of the branches of the row to be shaped
have been moved to their lowered position.
2. Starting with the bottom row of the tree bottom
section, pull the two branch wing tips out away from
center to about a 45º angle (Figure 2).
3. The smaller individual tips should then be spread out
separately (Figure 3). Figure 4 shows a fully shaped
branch with wing tips.
4. Follow this same sequence as you work around the
bottom row of branches. When completed, move up
to the next branch row and repeat.
5. As you work your way up branch rows, the wing tip
style branches will diminish, but branches will
otherwise shape similarly. Figure 5 shows a fully
shaped branch without wing tips.
6. The top section of the tree will have wrapped
branches in place of hinged branches. Gently lower
the branches and shape in a similar manner as the
branches in previous sections (Figure 6).
7. Upon completion of the assembly and shaping
procedures, walk around the tree and perform
additional shaping to fill any obvious holes or
openings.
READ AND FOLLOW ALL SAFETY INSTRUCTIONS
• Do not use seasonal products outdoors
unless marked suitable for indoor and
outdoor use. When products are used in
outdoor applications, connect the product to a
Ground Fault Circuit Interrupter (GFCI) outlet.
If one is not provided, contact a qualified
electrician for proper installation.
• This seasonal use product is not intended for
permanent installation or use.
• When decorating trees, use miniature light
bulb strings or LED light strings only. “C”
size bulbs are not recommended.
• Do not mount or place near gas or electric
heaters, fireplaces, candles or other similar
sources of heat.
• Do not secure the wiring of the product with
staples or nails, or place on sharp hooks or nails.
• Unplug the product when leaving the house,
when retiring for the night, or if left unattended.
• CAUTION: This is an electrical product – not a
toy! To avoid risk of fire, burns, personal
injury and electric shock, it should not be
played with or placed where small children
can reach it.
• Do not let lamps rest on the supply cord or
any wire.
• Do not use this product for other than its
intended use.
• Do not hang ornaments or other objects from
cord, wire or light string.
• Do not close doors or windows on the product
or extension cords as this may damage the
wire insulation.
• Never operate this product if the power cord
or plug is damaged.
• Use only manufacturer specified replacement
bulbs.
• Read and follow all instructions that are on
the product or provided with the product.
USE AND CARE INSTRUCTIONS
• When storing the product, carefully remove
the product from wherever it is placed,
including trees, branches, or bushes, to avoid
any undue strain or stress on the product
conductors, connections, and wires.
• When not in use, store neatly in a cool, dry
location protected from sunlight.
CAUTION: IMPORTANT SAFETY INSTRUCTIONS
2