
Instructions / Assembly


3
BOTTOM MIDDLE TOP
BOTTOM MIDDLE TOP
BOTTOM MIDDLE TOP
Each carton contains one bottom section, one middle
section (larger trees include additional middle sections),
one top section and a metal tree stand.
S
pecial note about larger trees: Some of the larger
t
rees (9 ft. and taller) will include more than one middle
s
ection. If your tree contains additional middle
s
ection(s), note that each will be numbered in
a
scending order. The tree bottom section (which inserts
i
nto tree stand) will be number 1. The next section as you build up, will
b
e number 2. Section 3 will follow until assembly is completed by
inserting tree top section.
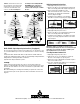
1. Remove packing material from ends of all poles. Unfold the tree stand
and partially insert the eye bolt.
The tree bottom section will have a tapered center pole. Insert the
bottom section pole into the tree stand making sure it is seated
properly (Figure 7). Tighten eye bolt.
2. Release the tie wrap holding the branches together and let the
branches fall into their lowered positions (Figure 8). Begin shaping
process (see Branch Shaping).
PRE-LIT TREE NOTE: If your tree is
pre-lit, and not a PowerConnect
™
tree,
it is recommended that the light plugs
between sections be connected prior
to or at the same time as shaping is
performed. (See Important Note
diagram.) Refer to Pre-Lit Tree Light
Connections below for descriptions
of light connection styles.
Optional: Lubricating middle section pole ends prior to assembly will
make sections easier to separate when disassembling for storage.
3. Insert the middle tree section into the bottom section. Repeat
instructions in number 2 above.
Insert additional section(s) if included and repeat instructions in
number 2 above.
4. Insert the rod of the top tree section into the green plastic opening of
the middle tree section. This is the “pole cap” which keeps tree top
section securely in place (Figure 9).
Begin shaping process (see Branch Shaping). If preferable, tree top
branch shaping can be performed before inserting into middle section
pole cap.
Assembly Instructions
IMPORTANT NOTE: When lowering
branches be extremely careful not
to tangle wire in gap between
branch and bracket.
Note: Not all low
voltage LED trees
include foot switch
Fig. 7 Fig. 9Fig. 8
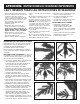
CONNECTION STYLE 1 CONNECTION STYLE 2 CONNECTION STYLE 3
continued on next page
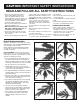
Trees with WRAPPED Branches
The assembly procedure is the same, but unlike hinged tree branches,
wrapped branches need to be individually lowered to position. Working
your way up from the bottom, gently lower all branches from their
upright setting by grasping the branch and pulling it downward (Figure
6). See Branch Shaping for proper shaping procedures.
Trees with MEMORY SHAPE
®
Branches
These tree designs do not require extensive branch shaping. Branches
fall into place during assembly. Minimal shaping may be required to fill
obvious holes or openings.
Pre-Lit Tree Light Connections
There are several variations of pre-lit tree light connections. Refer
to the below LIGHTING STYLE descriptions and supporting diagrams
to find the light connection instructions for your tree.
LIGHTING STYLES
STYLE 1: Each tree section has a light string cord that will plug into a
receptacle on the section below. The extension cord at the bottom of the
tree plugs into a standard electrical outlet or other power source.
NOTE: Trees with more than 1300 lights will include an additional
extension cord. This extension cord must be plugged into an electrical
outlet separately. We recommend using a multiple socket power strip
(not included) to accept added light set extension cords.
STYLE 2: The light string cords from all sections should be pulled down
through the center of the tree. The cords can then be plugged into each
other and then into an extension cord to power supply.
STYLE 3: Low voltage LEDs. Each tree section has a light string cord
that will plug into a receptacle on the section below. Note that the male
and female connectors are keyed and will only connect in one direction.
After connection, twist closed each connector nut securely.