
Instructions / Assembly
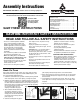

Each carton contains one top section,
one bottom section (larger trees
include one or more middle sections)
and a metal or plastic tree stand.
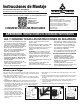
1. If your tree has a metal stand,
u
nfold it and insert the eye bolts.
Remove packing material from
ends of poles. Put bottom section
pole into tree stand making sure it
is seated properly (Figure 1).
Tighten eye bolts.
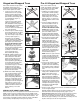
If your tree has a plastic stand,
slide legs upward into slots at
base of bottom section (Figure 2)
and tap lightly with a hammer until
secure. WARNING: Using
excessive force to assemble base
may cause breakage.
2. Insert the top tree section into the
green plastic opening of the lower
tree assembly. This is the “pole
cap” which keeps tree top section
securely in place (Figure 3).
For larger trees with middle
section, carefully insert middle
section pole(s) into bottom section
pole (Figure 4) as instructed in
SPECIAL NOTE ABOUT GIANT
TREES below. Then insert top
section into pole cap. Optional:
You may want to lubricate middle
section pole ends prior to
assembly. This will make sections
easier to separate when
disassembling for storage.
3a. HINGED TREES: Working your
way up from the bottom, gently
lower all branches from their
upright setting (Figure 5). Each
branch must be shaped to a
natural position by spreading out
the left and right tips away from
the center tip (See Shaping
Instructions on page 7). Continue
to lower branches on upper
section(s) in the same manner
making sure not to place undue
pressure on the brackets.
3b. WRAPPED TREES: Working your
way up from the bottom, gently
lower all branches from their
upright setting by grasping the
branch and pulling it downward
(Figure 6). Each branch must be
shaped to a natural position by
spreading out the left and right tips
away from the center tip (See
Shaping Instructions on page 4).
Continue to lower branches on
upper section(s) in the same
manner.
Fig. 1
Fig. 2
Fig.3
Fig.4
Fig.5
Fig.6
SPECIAL NOTE ABOUT GIANT TREES
Some of the larger trees in our product line will include more than one
middle section. If your tree contains more than one middle section,
note that each section will be numbered in ascending order. The tree
bottom section (which inserts into tree stand) will be number 1. The
next section as you build up, will be number 2. Section 3 will follow
until assembly is completed by inserting tree top section.
Each carton contains one top
section, one bottom section (larger
trees include one or more middle
sections) and a tree stand.
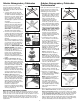
1. Unfold the tree stand and insert
t
he eye bolts. Remove packing
material from ends of poles. Put
bottom section pole into tree
stand making sure it is seated
properly (Figure 1). Tighten eye
bolts until bottom section is held
securely.
2. Insert the middle section of the
tree into the bottom section. (If
your tree has more than one
middle section, please refer to
SPECIAL NOTE ABOUT GIANT
TREES below.) Make sure that
the extension cord on the center
pole of the middle section is
hanging straight down towards
the floor with no loose slack that
could interfere with branch hinges.
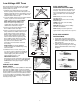
3. The light string extension cords
connected to the bottom and
middle section poles have
colored-coded tags attached at
the plug end. Depending on the
number of sections to your tree,
the light strings plug in as follows:
the cords with PURPLE tags plug
into the receptacle on the tree
section below. The cords with a
BLACK tag are plugged into an
electrical outlet (Figure 2).
NOTE: Some tree styles will have
a single extension cord that will
run from the bottom part of tree
and out to the electrical outlet. All
light strings will plug into this
single cord.
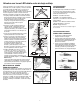
4. Insert the top section of tree into
the upper most part of middle
section. Refer to the colored tag
for instructions where to plug the
top section light string extension
cord.
5. Plug the BLACK tagged extension
cord(s) into a standard electrical
outlet or other power source.
NOTE: Trees with 1350 lights or
more will include an additional
BLACK tagged light set extension
cord. This extension cord must be
plugged into an electrical outlet
separately. We recommend using
a multiple socket power strip (not
included) to accept added light
set extension cords.
IMPORTANT NOTE: When lowering
branches be extremely careful not
to tangle wire in gap between
branch and bracket.
Fig. 1
Fig.3
BLACK
COLOR
PURPLE
C
OLOR
PURPLE
C
OLOR
Fig.2
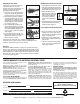
6. For best results, shape your tree while lit. For WRAPPED TREES,
see 3b on opposite page.
HINGED TREES: Working your way up from the bottom, gently
lower all branches from their upright setting (Figure 3). See
Important Note below. Each branch must be shaped to a natural
position by spreading out the left and right tips away from the
center tip (See Shaping Instructions, page 4). Continue to lower
branches on upper section(s) in the same manner making sure not
to place undue pressure on the hinge brackets.
2
Hinged and Wrapped Trees Pre-Lit Hinged and Wrapped Trees