
Instructions / Assembly
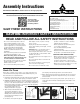


2 Commerce Drive, Cranford, New Jersey 07016 USA
RETAIN FOR YOUR RECORDS:
Tree Style No. UPC Code
Store Where Purchased
Date Purchased Price
LIMITED WARRANTY FOR ARTIFICIAL CHRISTMAS TREES
Please read this warranty thoroughly and familiarize yourself with
its restrictions and requirements.
National Tree Company warrants its trees against manufacturer-
only defects for a period of five (5) years from the date of
purchase indicated on your sales receipt. (White Trees, one year).
Manufactured defective parts will be repaired or replaced.
The lights on Pre-Lit Trees are warranted for a period of two (2)
years from date of purchase; three (3) years for low voltage
LED trees (see below).
This Warranty does not apply to trees that are used as display
trees in the store. This tree is for indoor use only. Outdoor use of
this tree voids the warranty.
PRE-LIT TREES LIMITED WARRANTY
National Tree Company warrants the light sets on its Pre-Lit trees
against manufacturer-only defects in material or
workmanship for a period of two (2) years from date of
purchase; three (3) years for low voltage LED trees. Culpability
of Company is limited to replacement of defective light set only.
To have the Warranty placed into effect, completed online
registration of product is required with inclusion of sales
receipt noting purchase date and place. New product registration
SAVE YOUR SALES RECEIPT. It will be needed when requesting warranty service.
can only be completed online at www.nationaltree.com.
Shipping Costs under PRE-LIT WARRANTY TERMS: Please
note the following terms regarding shipping of product for
warranty service:
1) National Tree Company will pay the cost of shipping (to our
facility and back to customer), under warranty terms, during the
first season of use. Receipt dated prior to December 25 of
purchase year constitutes first season of use. Please note that it
is the responsibility of the customer to obtain a box of the smallest
possible size and shape to securely contain the part being shipped.
2) After the second season of use, the customer will be
responsible for cost of delivery to our facility. National Tree
Company will pay the return cost delivery of parts repaired due
to manufacturing defect. Customer will be responsible for return
shipping cost of any parts repaired due to misuse or neglect.
3) All shipping costs to and from our facility for warranty service
after the third season of use will be the responsibility of the
customer.
REQUIREMENTS FOR WARRANTY SERVICE:
Customers are required to contact National Tree Company
for AUTHORIZATION OF RETURN prior to shipping product
for warranty service.
Remove all holiday decorations. Gently press tips back into center
branch. Raise all branches to original upright position taking care not
to place undue pressure on the attached ends of the branches. When
disassembling tree, a twisting motion will help to separate the sections
from each other. All tree parts can be replaced in carton and should
be stored in a cool, dry place.
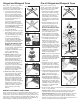
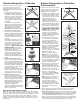
Shaping the tree branches is the last
step of assembly. The care and
attention given to this final process will
r
esult in a genuinely beautiful and
appealing holiday centerpiece.
1. Every tree style is shipped from the
f
actory with the tips of each branch
compressed to the center (Figure 1).
2. Each branch tip must be shaped to
i
t’s proper position to give the tree a
natural look. This is done by gently
grasping the left and right wing tips
and spreading them out away from
the center tip (Figure 2).
3. Each individual tip should then be
spread out separately. Tips should
then be bent slightly upward to add a
more natural looking appearance.
Figure 3 shows a typical tree branch
after shaping.
4. As you shape closer to the top, the
branches will not have wing tips, but
will otherwise shape in the same
manner as lower sections.
Fig. 1
Fig. 2
Fig. 3
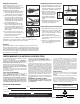
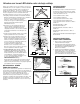
1. Unplug light string from power source.
2. Pull up on the Bulb Lock unlatching
the bulb from the bulb socket. Gently
pull the bulb straight out (Figure 1).
3. Before inserting the new
b
ulb into socket, make sure
that the two wires on either
side of the the bulb base
are straight up and flush
with the base (diagram at
right).
4. Carefully insert new bulb into socket
and push down Bulb Lock until it
snaps into place (Figure 2).
Fig. 1
Fig. 2
The branch tips of Hook-On trees should be shaped prior to
attachment to center pole. The tips of Hinged and Wrapped trees
should be shaped after they have been lowered.
To receive authorization of return, email us at service@
nationaltree.com or call 1-888-494-PART (7278). Information
required will include: product item number, UPC bar code number,
name of store where purchased, a detailed description of the
problem, and your address and phone number.
At the discretion of National Tree Company, you may either
receive a replacement part or be instructed as to which part(s)
to ship prepaid to National Tree for our inspection and
determination and/or possible repair. Replacement or repair as
provided by this limited warranty is our exclusive remedy to the
consumer and does not place National Tree Company liable for
any incidental or consequential damages.
IMPORTANT NOTES:
Removing factory attached functioning or non-functioning light
strings from any section of your pre-lit tree will void the
warranty.
Please retain the product carton for storage purposes and/or for
use in the event of warranty service for product shipment.
Keep product away from heat and moisture. This limited warranty
does not cover damage resulting from accident, misuse, abuse,
negligence, or normal wear. In these instances, parts can be
purchased at a reasonable fee plus shipping charges.
4
1. Unplug light string from power source.
2. Fuses are located in light string plug.
Slide the fuse access cover away
from cord side (in direction of arrow,
Figure 3) exposing fuses.
3. Remove fuses from compartment
and examine. Replace burnt out fuse
with new one.
4. Close fuse compartment by sliding
access cover back in towards cord
side of plug (Figure 4).
Fig. 3
Fig. 4