
Instructions / Assembly


Christmas Tree
Model: TG66M2AGNL00
Sku # XXXX XXX XXX
IMPORTANT SAFETY
INSTRUCTIONS
a. READ AND FOLLOW ALL
SAFETY INSTRUCTIONS.
b. This product is for indoor use only. The electrical rating is
0.1A 120V 60Hz.
c. This seasonal product is not intended for permanent installa
tion or use.
d. Do not mount or place the product near gas or electric
heaters, fireplaces, candles, or other similar sources of heat.
e. Do not secure the wiring of the product with staples or nails,
or place on sharp hooks or nails.
f. Do not let lamps rest on the supply cord or on any wire.
g. Unplug the product when leaving the house, when retiring
for the night, or if left unattended.
h. This is an electric product and not a toy! To avoid risk of fire,
burns, personal injury and electric shock it should not be
played with or placed where small children can reach it.
i. Do not use this product for other than its intended use.
j. Do not hang ornaments or other objects from cord, wire, or
light string.
k. Do not close doors or windows on the product or extensions
cords as this may damage the wire insulation.
l. Do not cover the product with cloth, paper, or any material
that is not a part of the product when in use.
m. Read and follow all instructions that are on the product or
provided with the product.
n.
SAVE THESE INSTRUCTIONS
When using electrical products, basic precautions should always-
be followed, including the following:
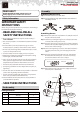
Package Contents
Pre-Assembly
Part
A
B
C
D
Description
Tree top
Tree center, Sticker 2
Tree center, Sticker 1
Tree stand
Quantity
1
1
1
1
Safety Information
Tree Top
Section 2
Section 1
Insert
Green Label
Plug Into Wall
Outlet
Assemble
Red Labels
Together
Assemble
Yellow Labels
Together
S100
S50
S100
Top view
Side view
Assembling the tree
Assembly
Assembling the tree stand
Step 1.
Choose a location near a wall outlet.
Step 2.
Insert and slide the legs upward into the slots of the base
until firmly secured.
Step 1. Remove the protective caps from the tree bottom and insert
the pole into the tree stand.
Step 2. Continue by inserting the upper tree section(s) to the lower
section(s) until inserting the tree top.
Step 3. Shape the branches to your preference by working from the
bottom to the top. When adjusting branches, ensure that all
wires are free of branch hinges.
Step 4. Connect the light strings as per the color labels indicated in
attached photo and insert green label plug into the wall
outlet.
Step 5. Shape the tree from the bottom to the top. Start with the
branches farthest from the pole – fan out in a star shape,
and continue until the entire tree is shaped.
Step 6. When finished shaping the branches, slightly upsweep all
branch tips for a uniform look.
TM
NEED HELP?
DO NOT RETURN TO STORE. PLEASE VISIT US AT:
www.polygroupstore.com OR 1-877-527-0313