
Instructions / Assembly


Safety Information
IMPORTANT SAFETY
INSTRUCTIONS
a. READ AND FOLLOW ALL
SAFETY INSTRUCTIONS.
When using electrical products, basic precautions should
always be followed, including the following:
b. Do not use seasonal products outdoors unless marked
suitable for indoor and outdoor use. When products are
used in outdoor applications, connect the product to a
Ground Fault Circuit Interrupting (GFCI) outlet. If one is
not provided, contact a qualified electrician for proper
installation.
c. This seasonal product is not intended for permanent
installation or use.
d. Do not mount or place the product near gas or electric
heaters, fireplaces, candles, or other similar sources of
heat.
e. Do not secure the wiring of the product with staples or
nails, or place on sharp hooks or nails.
f. Do not let lamps rest on the supply cord or on any wire.
g. Unplug the product when leaving the house, when
retiring for the night, or if left unattended.
h. This is an electric product and not a toy! To avoid risk of
fire, burns, personal injury and electric shock it should not
be played with or placed where small children can reach it.
i. Do not use this product for other than its intended use.
j. Do not hang ornaments or other objects from cord, wire,
or light string.
k. Do not close doors or windows on the product or exten
sions cords as this may damage the wire insulation.
l. Do not cover the product with cloth, paper, or any materi
al that is not a part of the product when in use.
m. This product is equipped with push-in type lamps. Do not
twist lamps.
n. Read and follow all instructions that are on the product
or provide with the product.
o.
SAVE THESE INSTRUCTIONS
Step 1
. Choose a location near a wall outlet.
Step 2
. Unfold the legs of the tree stand and lay the stand
on the floor.
Step 3
. Slide the locking disk of the tree stand down until it
snaps into place.
Assembling the tree
This tree assmebles with Quick Set® technology
---Set up and light up your tree in less than 10 minutes!
Step 1
. Remove the protective caps from the tree bottom
and insert the pole into the tree stand.
Step 2
. Continue by inserting the upper tree section(s) to
the lower section(s) until inserting the tree top.
Step 3
. Shape the branches to your preference by working
from the bottom to the top. When adjusting branches,
ensure that all wires are free of branch hinges.
Step 4
. Insert the adapter into the wall outlet. All your lights
should now be lit.
Step 5.
Shape the tree from the bottom to the top. Start with
the branches farthest from the pole – fan out in a star
shape, and continue until the entire tree is shaped.
Step 6
. When finished shaping the branches, slightly
upsweep all branch tips for a uniform look.
Assembly
Assembling the tree stand
Pre-Assembly
Package Contents
Part Description Quantity
A Tree top 1
B Tree center, Sticker 2 1
C Tree center, Sticker 1 1
D Tree stand 1
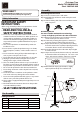
Christmas Tree
Model: TG70M3BBKD00
Sku # 1005 265 069
Tree top
Section 2
Section 1
Control box
Adapter
To Be Plugged
Into Wall
Outlet
Foot Pedal
on/off Switch
Top view
Side view
TM
NEED HELP?
DO NOT RETURN TO STORE. Call: 1-877-527-0313
Form 8am to 5pm EST, Monday through Friday.
Align both arrows
in a straight line
before sliding
down to insert
Open the
cap cover
Do Not Tamper
Internal Parts
100S
50S
100S
100S