
Instructions / Assembly

Christmas Tree
Model: TG90P4942D02
Sku # SC10-609
Pre-Assembly
Package Contents
Part Description Quantity
A Tree top 1
B
Tree center, Sticker 2 1
C
Tree center, Sticker 1 1
D Tree stand 1
NOTE: If some bulbs do not light or flicker, search for any
loose plugs and/or broken, loose, or missing bulbs. Replace
bulbs promptly with the replacement bulbs provided in
order to maintain the performance and life expectancy of
your tree.
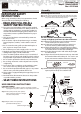
Step 1. Connect the light strings of the tree together and
plug the adaptor into a wall outlet.
Step 2. If the tree comes with a foot pedal, step on the
On/Off button.
Operation
Turning on the tree
This tree package includes hinge pins, washers and bulbs
for any replacement or repair that you need to perform on
your tree. If extra parts are needed, contact the Customer
Service Team at 1-877-527-0313 between the hours of 8 am
and 5 pm EST, Monday through Friday.
Repairing Loose Hinges
Step 1. Place the branch into the slot of the bracket
Step 2. Insert a new hinge pin through the holes of the
bracket and secure with a washer.
Maintenance
Spare parts
1. Before using or reusing, inspect product carefully. Discard
any products that have cut, damaged or frayed wire
insulation or cords, cracks in the lampholders or enclo
sures, loose connections, or exposed copper wire.
2. Before disassembling the tree, unplug the tree and
remove all ornaments and decorations.
3. Gently lift the tree top straight up to remove from the
center section and fold all branches towards the pole.
4. Repeat this step for the center and bottom tree sections.
5. When storing the product, carefully remove the product
from wherever it is placed, including tree, branches, or
bushes, to avoid any undue strain or stress on the product
conductors, connections, and wires. Cover the protective
cap on the poles to avoid damaging
the internal parts.
6. When not in use, store neatly in
a cool, dry location protected
from sunlight.
Use and Care Instructions
Troubleshooting
Problem Solution
The tree does
not light
Ensure that all tree sections are
plugged into each other and that the
tree is plugged into the wall. If your
tree came with a foot pedal, step on
the On/Off button.
Check for loose, broken, or missing
bulbs and replace as needed with the
replacement bulbs provided
CAUTION: Use only power adaptor that was
provided with this product. Using a different power adaptor
will damage the lights and cause fire, electrical shock azard.
INSTALLATION AND REPLACEMENT OF BATTERIES –
REMOTE CONTROLLER:
• Use ONLY AAA size (LR03) batteries.
• For longer battery life, use alkaline batteries.
• WARNING: CHOKING HAZARD - AAA BATTERIES ARE
SMALL PARTS, KEEP AWAY FROM CHILDREN.
• Do not expose light set to moisture.
• Do not mix old and new batteries.
• Do not mix alkaline, standard (Carbon - Zinc), lithium, or
rechargeable (NiCd, NiMH or other type) batteries.
• Remove batteries when not used for an extended period
of time, or when depleted.
• Dispose of used batteries properly by following directions
on batteries.
• Clean the battery contacts prior to battery installation.
• DO NOT DISPOSE OF BATTERIES IN FIRE. BATTERIES MAY
EXPLODE OR LEAK.
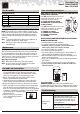
HOW TO USE THE DUAL COLOR LIGHT CONTROLLER
AND REMOTE CONTROL:
User servicing instructions
A selector
button
B selector
button
Press A selector button on the “Dual
Color Light Controller” or “Remote
Controller” to select among:
(1) CLEAR AND MULTI-COLOR
ALTERNATING; (2) CLEAR LIGHTS;
(3) MULTI LIGHTS
Press B selector button on the “Dual
Color Light Controller” or “Remote
Controller” to select among:
(1) COMBO (2) STEADY
(3) SHIMMER (4) STARFIELD
(5) CHASER (6)LIGHTING
(7) STACKER
TM