
Instructions / Assembly
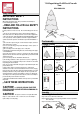


Assembling the tree
Please remove protective covers from the base of the pole for each tree
section before assembling.
Step 1. Insert tree bottom (D) into the tree stand and tighten the screw.
(See Fig. 1)
Step 2. Insert lower middle section (C) into the tree bottom (D). (See Fig. 2)
Step 3 Insert upper middle section (B) into the lower middle section (C).
(See Fig. 3)
Step 4. Insert tree top (A) into the upper middle section (B). (See Fig. 4)
Warning: There is a tree top connector on the tree top (A). Do
not overload. Connect other lighting strings or tree toppers
end-to-end up to a maximum of 216 Watts (1.8 Amps). Do not
interconnect low-voltage products.
Step 5. Insert the provided power cord into the connector on the tree
bottom (D) in right direction porperly and tightly (always match the
protuberance of the end connector of power cord to the concave
of the connector found on the tree bottom (D) according to the
magnified drawing on fig. 5.).
Step 6. Allow branches to fall into place or gently pull branches up and out.
When adjusting branches be sure that all wires are free of branch
hinges. (See Fig. 6)
Step 7. Shape the branches. Starting with tips closest to the pole, shape
one tip to the right, one to the left and one at the center of the main
stem. Repeat pattern for each branch. (See Fig. 7)
Step 8. Plug the power cord into a proper outlet. The plug F1 controls the
tree top lights. The plug F2 controls the tree lights. This tree comes
with a control box and a remote control. You can change the
lighting patterns of the tree by using control box or remote control.
Please see Instructions of control box and remote control as
below.
Operation
Turning on the tree
Step 1. Connect each tree section well and plug the power cord into a wall
outlet.
Instruction of control box and remote
control
Instruction of control box
1. Press the ON/OFF Timer button on control box to turn on and off
timer function.
2. Press the Timer button on control box to select below timer hours:
i. Indicator lights of timer on control box turn on at 2 position:
The tree lights will automatically run through a 2-hours
ON, 22-hours OFF cycle.
ii. Indicator lights of timer on control box turn on at 4 position:
The tree lights will automatically run through a 4-hours
ON, 20-hours OFF cycle.
iii. Indicator lights of timer on control box turn on at 6 position:
The tree lights will automatically run through a 6-hours
ON, 18-hours OFF cycle.
iv. Indicator lights of timer on control box turn on at 8 position:
The tree lights will automatically run through an 8-hours
ON, 16-hours OFF cycle.
No memory mode on timer whether the tree or the timer is
re-started.
Instruction of remote control
Please note this tree has a remote control.
Please pull out the insulation tape from the remote control, before starting
to use it.
1. Press the button ON or OFF to turn on or off the lights.
2. Press the 2H, 4H, 6H or 8H button to select the different timer hours.
If the remote control does not work, check whether the battery of the
remote control is out of power.
To replace the remote control battery:
1. Replace with a new button cell “CR2025” (3 volt)
into the compartment.
CAUTION: DO NOT DISPOSE OF
BATTERIES IN FIRE. BATTERIES MAY EXPLODE
OR LEAK.
Maintenance
Replace the fuse.
Power cord plug F1 fuse replacement (replaceable 3 amp, 125 volt fuse
is located in spare parts bag):
1. Grasp plug and remove from the receptacle or other outlet device. Do
not unplug by pulling on cord.
2. Open fuse cover. Slide open the fuse access cover towards the
blades of the attachment plug.
3. Remove fuse carefully.
4. Risk of fire. Replace fuse only with 3 Amp,
125 Volt fuse (provided with product).