HomeAutomation,Inc.
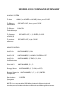
MODEL 1503 COMMAND SUMMARY ALARM SYSTEM To Arm AWAY (or ASLEEP or HOME), then your CODE To Silence and Disarm SECURITY-OFF, then your CODE To Silence CANCEL Trouble beeps To Bypass a Zone (2) To restore all zones SECURITY-OFF, *, 2, ENTER, CODE. SECURITY-OFF, #, #, CODE. HOME CONTROL Unit 2 On UNIT-NUMBER, 2, ON Unit 5 Off UNIT-NUMBER, 5, HOME-CONTROL-OFF Unit 5 On UNIT-NUMBER, 5, TIME, 6, 0, ON.
Model 1503 Owner's Manual Contents 1. INTRODUCTION .................................................................................. 6 UNDERWRITER’S LABORATORIES (UL) LISTING ................................................. 6 2. OVERALL DESCRIPTION .................................................................. 7 DIFFERENCES BETWEEN “VERSION 2” AND “LC” MODELS ................................ 7 OVERALL DESCRIPTION OF SYSTEM ....................................................................
Home Automation, Inc. 4. HOME CONTROL .............................................................................. 23 X-10 POWERHOUSEtm MODULES ........................................................................ 23 MODULE TYPES ...................................................................................................... 23 HOUSE CODES........................................................................................................ 24 UNIT NUMBERS ......................................
Model 1503 Owner's Manual SHOW PROGRAMS FOR ALL UNIT NUMBERS .................................................... 44 SHOW PROGRAMS FOR ONE UNIT NUMBER ...................................................... 44 SHOW SECURITY PROGRAMS.............................................................................. 45 SHOW ALL BUTTON PROGRAMS .......................................................................... 45 SHOW PROGRAMS FOR ONE BUTTON ................................................................
Home Automation, Inc. 9. SET-UP................................................................................................ 64 SET TIME .................................................................................................................. 64 SET DATE ................................................................................................................. 64 CATEGORIES ...........................................................................................................
Model 1503 Owner's Manual DIAL TYPE ................................................................................................................ 72 MY PHONE NUMBER ............................................................................................... 72 DIAL OUT NUMBER 1 .............................................................................................. 73 DIAL OUT 1 ON .........................................................................................................
Home Automation, Inc. 1. INTRODUCTION Thank you for purchasing your new Home Automation system. You are about to enjoy a new feeling of security, peace of mind and convenience in your home. We at Home Automation, Inc. hope that you will take a few moments to become familiar with all of the features of our fine product by reviewing this manual. Please keep this manual on file for future reference. In the event that there are any questions, please call your dealer first.
Model 1503 Owner's Manual 2. OVERALL DESCRIPTION This section describes your system. It is recommended that you read this section to understand the terms in the following sections. DIFFERENCES BETWEEN “VERSION 2” AND “LC” MODELS This Owner's Manual covers two products: 1. Model 1503 Version 2 2. Model 1503-LC The Model 1503-LC is a “lite” Model 1503 Version 2. The -LC has all of the major features of the Version 2, but is not expandable.
Home Automation, Inc. f. Control Modules - Each light or appliance to be controlled by the System is plugged into or wired into a control module that can receive commands over the existing electrical wiring in your home from the Control/Communicator. g. Optional Programmable Energy Saver Modules (Model 1101 PESM) - Central heating and air conditioning (HVAC) systems can be connected to this module so that the HVAC system is set back automatically when you leave the house or by schedule. h.
descriptions are normally entered by your dealer. See SET-UP, NAMES.) Whenever a zone, unit, or button must be specified, the SHOW key may be pressed to show the name for the first zone, unit, or button. Alternatively, the number for a specific zone, unit, or button may be entered before pressing the SHOW key to display the name for that particular item. The SHOW and SETUP keys may then be used to scroll through the list of names.
Model 1503 Owner's Manual 3. SECURITY SYSTEM OPERATION correctly disarmed the system, and the GREEN indicator on the SECURITY-OFF key will light. DISARMING THE SECURITY SYSTEM and SILENCING ALARMS If an incorrect code is entered, the words INVALID CODE will appear on the display and the console will beep three times. Before going any further, you should know how to turn your alarm system OFF.
Home Automation, Inc. The HOME mode is intended for use when you and your family are in your home, and you wish to have doors and windows armed, but no interior motion detectors armed so that your family may move about freely inside the house. (PANIC, TAMPER and FIRE zones are always armed, as are the three EMERGENCY buttons on the console.) In the HOME mode, there is an ENTRY DELAY on the ENTRY-EXIT zone, so that an arriving family member can turn off the alarm before it sounds.
Model 1503 Owner's Manual If you do enter through an ENTRY-EXIT zone first, then the other zones are disabled during the ENTRY DELAY, in case you have to cross through another zone to get to your console (an interior motion detector, for example.) To put your system in the AWAY mode, Press the AWAY key. Press your code number on the keypad. The console will beep once and the red indicator on the AWAY key will light. Leave your home and close the door promptly.
Home Automation, Inc. then enter your master code number. The console will beep once, and the time, date and status display will return. The bottom line will now read “UPSTAIRS WINDOW BYPASSED” to remind you that the zone is bypassed. RESTORING ZONES Restoring a zone puts it back on active duty in the system. When restored, the BYPASSED indication will no longer be displayed on the status line and the zone will be checked for alarm and trouble conditions.
Model 1503 Owner's Manual EMERGENCY BUTTONS There are three buttons on the console surrounded by a border marked EMERGENCY. These buttons are labeled FIRE, POLICE and MEDICAL. There are actually two switches under each of these buttons. Touch each button lightly with your fingertip and you will feel two bumps under each one. In order to activate one of the emergency buttons, BOTH of these bumps must be pressed simultaneously using two fingers, and held for approximately 1 second.
Home Automation, Inc. - The system now waits the OUTSIDE SIREN DELAY. (0 - 60 seconds) - The Outdoor Siren is activated, which makes a loud, continuous sound. - The system now waits the DIAL OUT DELAY. (0 - 60 seconds) - The in house phones are seized (or disconnected) and the Model 1503 begins to dial out. If you are having your system monitored by a central station, the central station will be sent a code representing the type of alarm (burglary) and zone involved.
Model 1503 Owner's Manual When the FIRE alarm is activated by the smoke/fire detector(s), the alarm responds exactly as described under BURGLAR ALARM ACTIVATED, except: - The console display reads “FIRE ALARM! ZONE NAME TRIPPED” - The interior sounder will pulse on and off to distinguish the fire alarm from the burglar alarm. - The outside siren will pulse on and off to distinguish the fire alarm from the burglar alarm - The Central Station (if used) will receive a FIRE ALARM signal.
Home Automation, Inc. - The console display will read “FIRE ALARM - FIRE EMG BTN TRIPPED”. - The Central Station (if used) will receive a Fire Emergency Button signal. - The voice dialer dials out using the FIRE DIAL ORDER with the following message: “EMERGENCY... EMERGENCY... THE FIRE EMERGENCY BUTTON HAS BEEN ACTIVATED AT THE FOLLOWING ADDRESS: (your address is spoken here*) PHONE NUMBER (your phone number) PLEASE RESPOND IMMEDIATELY.
Model 1503 Owner's Manual When the last call is made in the MEDICAL DIAL ORDER, the house phones are reconnected and the system stops dialing. - The console beeper continues to sound and the lights continue to flash until the alarm is turned off. At any time, the alarm system can be turned off by the console. Medical alarms can also be turned off by pressing the CANCEL key. DURESS CODE ENTERED or DURESS ALARM ACTIVATED (See DURESS CODE for a description of when to use the DURESS CODE.
Home Automation, Inc. tinue to flash. The dialer will continue to dial until all numbers have been dialed. ALARM CANCEL At any time, you can silence your alarm system by pressing the SECURITY-OFF key and entering your code. If the system has reported, or is in the process of reporting an alarm to a central station, it will send the alarm code followed by a code indicating that the alarm has been canceled by the user.
Model 1503 Owner's Manual nected and that the battery fuse (in line with the red wire connected to the battery in the Model 1503 Control/Communicator) is good. The BATTERY LOW indication will remain until the next battery test is run, 1 hour later, or when a SHOW TEST command is given. - COMMUNICATOR TRBL NOW: Indicated if the digital communicator (not the voice dialer) was unable to make contact with the Central Station after trying both numbers multiple times.
Home Automation, Inc. the LARGER of the two cables (marked PHONE LINE on the processor board) plugged into the Model 1503 Processor board to be sure that it is firmly connected at both ends. To silence the trouble beeps on the console, press the CANCEL key. If more than one type of trouble has occurred, the display will show each one for two seconds. Pressing the CANCEL key will acknowledge all trouble indications. If the trouble condition occurs again, the console beeper will beep again. See SET-UP MISC.
4. HOME CONTROL The home control features of the Model 1503 make it easy and convenient to control almost any light or appliance from the console or over the telephone. You may also have your heating and air conditioning (HVAC) system under control of the system, which will allow it to save energy dollars by setting the temperature appropriately when you are home, asleep or away. (The Home Control functions have not been investigated by Underwriter's Laboratories.
Home Automation, Inc. Compatible” will work with the Model 1503. The modules come in various types, which are briefly described below: MODULE TYPES There are two basic types of modules, LAMP MODULES and APPLIANCE MODULES. When placing items under remote or automated control, always give due consideration to the safety aspects of turning an appliance on or off without being present to watch it. For example, do not activate dangerous appliances by remote control or on a timed basis.
17 - 32 first Model 1102* 33 - 48 second Model 1102* 49 - 64 third Model 1102* 65 - 80 fourth Model 1102* 81 - 96 X-10 modules 1 16, House Code X+1 97 - 112 1 - 16, X-10 modules Model 1503 Owner's Manual TURNING UNITS ON AND OFF On the left hand side of the console, there are four keys surrounded by a border marked HOME CONTROL. These keys are used to turn modules on and off, or brighten and dim lamp control modules.
Home Automation, Inc. Note: Only lamp modules and wall switch modules marked “for incandescent lamps only” will respond to dim and brighten commands. To dim a unit, press the UNIT-NUMBER key, then enter the unit number (or scroll to it using the SHOW and SET-UP keys) then press the * key on the keypad. The console display top line will read “UNIT NAME DIMMER” (unit name being the description of the unit number you entered) and the bottom line will read “1-9 (STEPS DIMMER)”.
The output may be turned ON for 199 minutes, then OFF; or turned OFF for 1-99 minutes then ON. To enter a timed on/off command, press the UNIT-NUMBER key, enter the unit number (or scroll to it using the SHOW and SETUP keys), press the TIME key, enter the on/off time in minutes, then press the ON or OFF key. For example, to turn unit 11 on for 10 minutes then off, press UNIT-NUMBER, 11, TIME, 10, ON. To turn unit 3 off for 30 minutes then on, press UNIT-NUMBER, 3, TIME, 30, OFF.
Home Automation, Inc. should be set to the desired normal temperature. Only when the energy saver is on will the temperature be allowed to deviate from your normal thermostat setting. There are three temperatures associated with each Model 1101 PESM: - Temperature - this is the air temperature read by the PESM. - LO temperature - the air temperature will be allowed to fall to this temperature when the energy saver is on.
When you are finished, press CANCEL twice to return to the time, date and status display. There is an alternative way to control energy saver modules using the UNIT-NUMBER key. To turn energy saver module 17 off, press UNIT-NUMBER, 1, 7, OFF. To turn energy saver module 18 on, press UNIT-NUMBER, 1, 8, ON. To change the LO temperature of energy saver module 17 to 65 degrees, press UNIT-NUMBER, 1, 7, *, 6, 5, ENTER.
Home Automation, Inc. Outdoor temperature zones have a HI and LO temperature associated with them that can be used for control purposes. An example where the bathroom heat is turned on if the outdoor temp goes below 60 degrees is shown in the PROGRAMMING section. HI and LO temperatures are changed the same way as the PESM. The outdoor temperature is annunciated over the telephone as part of the status menu (main menu selection 6).
these outputs, such as a sprinkler system, your dealer will explain its operation. Auxiliary outputs cannot be brightened or dimmed. Auxiliary outputs are NOT affected by ALL ON or ALL OFF commands.
Home Automation, Inc. determines which unit numbers to skip by looking at the number of expansion enclosures. If there are none, then units 20 - 80 are not used. In scrolling up and down, the display will jump from unit 19 to unit 81 when you press the up arrow key, and from 81 to 19 when you press the down arrow key. If expansion enclosures are installed, the display will show the unit numbers used by the expansion enclosures.
while you are programming, simply press the CANCEL key to get back to the status display. Then you can see which alarm is sounding and disarm the system. It is recommended that you program the system with the security system OFF. PROGRAM STORAGE When you program your system, programs are stored in a type of memory called battery backed RAM in the Model 1503 Control/Communicator. These programs will not be lost even if AC power fails, even if the battery is dead (but not disconnected).
Home Automation, Inc. ON. The display will now read “BEDROOM LIGHT ON - 12:00 AM 11/08 *IF”. This is the program that you are preparing to enter, which is, “Turn BEDROOM LIGHT On at 12:00 AM on date 11/08.” The Model 1503 assumes the time of 12:00 AM, and uses today’s date as a default for the program date. The *IF is for conditionals. Ignore it for now. Press the TIME key to change the time. The display will read “TIME: 12:00 AM HHMM AM PM”. Press 6, 0, 0, PM.
The display will read “FRONT PORCH OFF - 12:00 AM 11/08 *IF”. Model 1503 Owner's Manual then the zone number to bypass or restore, then enter your master code.) Press TIME, AM. The display will read “FRONT PORCH OFF - SUNRISE 11/08 *IF”. The display will now read “PROGRM AWAY 12:00 11/08 *IF.” Press TIME, 1, 0, 3, 0, PM. Now press the DATE-DAY key once. Press DATE-DAY 1, 1, 1, 0, ENTER. The display will read “DATE: 11/ 08 - MMDD DAY” Enter 1, 1, 0, 9, then press ENTER. (for 11/09, tomorrow.
Home Automation, Inc. want this program to run. 0=ONCE means that it will only run once, on the date that is entered if you press the DATE-DAY key only once, as you did in the previous example. You may change back to a one time program by pressing the DATEDAY key. The DATE menu will reappear and you can enter the date for a one time program. The DAY(S) will be set back to ONCE.
Model 1503 Owner's Manual Press ENTER. The console will beep as the program is entered into memory. EXAMPLE 6: Program the security system to OFF weekday mornings at 7:30 AM, IF it was previously armed in the ASLEEP mode. Press PROG key if you aren’t already at the PROGRAM: menu. Press (Security) OFF, then your MASTER CODE. Press TIME, 7, 3, 0, AM. Press DATE-DAY, DATE-DAY, WEEKDAYS, ENTER. The display will now read “PROGRM OFF 7:30 AM MTWTF—*IF”. Now press *, ASLEEP.
Home Automation, Inc. entry delay in the ASLEEP mode. If you forget and come home late one night, the security system will be on, but the entry delay will allow you to turn it off before the interior sounder comes on. 2. If you program the system to disarm itself, be sure to conditionalize it as shown in Example 6 so that it won’t disarm when you don’t intend it to. BUTTONS A powerful feature of the Model 1503 is the ability to program BUTTONS.
- Press PROG, * (for program a button) - Enter the button number, then ENTER - If a conditional is desired, press *, then the conditional (i.e. *, PM for “if dark”) - Enter the command (i.e. UNITNUMBER, 2, ON) - Press ENTER to save the program in memory. Repeat this procedure for each command that you want a button to perform. You can also name the button so that a description of the button appears on the display. (See SET UP NAMES...
Home Automation, Inc. The display will read “GO TO BED: MASTER ASLEEP” Press the ENTER key. The console will beep once and the program will be entered into memory. Button 3 is now programmed for the GO TO BED example. TO SEE YOUR BUTTON PROGRAMS To see the programs for BUTTON 3, press CANCEL to get back to the time, date and status display. Now press SHOW, PROG, *, 3, ENTER. The first program for BUTTON 3 will appear on the display. Press SHOW to see the second and third programs for BUTTON 3.
Buttons can be programmed to run on a time and date or day schedule exactly as any other command. Buttons can be programmed as one-time programs or repeating programs. EXAMPLE: Program BUTTON 2 to run at 6:00 PM every weekday, Press PROG (from the time, date and status display) Press 2, ENTER. (The button number that you wish to program) The display will read “RUN BUTTON 2: 12:00 AM 11/08 *IF”. Press TIME, 6, 0, 0, PM. Press DATE-DAY, DATE-DAY, 8, ENTER.
Home Automation, Inc. into the alarm state. So we program button 21 to turn unit 5 on for 5 minutes. Press *(button), 1, 7, 8, ENTER, UNITNUMBER, 1, 7, ON. Press PROG, *(button), 2, 1, ENTER, UNIT-NUMBER, 5, TIME, 5, ON. The display should read “WHEN AWAY: - ENERGY SAVER ON”. The display should show “WHEN Z6 ALM: - STAIRWELL ON FOR 5”. Press ENTER to commit the program to memory. Press ENTER to commit the program to memory.
To allow a program to only be executed if time clock 2 is on/enabled, press *, TIME, 2, ON. To allow a program to only be executed if time clock 3 is off/disabled, press *, TIME, 3, OFF. To allow a program to only be executed if zone 5 is closed/secure, press *, 5, OFF. To allow a program to only be executed if zone 13 is open/in alarm, press *, 13, ON. Model 1503 Owner's Manual When programming buttons, the conditional must be selected before the command for that button is programmed.
Home Automation, Inc. occur only during a normal Monday through Friday 9:00 - 5:00 work week. Enable and disable times for each of the three time clocks may be specified under SET-UP MISC, TIME CLOCKS. BUTTONS ACTIVATING OTHER BUTTONS It is possible to program a button to activate another button.
IMPORTANT Inthiscase,programs NOTE:associated Do not program withbuttona button 183 will to call itself (for example: PROG, only*, execute 190, when ENTER: button190, 179isENTER). activated and Youzones will1 create an endless loop that through could 4are prevent secure. other programs from running. It could also cause the console to appear to "lock up". If this happens, press the reset button in the Model 1503 Control/ Communicator to restore the console. Delete the errant programs.
Home Automation, Inc. (like a programmable thermostat), and by buttons - for example, your mode of security. Therefore, your temperatures are adjusted for your real-life schedule for maximum comfort and energy savings. Following is a programming example for temperature control based on security modes and button 1, which we call “Vacation”. Programs for “when security off:” - PROG, *, 175 (when security off), ENTER: UNIT-NUMBER, 17, OFF.
For each temperature zone, the secure/alarm status of the zone is determined by the current temperature of the zone in relation to its setpoints. The zone is considered to be in alarm if the current temperature is below the low setpoint or above the high setpoint. Otherwise, the zone is secure. Like ordinary security zones, the secure/alarm status of these temperature zones can be used as conditions for programs.
Home Automation, Inc. 6. SHOW The SHOW function allows you to show the following items on the display: - Programs - all timed and button programs - Events - the 50 most recent alarm system events - Test - a test facility for the zones - Aux - the status of temperatures, auxiliary inputs and outputs SHOW PROGRAMS You can show all of your programs or selected programs using the SHOW PROGRAM function.
previous program in memory. Model 1503 Owner's Manual When you reach the top of the list, the display will show the SHOW PROGRAMS menu. DELETE PROGRAM To delete a program, make sure that the display is showing the program you wish to delete. Then press 1. The display will show “DELETE PROGRAM:”,” 1= CURRENT”. Press 1 again to delete the current program, or press CANCEL if you do not wish to delete the program.
Home Automation, Inc. 7. TELEPHONE CONTROL Your Model 1503 is equipped with a built-in telephone response feature that allows you to control and get the status of your system from any Touch Tone phone. The Model 1503 actually talks to you using a digital recording of a real human voice, so the sound is startlingly life like. You send commands to it using the keys of your Touch Tone telephone.
Model 1503 Owner's Manual You will hear a slight click on your phone when the Model 1503 picks up or hangs up. This is normal. To access your Model 1503 from an inhouse phone: Pick up the receiver of any Touch Tone phone in your house. Pause for just a moment - about a second - then press the # key on the phone. You will hear the Model 1503’s voice read the menu, which tells you what commands are available over the telephone.
Home Automation, Inc. it was authorized, you should change your access and master codes to stop whoever made the calls. There are a number of SET-UP items that control what you can do from a remote phone when you or anyone else calls into your home. If you do not want to have the Model 1503 answer outside calls ever, you can set ANSWER OUTSIDE CALLS to NO. If you do not want to allow a remote caller to be able to control anything, but still get the status of the system, you can set REMOTE COMMANDS OK to NO.
Model 1503 Owner's Manual ALTERNATE METHOD: The Model 1503 has an alternate access method that may be more effective, especially when calling long distance. 1. Call the system and allow the phone to ring once or twice. 2. Hang up. 3. Within 60 seconds, call the system again. It will answer on the first ring and beep. 4. Enter your code.
Home Automation, Inc. then press the # key. control, For example, 1, 0, #. The Model 1503 will say “UNIT NUMBER 10. COMMANDS ARE: 0: OFF, 1: ON, 2: OFF FOR TIME, 3: ON FOR TIME, 4: LO, 5: HI, STAR (*): CANCEL.” DIMMING AND BRIGHTENING For unit numbers 1 - 16 (and 81 - 128 on Version 2 systems) LO and HI refer to dimming and brightening. After entering the unit number and pressing the # key, press 4 to dim or 5 to brighten the lamp.
Model 1503 Owner's Manual LO TEMPERATURE IS 65 DEGREES. HI TEMPERATURE IS 85 DEGREES. COMMANDS ARE: 0: OFF, 1: ON, 2: OFF FOR TIME, 3: ON FOR TIME, 4 LO, 5 HI, STAR (*) CANCEL.” This message means that the energy saver is on or off, that the air temperature at the PESM is 76 degrees Fahrenheit, that the setting for the LO temperature is 65 degrees F, and that the setting for the HI temperature is 85 degrees F.
Home Automation, EnterInc. your code number. When correctly entered, the Model 1503 will say “THE SECURITY MODE IS (whatever you set it to.) To Restore a zone, press the # key instead of entering your code number. The Model 1503 will say “ENTER ZONE NUMBER TO RESTORE, THEN POUND KEY, POUND KEY: ALL, STAR: CANCEL”. Press the zone number that you want to restore, or the # key to restore all zones. The Model 1503 will repeat the zone number you entered, or say ALL if you hit the # key, then “CODE NUMBER:”.
Model 1503 Owner's Manual The Model 1503 will beep once and return you to the main menu. (EMERGENCY, FIRE or BURGLAR) ALARM ACTIVATED OR 6 - STATUS To hear a complete status review, press 6 from the main menu. You will hear a status report, just as if you were looking at the console display.
Home Automation, Inc. 8 - MESSAGE (MODEL 1503 Version 2 ONLY) You can hear or leave an 8 second message on your Model 1503. You can also hear and record the street address that the Model 1503 uses when it dials out in an emergency. To hear the message, press 8 from the main menu. The Model 1503 will say “MESSAGE IS” and then play the message. After the message the Model 1503 will say “MESSAGE COMMANDS ARE: 1: RECORD MESSAGE, 8: REPEAT MESSAGE, 3: PLAY ADDRESS, STAR: CANCEL.” To record a message, press 1.
Model 1503 Owner's Manual into your system, then it takes only 5 presses of the # key to activate the emergency alarm. To prevent accidental activation of the panic feature over the phone, you must press the # key 5 times, all at once. If you pause for more than 2 seconds, or press any other key, the panic activation is canceled. The Model 1503 will say “CANCEL” when this happens. If you wish to cancel the emergency alarm before you have activated it, press any other key, wait a few seconds or hang up.
Home Automation, Inc.
Model 1503 Owner's Manual INSTRUCTIONS TO CALLED PARTY Dear _________________________________________________________ I have programmed my Home Automation system to call you if the alarm is activated at my house. If my alarm is activated, it will call and say: “Emergency... Emergency... The (burglar, fire or emergency) alarm has been activated at the following address: _________________________________________________________________ Phone Number_________________________ Please respond immediately.
Home Automation, Inc. 8. EMERGENCY DIAL-OUT Emergency dial out consists of two distinct parts: the “digital dialer” and the “voice dialer.” The communicator may be set up to automatically send a test code to the central station on a daily or weekly basis. This verifies proper operation of the entire monitoring system on a periodic basis. DIGITAL DIALER The digital dialer (also called a “digital communicator”) reports alarm events to a central station monitoring center.
Model 1503 Owner's Manual use a monitoring service if you want the police notified when your alarm is activated. As a preventative measure against phoning in a false alarm, you should have the system try to phone you, a neighbor and a relative and then try you again. The called party can stop the system from calling the next number by entering the access code. If a neighbor can look out his window and see that there isn’t a problem, then he can decide not to call 911 or the police.
Home Automation, Inc. 9. SET-UP Refer to UNDERWRITER'S LABORATORIES REQUIREMENTS for set up requirements in UL Listed Installations. This section describes the items normally associated with setting up the system when it is installed. However, over the life of the system you may wish to change them. SET-UP items are stored permanently in the system, even if the battery and AC power are disconnected. The “default” settings in are the ones that have been set at the factory.
through 7 for Sunday. The console will beep as it accepts the new day of week. If the console beeps 3 times and erases the time or date you have entered, the new time or date was invalid (example, 13:00 PM). Try again. CATEGORIES The next items that can be set up are grouped into three categories: DIAL, CODES and MISCELLANEOUS. Once you select a category, there are numerous items in the category that can be changed. To advance to the next item in the category, press the SHOW key.
Home Automation, Inc. IF YOU FORGET your master code or if you have purchased a home with a system whose code is unknown, contact your dealer to have a new code installed. The AUXILIARY codes cannot be used over a remote telephone. It can be used over an in-house phone (the Model 1503 System knows the difference.) AUXILIARY CODES 1 - 4 AUX CODE #1 ON TIME There are 4 auxiliary codes. To take an auxiliary code out of the system, enter 0000 as the code.
AUXILIARY CODE OFF TIME Press the SHOW key to advance the display to AUX CODE #1 OFF: You may now enter the time and day of week that the Auxiliary code is turned off, or disabled. To change the AUX CODE OFF time to 5:00 PM, Monday, Wednesday and Friday, follow the steps in the example for AUX CODE ON, substituting the time of 5:00 PM.
Home Automation, Inc. Press SHOW to advance the display to MODE OFF, press a 0 then press ENTER. HIGH SECURITY MODE. In HIGH SECURITY MODE, the MASTER CODE is always required to do the following functions: a. View or Change SET UP items. (SET-UP key) b. Create PROGRAMS. (PROG key) c. View or delete PROGRAMS or the EVENT LOG (SHOW key) d. Access the system from a local phone. With HIGH SECURITY MODE off, no code is required if the security system is in the OFF mode. If the security system is on (i.e.
ENTRY DELAY The ENTRY DELAY is the time, in seconds, that you have to turn off the alarm after entering your home. The entry delay ONLY applies to the entry/exit zone, your doors. If you (or someone else) come in through a window, there will be no entry delay and the alarm will sound immediately. When you come in through a door on the entry/exit zone, the other zones are delayed too.
Home Automation, Inc. This delay is set at the factory to 15 seconds. We recommend a minimum time of 15 seconds to preclude an accidental activation of the alarm from calling in a false alarm. To set the dial out delay, enter the desired dial out delay in seconds, then press ENTER. HOUSE CODE The HOUSE CODE is for the X-10 Powerhousetm modules used to control lights and appliances in your home. The HOUSE CODE must be set to the same HOUSE CODE as all of your modules.
ON FOR ALARM UNIT NUMBERS The ON FOR ALARM UNIT NUMBERS are turned on when the alarm is activated and the interior sounder begins to sound. The factory default is 129, for ALL LIGHTS ON. If you want appliances (a radio, for example) to come on too, enter 129 and its unit number. Up to 6 unit numbers (including 129 for ALL LIGHTS ON) can be entered. To enter new ON FOR ALARM UNIT NUMBERS, enter each unit number, then press the ENTER key once.
Home Automation, Inc. QUICK ARM ENABLED: The Quick Arm feature allows the security system to be armed by pressing the desired mode key twice instead of having to enter your code. To enable quick arm, press 1, ENTER. To disable this feature, press 0, ENTER. The default setting for QUICK ARM ENABLED is NO. LATITUDE, LONGITUDE, TIME ZONE The system automatically calculates the time of sunrise and sunset each day.
amount. The calculated time of sunrise/sunset will change by four minutes for every degree change in longitude. To cause the calculated sunrise/sunset to occur later, enter a larger value for longitude. Enter a smaller value for longitude to cause the time to occur earlier. It is not necessary to alter the time zone to compensate for daylight savings time, since the system requires you to specify when the time is set up whether daylight savings time is in effect.
Home Automation, Inc. REMOTE COMMANDS OK? DIAL TYPE The REMOTE COMMANDS OK? item allows you to prevent any commands from being issued from a remote telephone. When REMOTE COMMANDS OK? is set to YES, the Model 1503 will allow all commands to be executed when called from a remote telephone. If REMOTE COMMANDS OK? is set to NO, then lights, appliances and the security system cannot be controlled from a remote telephone that dials into your home.
Dial out numbers 1 - 4 have on and off times and days, so that no time is wasted calling you at the office at night or on a Sunday (for example) if the alarm is activated. For dial out number 1, you should enter your office number where you can be reached during working hours. Enter the phone number the same way as described for MY PHONE NUMBER, above. You can cause the system to pause for two seconds between digits of the number by pressing the TIME key, which puts a T in the number.
Home Automation, Inc. The TIME that was entered before setting an on or off time to NEVER is saved, and will re-appear when a day is set in place of NEVER. Setting both the DIAL OUT 1 ON and the DIAL OUT 1 OFF times to NEVER will make DIAL OUT NUMBER 1 never active. 10.
7. The DIAL OUT DELAY shall not exceed 30 seconds. 8. The BEEP ON TROUBLE feature must be ON. 9. The DIGITAL COMMUNICATOR shall be enabled and programmed in Home Health Care applications. 10. The Model 1503 Version 2 and the Model 1503-LC are compatible with the ADEMCO Model 685 Receiver in either of the formats available. 11. Installer: Model 1503 Owner's Manual 11. FIRE ALARM ESCAPE PLANNING Your fire protection system is designed to provide warning in the event of a fire.
Home Automation, Inc. FEDERAL COMMUNICATIONS COMMISSION NOTICE: 1. The Federal Communications Commission (FCC) has established Rules which permit this device to be directly connected to the telephone network. Standardized jacks are used for these connections. This equipment should not be used on party lines or coin lines. 2.