Table of Contents .. Safety Information . What is not Covered Pr-Assembly .. Planning Assembly. NOTES 1 Please read the assembly instructions prior ta assembling the product. 2. To avoid damage, assemble the product on a non-abrasive surface such a5 carpet. 3. Make sure all bolts are tightly fastened before the product is used. Pleads make sure you have all parts before beginning assembly.
PLANNING ASSEMBLY Uss & soft cloth between theses parts and the floor. Identify the parts which make up your pace of fumigator. Gather the hardware parts and count them. Have the necessary tools ready. . Keep Allen Key & Wrench as the Bolts & Nuts may need to be tightened in the future.
1 Attaching Cam Lock Bolts. O Attach Cam Lock Bolts (FF) to Top, Left and Right Canals (A), {B) and (C). 2 Attaching Push Latches. O Attach Push Latches {LL) to Top Panel (A) using Fiat Head Screw {EE).
3 Attaching Hinges to Left and Right Panels and Doors. O Detach the Hinge (KK} anti 2 parks. O Attach Hings (KK1) to Doors (D) and Base (KK2) to Left and Right Panels {B) and {C) using Round Head Screw (Short) (DD).
4 Attaching Shelf to Left and Right Panels. O Attach Sharif o Left and Right Panels (B) and {C) using Cam Lock (GG} and Dowel (MM) o Attaching Top Support to Top Panel. O Attach Top Support () to Top Anal {A) using Round Head Screw (Lang} (CC}.
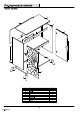
6 Attaching Top Panel to Left and Right Panels. O Attach Tap Panel to Left and Right Panels (B} and (C} using Cam Lock (GG) and Dowel (MM}. ~ Sliding Back Panels into unit. O Slide Back Canals (H) into the grave of unit.
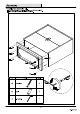
8 Attaching Base Assembly to Unit. O Attach Base Assembly (F) to Unit using Assembly Screws (BE) and Dow! (MM}, O Tight Assembly Screw (BB) using Allen Key (Small} {PP).
9 Attaching Legs to Unit.
10 Attaching Wedges and Round Head Screws to unit. O Attach Wedges {NN) o unit using Flat Head Screws (EE). O Attach Round Head Screw {Small) (DD) and Fiat Washers (Small) (JJ) to unit.
12 Adjusting the Doors. O Front middle screw on hinge will adjust your door to the left and right. O Back middle screw on hings will adjust your door forward and backward O Screw an hinge base will adjust your door up and down.
NEVER 1. Allow liquids 1o remain on furniture. Absorption causes parts to warp and spit and finishes to laminate. 2. Use glass cleaner on finished furniture. Ammonia chemically attacks the finish DO NOT 1. Place in direct sunlight to prevent fading. 2. Write directly on surface to prevent marking. 3. Place hot objects on surface to prevent finish damages. 4. Use rubber based place mats 1o prevent discoloring. 5.
HOME DECORATORS COLLECTION Questions, problems, missing parts? Before resuming to the store, call Home Decorators Collection Customer Service 8am. 7 p.m., EST, Monday Friday, 9am. 6 p.m.