Item #1000 000 000 Model #16980 USE AND CARE GUIDE 1-LIGHT OUTDOOR WALL LANTERN Questions, problems, missing parts? Before returning to the store, call Home Decorators Collection Customer Service 8 a.m. - 7 p.m., EST, Monday-Friday, 9 a.m. - 6 p.m., EST, Saturday 1-800-986-3460 HOMEDEPOT.COM/HOMEDECORATORS THANK YOU We appreciate the trust and confidence you have placed in Home Decorators Collection through the purchase of this light fixture.
Table of Contents Hardware Included ...................................................................3 Package Contents ....................................................................4 Installation ..................................................................... 5 Care and Cleaning ........................................................ 7 Troubleshooting ............................................................ 7 Service Parts .................................................................
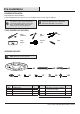
Pre-Installation PLANNING INSTALLATION Read all instructions before installing. To avoid damaging this product, place it on a soft, non-abrasive surface, such as carpet or cardboard. NOTE: This product requires one 100W maximum IMPORTANT: Inspect the wire insulation for any cuts, abrasions, or exposed copper that may have occurred during shipping. If there is a defect in the wire, do not attempt installation. Please call the Customer Service Team at 1-800-986-3460.
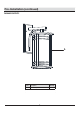
Pre-Installation (continued) PACKAGE CONTENTS A Part Description Quantity A Fixture body 1 4
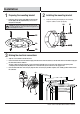
Installation 2 Installing the mounting bracket ƶ Fasten the support screws (long) (BB) into the mounting bracket (AA) (to be fully tightened later), and secure it using the hex nuts (DD). AA ƶ Fasten the mounting bracket (AA) onto the outlet box using two outlet box screws (short) (CC). NOTE: The support screws (BB) should extend long enough to protrude through the canopy on the fixture body (A) when it is mounted (Adjust as needed).
Installation (continued) 5 Applying the caulk the fixture body to 4 Installing the outlet box ƶ Use weather resistant caulk (sold separately) to seal around the top and side perimeter of the back plate of the fixture body (A). Do not caulk the bottom of the back plate to allow for condensation evaporation. ƶ Place the fixture body (A) over the outlet box, and ensure the heads of the support screws (long) (BB) come through the holes of the fixture body (A).
Care and Cleaning Do not use any cleaners with chemicals, solvents, or harsh abrasives. Use only a dry, soft cloth to dust or wipe carefully. To clean the fixture, disconnect power by turning off the circuit breaker or by removing the fuse at the fuse box, and use a dry or slightly dampened, clean cloth to wipe the exterior surface of the fixture. Troubleshooting Problem Possible Cause Solution The lights will not turn on. The bulb is burned out. Replace the light bulb. The power is off.
Service Parts MODEL: 16980 AA DD BB GG FF EE A Part Description AA BB Mounting bracket Support screw (long) Outlet box screw (short) Hex nut CC DD EE FF GG HH A Green ground screw (Pre-assembled to mounting bracket (AA)) Wire connector Cap nut Rubber washer Fixture body 8 CC HH
Questions, problems, missing parts? Before returning to the store, call Home Decorators Collection Customer Service 8 a.m. - 7 p.m., EST, Monday-Friday, 9 a.m. - 6 p.m., EST, Saturday 1-800-986-3460 HOMEDEPOT.COM/HOMEDECORATORS Retain this manual for future use.
Artículo #1000 000 000 Modelo # 16980 GUÍA DE USO Y MANTENIMIENTO LÁMPARA DE PARED DE EXTERIOR DE 1 LUZ ¿Preguntas, problemas o piezas faltantes? Antes de regresar a la tienda, llama al Servicio al Cliente de Home Decorators Collection, de 8 a.m. a 7 p.m., hora estándar del Este, de Lunes a Viernes, y de 9 a.m. a 6 p.m., hora estándar del Este, Sábados. 1-800-986-3460 HOMEDEPOT.COM/HOMEDECORATORS GRACIAS POR TU COMPRA.
Índice Aparillage Incluido ..................................................................3 Contenido del Paquete ............................................................4 Instalación ..................................................................... 5 Cuidado y Limpieza ......................................................7 Solución de Problemas ................................................7 Partes de Servicio ........................................................ 8 Modelo .................
Pre-Instalación PLANIFICACIÓN DE LA INSTALACIÓN Lea todas las instrucciones antes de comenzar la instalación. Para evitar dañar el producto, colócalo sobre una superficie suave, no abrasiva, como por ejemplo una alfombra o cartón. IMPORTANTE : Revisa que el aislamiento de los cables no haya sufrido ningún corte, abrasión ni tenga filamentos de cobre expuestos debidos al envío. Si hay un defecto en el cable suspenda el ensamblaje. Por favor llama a nuestro Equipo de Servicio al Cliente al 1-800-986-3460.
Pre-Instalación (continuación) CONTENIDO DEL PAQUETE A Pieza A Descripción Cantidad Cuerpo de la lámpara 4 1
Instalación 2 Instalación del soporte de montaje ƶ Apriete los tornillos de soporte (largos) (BB) en el soporte de montaje (AA) (para ser apretados completamente mas tarde), y asegúrelos usando las tuercas hexagonales (DD). AA ƶ Coloque el soporte de montaje (AA) sobre la caja eléctrica usando los dos tornillos de la caja eléctrica (corto) (CC). NOTA: El tubo roscado (BB) debe extenderse lo suficiente para sobresalir a través del dosel (A) cuando esté montado.
Instalación (continuación) 5 Aplicando el sellante 4 Instalando la lámpara a la caja eléctrica ƶ Use un sellante resistente a las inclemencias del tiempo (se vende por separado) para sellar alrededor de la parte superior y los costados de la placa posterior del cuerpo de la lámpara (A). No aplique el sellante en la parte inferior de la placa posterior de la lámpara para permitir la evaporación de la condensación.
Mantenimiento y Limpieza No use limpiadores con químicos, solventes ni productos abrasivos. Use sólo un paño suave y seco para desempolvar o limpiar con cuidado. Para limpiar la lámpara, primero corta el suministro de electricidad, apagando el interruptor automático o retirando el fusible correspondiente en la caja de fusibles. Seguidamente, usa un paño limpio, seco o ligeramente húmedo (usa sólo agua limpia, nunca un solvente) para limpiar el exterior de la lámpara.
Piezas de remplazo MODELO: 16980 AA DD BB GG FF EE A Pieza AA BB CC DD EE FF GG HH A Descripción Soporte de montaje Tornillo de soporte (largo) Tornillo de la caja eléctrica (corto) Tuerca hexagonal Tornillo verde a tierra (Preinstalado al soporte de montaje (AA)) Conector de cable Tuerca ciega Arandela de goma Cuerpo de la lámpara 8 CC HH
¿Preguntas, problemas o piezas faltantes? Antes de regresar a la tienda, llama al Servicio al Cliente de Home Decorators Collection, de 8 a.m. a 7 p.m., hora estándar del Este, de Lunes a Viernes, y de 9 a.m. a 6 p.m., hora estándar del Este, Sábados. 1-800-986-3460 HOMEDEPOT.COM/HOMEDECORATORS Conserva este manual para referencias futuras.