
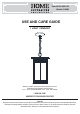
Instructions / Assembly


6
Installation (continued)
7
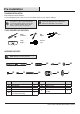
Strip 3/4 in. of insulation from the wire ends.
Making the electrical connections
ƶ
ƶ
Connect the glossy live wire from the xture to the black
wire from the outlet box, and the rough neutral wire from the
xture to the white wire from the outlet box.
ƶ
The bare copper ground wire from the xture must loop one
turn under the head of the green ground screw (EE) on the
mounting bracket (AA) before it is connected to the ground
conductor of the supply circuit.
ƶ
Cover the wires with wire connectors (FF). Tape the wire
connectors (FF) and wires together, and carefully position
all wires inside the outlet box.
AA
EE
FF
NOTE:
The glossy live wire has the text printed on it;
the rough neutral wire has the ridge on it.
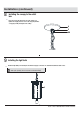
6
ƶ
ƶ
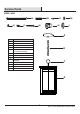
Unscrew the ring (II) from the screw collar loop (HH), and
lower the canopy (A) and ring (II) over the chain (B) on the
xture.
Weave the xture wires and bare copper ground wire up
through the chain (B), ring (II), canopy (A), screw collar loop
(HH), threaded tube (BB), and then into the outlet box.
BB
HH
B
A
II
Weaving the xture wire
5
ƶ
Adjust the chain (B) to the desired height by spreading
the end link of the chain (B) apart. Use a pair of pliers
and a screwdriver. Wrap a soft cloth around the pliers
to protect the chain’s nish.
Attach one end of the chain (B) to the screw collar
loop (HH) and the other end to the loop (C).
Attaching the chain
D
C
B
HH