
Installation Guide


12
1.
Power ON/OFF. - Press and release the button to turn the fan and/or light on or off.
□ Press and hold the button for 5 seconds to use the “walk away time delay”; this will active the light
for 30 seconds (the light will be activated at 50% brightness).
2. Fan Speed - LEDs on the fan speed button will illuminate to the corresponding speed.
- Press and release 1 time - turns the fan on high speed.
- Press and release 2 times - turns the fan on medium-high speed.
- Press and release 3 times - turns the fan on medium-low speed.
- Press and release 4 times - turns the fan on low speed.
- Press and release 5 times - turns the fan off.
3. Light ON/OFF
□ Press and release the button to turn the light on or off.
□ Press and hold the button to activate the dimmer function (as long as you have NOT previously set
O/D dip switch in your remote to the “ON” position).
4. Comfort Breeze
TM
□ Press and release the button to enable Comfort Breeze
TM
; this will change your fan speed randomly,
simulating a relaxing breeze. To cancel this feature press or .
5. Fan reverse button (Must be pushed when the fan is in operation)
□ Press and release the button to forward and reverse the fan.
6. Timer
- While the fan is on press 1 time - turns on a 2 hour run timer.
- While the fan is on press 2 times - turns on a 4 hour run timer.
- While the fan is on press 3 times - turns on an 8 hour run timer.
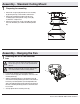
Assembly - Hanging the Fan (continued)
Installing the glass bowl
10
□ Place the bowl (E) into the light kit tter assembly (D),
by aligning the three at areas on the top ange of the
bowl (E) with the three raised dimples in the light kit tter
assembly (D).
□ Turn the shade clockwise until it stops.
D
E
WARNING: To reduce the risk of injury, allow the glass to cool
completely before removing.
Operating Your Fan and Remote Control
G