
Installation Guide


8
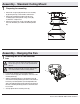
Assembly - Hanging the Fan (continued)
Hanging the fan
□ Carefully lift the fan-motor assembly (B) up to the slide-on
mounting bracket (A).
□ Hang the fan on the hook (FF) provided by utilizing one of
the non-slotted (round) holes at the outer rim of the fan-
motor assembly (B).
2
A
B
EE
FF
3
WARNING: The hook (FF) is only to balance the fan while
making the electrical connections. Failure to hang as shown
may result in the hook (FF) breaking, causing the fan to fall.
The hook must pass from the inside to the outside of the
canopy.
WARNING: When hanging the fan on the hook (FF) it is critical
that you use one of the non-slotted (round) holes in the fan-
motor assembly (B).
NOTE: The frequencies on your receiver and hand unit have
been preset at the factory. Before installing the receiver,
make sure the dip switches on the receiver and hand unit are
set to the same frequency. The dip switches on the hand unit
are located inside the battery compartment.
NOTE: The switch marked O/D controls the dimming function
of the light. Use a ballpoint pen or small screwdriver to
switch to O to disable the dimming function. The factory
preset is D.
Setting the code on the remote
control and receiver
□ Remove the remote control (G) battery cover by pressing
rmly on the arrow and sliding the cover off.
□ Slide the dip switches to your choice of either up or down.
The factory setting is up.
□ Slide the dip switches (ZZ) on the receiver (F) to the same
position as set on the remote control (G).
□ Install two 1.5V AAA batteries (included).
□ Replace the battery cover on the remote control (G).
□ Insert the silicone rubber stopper (OO) into the hole on the
receiver (F) to cover the dip switches.
G
F
ZZ
1 2 3 4
ON
D O
1 2 3 4
ON
DIP
1 2 3 4
ON
D O
1 2 3 4
ON
OO
NOTE: The battery will weaken with age and should be
replaced before leaking takes place as this will damage the
hand unit. Dispose of used battery properly and keep the
battery out of the reach of children.