
Instructions / Assembly


6
1
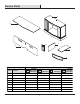
Attaching the connectors
□ Lay one upper front panel (D) and one upper side panel (E)
on a clean, at surface. Attach two short connectors (BB) to
the upper front panel (D) using bolts (AA). Attach one long
connector (CC) and four short connectors (BB) to the upper
side panel (E) as shown using bolts (AA). Repeat using the
remaining upper front panel (D) and upper side panel (E).
Installation
2
Assembling the panels
□ Insert two dowels (DD) in the predrilled holes in the
edge of one upper side panel (E) as shown. Slip one
upper front panel (D) over the dowels (DD) until snug.
Attach the upper front panel (D) to the upper side panel
(E) using a bolt (AA). Repeat using the remaining upper
front panel (D) and upper side panel (E).
E x2
BB
AA
CC
3
Attaching the panels
□ Insert eight dowels (DD) in the predrilled holes in the top
of the base cabinet (B). Slip one panel assembly over
the dowels (DD) on the left side of the base cabinet (B)
and secure using bolts (AA). Repeat on the right side
using the remaining panel assembly.
4
Attaching the top panel
□ Insert eight dowels (DD) in the predrilled holes in the top
edges of the panel assemblies. Slip the top panel (A)
over dowels (DD) until snug and secure from underneath
using bolts (AA) as shown.
D x2
DD
D x2
E x2
AA
AA
DD
B
DD
AA
A
AA
BB