Item #1001383349 Model #258-81-35 USE AND CARE GUIDE VANDERFORD ELECTRIC FIREPLACE Questions, problems, missing parts? Before returning to the store, call Home Decorators Collection Customer Service 8 a.m. - 7 p.m., EST, Monday - Friday, 9 a.m. - 6 p.m., EST, Saturday 1-8OO-986-3460 HOMEDEPOT.COM/HOMEDECORATORS THANK YOU We appreciate the trust and confidence you have placed in Home Decorators Collection through the purchase of this electric fireplace.
Table of Contents Table of Contents. . . . . . . . . . . . . . . . . . . . . . . . . . . . . . . . . . . . 2 Warranty. . . . . . . . . . . . . . . . . . . . . . . . . . . . . . . . . . . . . . . . . . . 3 What is covered. . . . . . . . . . . . . . . . . . . . . . . . . . . . . . . . . . . . 3 What is not covered. . . . . . . . . . . . . . . . . . . . . . . . . . . . . . . . . 3 Pre-Assembly. . . . . . . . . . . . . . . . . . . . . . . . . . . . . . . . . . . . . . . 4 Assembly. . . . . . . . . . . . . . .
Warranty 1-YEAR WARRANTY WHAT IS COVERED The manufacturer warrants that your new electric fireplace is free from manufacturing and material defects for a period of one year from date of purchase, subject to the following conditions and limitations. Variations in actual wood color and finishes which may result from natural characteristics of the wood, such as grain patterns, mineral streaks and the like, are not considered defects.
Pre-Assembly PLANNING ASSEMBLY Before beginning assembly of product, make sure all parts are present. Compare parts with the package contents list and hardware contents list. If any part is missing or damaged, do not attempt to assemble the product.
Pre-Assembly (continued) PACKAGE CONTENTS B D A C F H M L J K G E P N Part Description Quantity A Top Panel 1 B Base 1 C Media Shelf 1 D Corner Top Panel 1 E Support 1 F Left Side Panel 1 G Right Side Panel 1 H Left Lower Front Panel 1 J Right Lower Front Panel 1 K Back Panel 1 L Removable Header 1 M Front Rail 1 N Upper Side Panel 2 P Upper Front Panel 2 5 HOMEDEPOT.COM/HOMEDECORATORS Please contact 1-800-986-3460 for further assistance.
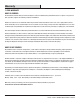
Assembly 1 2 Preparing the side panels □□ Lay the left side panel (F) face down on a flat surface. Insert six small connectors (BB) into predrilled holes and secure with screws (AA). Repeat using the right side panel (G). Lay one upper side panel (N) face down on a flat surface. Insert three long connectors (CC) into predrilled holes and secure with screws (AA). Repeat using the second upper side panel (N).
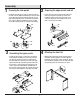
Assembly (continued) 5 6 Attaching the base Attaching the media shelf □□ Insert four dowels (DD) into the predrilled holes in the top edges of the mantel assembly. Slip the media shelf (C) over the dowels (DD) and secure from the underneath the side with the bolts (AA) as shown. □□ Lay the base (B) on a flat surface. Insert four dowels (DD) into the predrilled holes in the base (B). Slip previous assembly over the dowels (DD) and secure using bolts (AA) as shown.
Assembly (continued) 9 10 Preparing the corner top panel Attaching the back panel □□ Place the back panel (K) in position at the top, back edge of the assembly and secure with back panel screws (EE). □□ Lay the corner top panel (D) and the corner support (E) on a clean, flat surface. Attach three long connectors (CC) to the top edge of the corner top panel (D) using bolts (AA). Attach two short connectors (BB) on each end of the corner support (E) using bolts (AA).
Assembly (continued) 14 Securing the firebox 13 Installing the firebox □□ Once the firebox is in position, secure from behind using the brackets and screws included with the firebox. □□ Insert the firebox from the front of the mantel as shown. 9 HOMEDEPOT.COM/HOMEDECORATORS Please contact 1-800-986-3460 for further assistance.
Service Parts B D A C F H M L J K G E P N 10
Service Parts Part Description Part Number Ebony Finish 258-81-35 A Top Panel 20-12-771 B Base 20-12-772 C Media Shelf 20-12-773 D Corner Top Panel 20-12-774 E Corner Support 20-12-775 F Left Side Panel 20-12-776 G Right Side Panel 20-12-777 H Left Lower Front Panel 20-12-778 J Right Lower Front Panel 20-12-779 K Back Panel 20-12-780 L Removable Header 20-12-781 M Front Rail 20-12-782 N Upper Side Panel 20-12-783 P Upper Front Panel 20-12-784 n/a Hardware Pack
Questions, Questions,problems, problems,missing missingparts? parts?Before Beforereturning returningtotothe thestore, store, call Hampton Bay Customer Service call Home Decorators Collection Customer Service 8 a.m.-7 p.m., EST, Monday-Friday 9 a.m. - 6 p.m., EST, Saturday 8 a.m.-6 p.m., EST,, Monday-Friday 1-800-986-3460 1-877-527-0313 HOMEDEPOT.COM HOMEDEPOT.COM/HDC Retainthis thismanual manualfor forfuture futureuse. use. Retain Manufactured by: GHP Group, Inc. • 6440 W. Howard St.
Núm. de artículo #1001383349 Núm. de modelo 258-81-35 GUÍA DE USO Y CUIDADO CHIMENEA ELÉCTRICA DE VANDERFORD ¿Tiene preguntas, problemas, o faltan piezas? Antes de regresar a la tienda, llame a Servicio al Cliente de Home Decorators Collection de lunes a viernes de 8 a.m. a 7 p.m., hora local del Este, sábado de 9 a.m. a 6 p.m., hora local del Este 1-800-986-3460 HOMEDEPOT.
Tabla de contenido Pre-Ensamblar. . . . . . . . . . . . . . . . . . . . . . . . . . . . . . . . . . . . . . 4 Ensamblar. . . . . . . . . . . . . . . . . . . . . . . . . . . . . . . . . . . . . . . . . . 6 Piezas de repuesto. . . . . . . . . . . . . . . . . . . . . . . . . . . . . . . . . . 10 Tabla de contenido. . . . . . . . . . . . . . . . . . . . . . . . . . . . . . . . . . . 2 Garantía. . . . . . . . . . . . . . . . . . . . . . . . . . . . . . . . . . . . . . . . . . . 3 Lo que está cubierto . . . .
Garantía GARANTÍA DE 1 AÑO LO QUE ESTÁ CUBIERTO El fabricante garantiza que su nueva chimenea eléctrica está libre de defectos de fabricación y materiales por un periodo de un año a partir de la fecha de compra, sujeto a las siguientes condiciones y limitaciones. Las variaciones en el color real de la madera y los acabados que pueden resultar de las características naturales de la madera, como patrones de grano, marcas minerales y cosas semejantes, no son considerados defectos.
Pre-ensamblar PLANIFICACIÓN DE LA ENSAMBLAR Antes de comenzar a ensamblar este producto, asegúrese de que todas las piezas estén presentes. Compare las piezas con la lista de contenido del paquete y herraje incluido. Si hace falta alguna pieza o se encuentra dañada, no intente ensamblar el producto.
Pre-ensamblar (continuación) CONTENIDO DEL PAQUETE B D A C F H M L J K G E P N Pieza Descripcion Cantidad A Tablero de Arriba 1 B Base 1 C Aparatos Electrónicos 1 D Tablero Esquinero 1 E Soporte Esquinero 1 F Tablero del Lado Izquierdo 1 G Tablero del Lado Derecho 1 H Tablero Frontal del Lado Inferior Izquierdo 1 J Tablero Frontal del Lado Inferior Derecho 1 K Tablero de Atrás 1 L Cabecera Extraíble 1 M Barra Frontal 1 N Tableros Laterales Superiores 2 P
Ensamblar 1 2 Preparando los tableros laterales □□ Poner el tablero del lado izquierdo (F) hacia abajo en una superficie plana. Insertar seis conectores pequeños (BB) dentro de los huecos pre-perforados y asegurarlos con tornillos (AA). Repetir el mismo procedimiento usando el tablero del lado derecho (G). Poner un tablero del lado superior (N) hacia abajo en una superficie plana. Insertar tres conectores largos (CC) dentro de los huecos pre-perforados y asegurarlos con tornillos (AA).
Ensamblar (continuación) 5 6 Fijando la base □□ Poner la base (B) en una superficie plana. Insertar cuatro clavijas (DD) dentro de los huecos pre-perforados que están en la base (B). Poner este ensamblaje sobre las clavijas (DD) y asegurarlos con los tornillos (AA) tal y como está ilustrado. Fijar el Estante para Aparatos electrónicos □□ Insertar cuatro clavijas (DD) dentro de los huecos pre-perforados que están en los bordes superiores del ensamblaje de la repisa.
Ensamblar (continuación) 9 10 Preparando el tablero esquinero Fijando el tablero de atrás □□ Poner el tablero esquinero (D) y el soporte esquinero (E) en una superficie plana y limpia. Fijar tres conectores largos (CC) al borde de arriba del tablero esquinero (D) utilizando tornillos (AA). Poner dos conectores pequeños (BB) en cada borde del soporte esquinero (E) utilizando tornillos (AA).
Ensamblar (continuación) 13 Instalando la chimenea 14 Asegurando la chimenea □□ Insertar la chimenea desde la parte frontal de la repisa tal y como está ilustrado. □□ Una vez que la chimenea esté en posición, asegurarlo desde atrás utilizando los soportes y tornillos incluidos con la chimenea. 9 HOMEDEPOT.COM/HOMEDECORATORS Póngase en contacto con el 1-800-986-3460 para recibir más ayuda.
Piezas de servicio B D A C F H M L J K G E P N 10
Piezas de servicio Pieza Descripcion Numero de Pieza Ebony Finish 258-81-35 A Tablero de Arriba 20-12-771 B Base 20-12-772 C Aparatos Electrónicos 20-12-773 D Tablero Esquinero 20-12-774 E Soporte Esquinero 20-12-775 F Tablero del Lado Izquierdo 20-12-776 G Tablero del Lado Derecho 20-12-777 H Tablero Frontal del Lado Inferior Izquierdo 20-12-778 J Tablero Frontal del Lado Inferior Derecho 20-12-779 K Tablero de Atrás 20-12-780 L Cabecera Extraíble 20-12-781 M Barra Fro
¿Tiene Questions, preguntas,problems, problemas,missing o faltanparts? piezas? Antesreturning de regresar a la tienda, Before to the store, llamecall a Servicio al Cliente de Home Decorators Home Decorators Collection Customer Collection Service de lunes a viernes de 8 a.m. a 7 p.m., hora local delEST, Este, sábado de 9 a.m. a 6 p.m., hora local del Este 8 a.m.-6 p.m., Monday-Friday 1-800-986-3460 1-877-527-0313 HOMEDEPOT.COM HOMEDEPOT.COM/HOMEDECORATORS Retaineste thismanual manualpara for future use.