
Installation Guide


For Assistance, Call: 1-800-986-3460
HomeDepot.com/homedecorators
Installation Instructions
Laminate Flooring (For Indoor Use Only)
Grade Levels
Above Grade
On Grade
Below Grade
PLYWOOD OR ORIENTED STRAND BOARD (OSB) SPECIFICATIONS
On truss/joist spacing of 16 in. (406 mm) O/C or less, the industry standard for
single-panel subooring is a minimum 5/8 in. (19/32 in., 15.1 mm) CD Exposure
1 plywood suboor panels (CD Exposure 1) or 23/32 in. OSB Exposure 1 suboor
panels, 4 ft. x 8 ft. sheets. Expansion gap between panels should be 1/8 in. (3
mm). If panels are not tongued and grooved and there is not sufcient spacing
or is inadequate, cut in the required spacing with a circular saw. Do not cut in
expansion space on tongue and groove panels.
PARTICLE BOARD OR FIBER BOARD
Only for oating installation.
EXISTING FLOORS
Installation over an existing oor requires the installer to consider potential
issues related to moisture damage, adhesive failure and fastener failure.
Contact the adhesive and fastener manufacturers respectively for their specic
instructions, recommendations and requirements.
Acceptable oor coverings include: solid hardwood, vinyl composition tile,
linoleum, terrazzo, ceramic tile and other “moisture sealing oors.”
Unacceptable oor coverings include: carpet, needle punch felt, edge glued
linoleum and other “moisture absorbing ooring.”
JOB SITE CONDITION
Prior to installation, the installer must ensure that at the time of installation, the
job site conditions including suboor/substrate, ambient temperature and relative
humidity, and all impacting variables will not negatively affect the oor. The
manufacturer will decline responsibility for damages associated with improper
installation or poor site conditions.
STORAGE AND CONDITIONS
Do not store ooring in uncontrolled environmental conditions. For example,
garages and exterior patios are not acceptable areas to store ooring. Handle
and unload the laminate ooring with care and store within the environmentally
controlled site in which it is expected to perform. Flooring stored on a concrete
slab should be elevated at least 4 in. to allow air circulation under cartons.
EXISTING HOME
An existing home should have a consistent room temperature of 60°F-80°F and
relative humidity (RH) of 35%-70%. Continual deviation from these conditions
will affect the dimensions of ooring. When using a heater during winter months,
humidity may be much lower than the acceptable range. During the warmer
months, maintain humidity levels using an air conditioner, dehumidier, or by
turning on your heating system periodically.
NEW CONSTRUCTION OR REMODEL
All work involving water, such as pouring basement concrete oors, drywall
and plasterwork, plumbing, etc. must be completed well in advance of the
oor delivery. Ensure that the building is enclosed. Where building codes allow,
permanent heating and/or air conditioning systems should be operating at least
ve days preceding installation and should be maintained during and after
installation. If it is not possible for the permanent heating and/or air conditioning
system to be operating before, during and after installation, a temporary
heating and/or dehumidication system that simulates normal living (occupied)
conditions can enable the installation to proceed until the permanent heating
and/or air conditioning system is fully operational. Your job site should have a
consistent temperature of 60°F-80°F and relative humidity (RH) of 35%-70%
which should be maintained continuously thereafter.
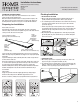
BASEMENTS AND CRAWL SPACES
Concrete slab or ground must be dry. The ground in the crawl spaces must be completely
covered using 6 mil black polyethylene. Crawl space clearance between the earth and
underside of joists should be no less than 18 in. and the perimeter vent area should be
equal to 1.5% of the total square footage of the crawl space or as mandated by code.
RADIANT HEATED SUBFLOOR
This product can be installed over a radiant heated suboor if the heating
element is installed into wood or concrete suboor. Operating surface
temperature must be less than 84°F. Decrease temperature to 60°F for one
week before installation in increments of 10°F per hour. Increase temperature
gradually after installation in increments of 10°F per hour. Follow installation
instructions for wood or concrete as outlined above.
WET AREAS
Do not install in saunas, swimming pool areas and other similar extreme wet
areas. Fill all expansion gaps with water repellent sealant.
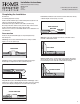
MOISTURE BARRIER AND MOISTURE RETARDER
CONCRETE SUBFLOOR
For oating installation, use 6 mil (0.006 in.) virgin polyethylene lm or other
means with equivalent permeability. Overlap the edge seams and tape it
together. Extend moisture barrier up to the wall about 1 in. high.
WOOD SUBFLOOR
Use asphalt-saturated kraft paper or #15 or #30 felt that meets ASTM Standard
D4869 or UU-B-790, Grade D. Overlap along the edge seams 2 in.- 4 in. wide.
This retards moisture movement from below. Extend the moisture retarder to
about 1 in. from the walls. Secure to the suboor as necessary.
SOUND CONTROL UNDERLAYMENT
Sound reducing underlayment is required. Check with the sound control
manufacturer for application guidelines. Generally, the less compressive
underlayment is preferred.
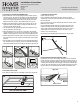
EXPANSION GAP
A 5/16 in. to 3/8 in. expansion gap is required around the perimeter of the oor
and between the oor and all vertical obstructions. Do not place permanently
mounted structures such as kitchen counters/cabinets on the installed oor.
TRANSITION MOLDING
Floating installation, transition T-molding is required in the following cases: oor
spanning greater than 30 ft. in length or width; wall openings with or without a
door.
NOTE: Floor areas interrupted by wall sections extending out of the wall;
oor areas which are not rectangular may experience buckling or gapping if
there is excessive oor expansion or shrinkage.
TOOLS AND MATERIALS BASICS
• Tape measure • Moisture meter (wood, concrete or both) • Chalk line & chalk
• Hammer • Electric power saw • Carbide tipped saw blade for ne cut
• NIOSH-designated dust mask • Hand saw or jamb saw • Eye protection
• Straight edge or Spacers • Pry Bar • Mallet • Broom • Tapping block
• Color matched wood putty • Pull bar • Sandpaper • Level • Duct tape
• Premium laminate glue • Vacuum • Caulking gun • Work gloves • Knee pads
Helpful Pointers
GENERAL TIPS
Remove all existing moldings.
Install ooring perpendicular to the direction of the oor joists.
If possible, install the boards parallel to the direction of the light
entering the room.
Make sure your work area is well lit. Good visibility ensures that color is
consistent and that visually defective planks are detected and removed.
The minimum length of the rst and last plank is 12 in.
Using a shorter piece at undercut door jams will help when tting
ooring in place.
2