
Installation Guide


For Assistance, Call: 1-800-986-3460
HomeDepot.com/homedecorators
Installation Instructions
Laminate Flooring (For Indoor Use Only)
Grade Levels
Above Grade
On Grade
Below Grade
CUTTING THE LAST ROW TO WIDTH
Most often the entire length of the last row will need to be cut so that it is
narrow enough to t the remaining space.
Measure the distance between the oor face edge (exclude the tongue) to the
wall. Subtract 5/16 in. from this measurement for expansion gap. Draw a line.
Cut through the line. Discard the excess piece. Proceed with the installation.
Preparing for Installation
Ensure suboors are clean.
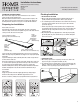
Understand the locking part of the ooring plank. The tongue is the thinner
extension coming out of the side of the planks. The groove is the wider extension
coming out of the other side of the oor plank.
Groove / Rainure / Ranura
(Short side / Côté court / Deslizador corto)
Tongue
(Long side)
Languette
(Côté long)
Lengüeta
(Deslizador largo)
Groove
(Long side)
Rainure
(Côté long)
Ranura
(Deslizador largo)
(Short side / Côté court / Deslizador corto)
Tongue / Languette / Lengüeta
Lay out several cartons. Randomly rack planks to ensure good color and shade
mixture and end joint spacing. Minimum end stagger is 6 in. Inspect plank quality
and grading.
Lay out trim moldings in advance and nd planks whose shade closely matches.
Set these aside for future use.
Remove the existing base, shoe molding or threshold carefully. They can be used
to cover the 5/16 in. expansion gap left around the edge of the room. Undercut
doors and casings using a handsaw laid at on a piece of scrap ooring.
Install the underlayment according to the underlayment manufacturer instructions.
Install the underlayment in the same direction that the laminate ooring is
to be installed.
Tape all seams.
Stagger end joints but avoid stair-stepping appearance by varying stagger
distances between adjacent rows. Minimum stagger distance is 6 in.
Check door clearances, making necessary adjustments before laying the oor.
Floating Installation
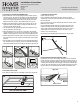
1. INSTALLING THE FIRST ROW
a. When possible, begin installation from the straightest wall (Fig. 1A). If
possible, install the oor perpendicular to the oor joists (Fig. 1B).
b. Use a carbide-tipped circular saw blade to remove both the short and long
side tongues from the plank to allow room for spacers. Do not trim the
groove sides (Fig. 1C).
c. Trim the long side tongue from each plank needed to complete the rst
row. Install the planks from left to right. Place 3/8 in. spacers between the
wall and the cut edge of the planks to ensure a 3/8 in. space along the
perimeter (Fig. 1D).
d. Adjoin the planks by using a tapping block as shown (Fig. 1E) and gently
tap until the planks are joined. Continue this process until the nal plank
for the row is needed.
1C1B1A
1D
1E
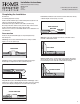
2. COMPLETING A ROW
a. When cutting a plank used for completing a row be sure to allow for the
proper 3/8 in. gap once the plank is installed. (Fig. 2A)
b. Use a pull bar in place of a tapping block to close the gap between the two
planks to complete the row (Fig. 2B). If the remainder of the cut plank is a
minimum of 12 in. long it may be used to start the next row.
5/16” gap
2A 2B
3