
Installation Guide


For Assistance, Call: 1-800-986-3460
HomeDepot.com/homedecorators
Installation Instructions
Laminate Flooring (For Indoor Use Only)
Grade Levels
Above Grade
On Grade
Below Grade
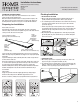
3. INSTALLING THE SECOND AND REMAINING ROWS
a. Begin installing the second row by angling the plank to allow the tongue to
slip into the groove of the plank in row 1 (Plank C, Fig. 3A). Maintain inward
pressure (towards the previous row) while gently moving the plank up and
down as you slowly push the plank to the oor (Fig. 3B). Do not force the
plank to the oor if the tongue is only partially inserted into the groove.
b. Install the next plank by placing it near the previous plank in the row and
laying it at to the oor while leaving a small gap (2-3 mm) between the
short ends of planks D and C (Fig. 3C).
c. Once the plank is lying at, gently tap the plank as described at the end of
step 2 to join planks C and D (Fig. 3D).
d. Placing the tapping block no closer than 8 in. from either end, tap lightly
along the long side to ensure the joint is fully seated and no gaps exist. (Fig.
3D) Note: Uneven tapping or use of excessive force may damage the joint.
e. Continue laying the oor from left to right, as described in the previous steps
(Fig. 3E). Remove the short side tongue from any full planks used in starting
a new row.
f. Trim the planks to be used in the nal row to the desired width while taking
into consideration the necessary gap of 5/16 in. needed between the planks
and the wall. Install the nal row as described in the previous steps (Fig. 3F).
20º
20º
C
3A 3B
C
D
C
D
3C
3D 3E 3F
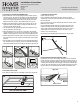
4. INSTALLING THE LAST ROW
Use the pull bar to draw the last row to t tightly to the previous row (Fig. 4A).
4A
USE PULL BAR LAST ROW
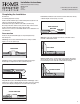
4. FINISHING THE INSTALLATION
Remove all spacers (Fig. 5A).
Create a watertight seal by rst lling the entire expansion perimeter,
T-molding spaces, and other open areas with 3/8 in compressible PE foam
backer rod (Fig. 5A).
Next cover the backer rod and any remaining gaps with 100% silicone sealant.
DO NOT use acrylic sealants.
Prior to installing the molding, apply silicone sealant to the portion of the
molding or transition that will contact directly with the laminate ooring
surface. Install moldings and immediately wipe away any excess silicone
sealant. Apply silicone sealant at connections to door frames, T-Joint
moldings, or any other xed objects.
Install moldings and immediately wipe away any excess silicone sealant.
5A
INSTALLING AROUND MOLDINGS AND DOOR JAMBS
In challenging areas such as door moldings where planks can’t be installed at
an angle it may be necessary to modify the joint. Begin by removing a portion of
the groove from the planks being tted to in the previous row by either planing
or sanding. Once the material is removed apply a small amount of laminate glue
to the top of the subsequent plank’s tongue and install it by sliding it on the oor
into place. Wipe up excess laminate glue with a damp cloth and warm water.
Plane or Sand
Apply Glue
4