Item #1001 516 481 #1001 516 482 Model #AM208W-BN #AM208W-NI USE AND CARE GUIDE BENTLEY II 18 INCH WALL FAN Questions, problems, missing parts? Before returning to the store, call Home Decorators Collection Customer Service 8 a.m. - 7 p.m., EST, Monday-Friday, 9 a.m. - 6 p.m., EST Saturday 1-800-986-3460 HOMEDEPOT.
Table of Contents Table of Contents .......................................................... 2 Disassembling Your Fan ............................................. 10 Safety Information ......................................................... 3 Operation ..................................................................... 11 Switch Operating Instructions ............................................... 11 User Servicing Instructions .................................................... 11 Warranty ...
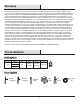
Safety Information WARNING: Do not insert foreign objects between rotating fan blades. WARNING: Risk of fire. Do not replace attachment plug. Contains a safety device (fuse, AFCI, LCD) that should not be removed. Discard product if the attachment plug is damaged. CAUTION: Do not operate any fan with a damaged cord or plug. Discard fan or return to an authorized service facility for examination and/or repair. CAUTION: Do not run cord under carpeting.
Warranty The manufacturer warrants the fan motor to be free from defects in workmanship and material present at time of shipment from the factory for a period of lifetime after the date of purchase by the original purchaser. The manufacturer warrants the light kit (excluding any glass), to be free from defects in workmanship and material present at time of shipment from the factory for a period of five years after the date of purchase by the original purchaser.
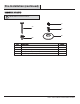
Pre-Installation (continued) HARDWARE INCLUDED NOTE: Hardware not shown to actual size. CC AA DD EE BB Part Description Quantity AA Wood screw 7 BB Thumb screw 2 CC Rear guard screw (preassembled) 4 DD Front guard screw (preassembled) 4 EE Blade cover (preassembled) 1 5 HOMEDEPOT.COM/HOMEDECORATORS Please contact 1-800-986-3460 for further assistance.
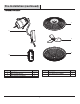
Pre-Installation (continued) PACKAGE CONTENTS C A D E B Part Description Quantity Part Description Quantity A Motor head (preassembled) 1 D Blade (preassembled) 1 B Wall mounting bracket 1 E Front guard (preassembled) 1 C Rear guard (preassembled) 1 6
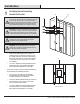
Installation 1 Installing the wall mounting bracket to the wall FF B CAUTION: Carefully open the packaging and take out items from styrofoam. Please lift the motor head with two hands by gooseneck arm and base, and DO NOT remove the plastic binder from the motor head until fan installation is completed. Removing the plastic binder from the motor head before or during installation will damage the oscillating mechanism.
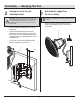
Assembly — Hanging the Fan 2 Hanging the fan to the wall mounting bracket 3 WARNING: Ensure the four slots in the back of the base are completely engaged with four hooks (GG) on the mounting bracket (B), and the fan assembly (A) sits securely on the mounting bracket (B), or else the fan may fall and result in injury or death. □ Remove the thumb screw (BB) at the base of the fan assembly (A). □ Grab the fan assembly (A) firmly with two hands.
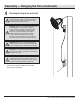
Assembly — Hanging the Fan (continued) 4 Attaching the plug to the wall outlet WARNING: If using this fan in a DAMP location, this fan must be connected to a supply circuit that is protected by a Ground Fault Circuit interrupter (GFCI) to reduce the risk of personal injury, electrical shock or death. WARNING: The power cord is equipped with a three-prong grounded plug that must be inserted into a matching receptacle. Under no circumstances must the grounding prong be cut off the plug (KK).
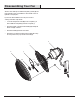
Disassembling Your Fan This fan comes with a pre-assembled rear guard (C), blade (D), and front guard (E) for your easy installation. Check that all screws are tight and securely in place. If you need to disassemble the fan for any reason such as cleaning, follow these steps below: □ Loosen the front guard screws (DD) on the rear guard (C) to disassemble the front guard (E) from the rear guard (C). □ Remove the blade cover (EE) from the blade (D) by turning the blade cover (EE) clockwise.
Operation SWITCH OPERATING INSTRUCTIONS WARNING: Do not manually move the fan head. Doing so will destroy the gears in the oscillating mechanism. It is recommended you test the fan before finalizing installation. Restore power to the circuit box. Test fan speeds with the wall control on the left side of fan assembly. OFF = Turns the fan off. H = High speed. M = Medium speed. L = Low speed. Test the oscillation function with the wall control on the right side of the fan assembly. OFF = Oscillation off.
Care and Cleaning Do □ Do not Check the support connections, brackets, and blade attachments twice a year. Make sure they are secure. Because of the fan’s natural movement, some connections may become loose over time. It is not necessary to remove the fan from the ceiling. □ Clean your fan periodically. Use only a soft brush or lint-free cloth to avoid scratching the finish. The plating is sealed with a lacquer to minimize discoloration or tarnishing.
Service Parts C AA EE A D BB CC E B DD Part Description Part Description A Motor head (preassembled) AA Wood screw B Wall mounting bracket BB Thumb screw C Rear guard (preassembled) CC Rear guard screw (preassembled) D Blade (preassembled) DD Front guard screw (preassembled) E Front guard (preassembled) EE Blade cover (preassembled) 13 HOMEDEPOT.COM/HOMEDECORATORS Please contact 1-800-986-3460 for further assistance.
Questions, problems, missing parts? Before returning to the store, call Home Decorators Collection Customer Service 8 a.m. - 7 p.m., EST, Monday-Friday, 9 a.m. - 6 p.m., EST Saturday 1-800-986-3460 HOMEDEPOT.COM/HOMEDECORATORS Retain this manual for future use.