HOME DECORATORS COLLECTION Item # 765477 Model # BSF-1733 USE AND CARE GUIDE 60in Media Console Infrared Electric Fireplace in Cherry IMPORTANT INSTRUCTIONS PLEASE READ THIS MANUAL BEFORE INSTALLING AND USING APPLIANCE WARNING! IF THE INFORMATION IN THIS MANUAL IS NOT FOLLOWED EXACTLY, AN ELECTRICAL SHOCK OR FIRE MAY RESULT CAUSING PROPERTY DAMAGE, PERSONAL INJURY OR LOSS OF LIFE. INSTALLER: Leave this manual with the appliance. CONSUMER: Retain this manual for future reference.
Table of Contents Table of Contents. . . . . . . . . . . . . . . . .2 Warranty. . . . . . . . . . . . . . . . . . . . . . . 2 Safety Information . . . . . . . . . . . . . . . 3 Pre-Assembly. . . . . . . . . . . . . . . . . . . 5 Planning Assembly . . . . . . . . . . . . . . . . . . 5 Tools Required. . . . . . . . . . . . . . . . . . . . . 5 Hardware Included. . . . . . . . . . . . . . . . . . 5 Package Contents . . . . . . . . . . . . . . . . . . 6 Assembly . . . . . . . . . . . . . . . . . . . . . . . .
Safety Information Please read and understand this entire manual before attempting to operate or install the product. To avoid malfunction, please be certain the input voltage of the electric fireplace insert and the voltage of the outlet are identical before plugging in. Check the unit for any damage that may exist (such as missing screw, dents, etc.) before using this device. Heater When first used, the electric fireplace insert may emit a slight odor.
Safety Information (continued) DO NOT operate this device if the cord becomes damaged, after the unit malfunctions in any way, has been dropped or becomes damaged in any manner. If this happens, discard the unit or return to an authorized service facility for inspection and/or repair. DO NOT insert or allow foreign objects to enter any ventilation or exhaust opening as this may cause an electric shock, fire or damage to this fireplace. This fireplace utilizes sparks and arcing in its internal operation.
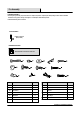
Pre-Assembly PLANNING ASSEMBLY Before beginning assembly of product, make sure all parts are present. Compare parts with package contents list and hardware contents list. If any part is missing or damaged, do not attempt to assemble the product. Estimated Assembly Time: 45 minutes TOOLS REQUIRED Phillips screwdriver (Not provided) HARDWARE INCLUDED NOTE: Hardware not shown to actual size.
Pre-Assembly (continued) PACKAGE CONTENTS A B C D F G E J H I K M N O L PART DESCRIPTION QUANTITY PART DESCRIPTION QUANTITY A Top 1 I Right Partition 1 B Base 1 J Rail 2 C Big Shelf 1 K Small Shelf 2 D Top Back Panel 1 L Door 2 E Bottom Back Panel 2 M Electric Fireplace Insert 1 F Upper Side Panel 2 N Remote Control 1 G Lower Side Panel 2 O Battery 1 H Left Partition 1 6
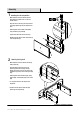
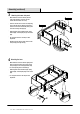
Assembly 1 Installing the rail and partition With assistance from other adults, place the Right partition (I) upside down on a soft and smooth surface. Align the holes on the Rail (J) and the punctures on the Right partition (I) and push together until flush. MM Attach together with Flat head screws (MM) using screwdriver (not provided). I Tighten all the flat head screws in this step. Repeat the above steps to attach another Rail (J) to the Left partition (H).
Assembly (continued) 3 Attaching the lower side panel With assistance from other adults, place the Lower side panel(G) on a smooth and soft surface with the smooth end on top. Insert the wooden tenons into the corresponding holes of the Big shelf (C). Slightly move parts to ensure the holes of the Lower side panel (G) and the holes of the Big shelf (C) align. Attach together with Flat washers (CC), Spring washers (BB), and Bolts (AA) using a Hex wrench (DD).
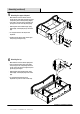
Assembly (continued) 5 Attaching the upper side panel With assistance from other adults, insert the wooden tenons of the Upper side panel (F) into the corresponding holes of the Big shelf (C). Slightly move parts to ensure the holes of the Upper side panel (F) and the holes of the Big shelf (C) align. Attach together with Flat washers (CC), Spring washers (BB), and Bolts (AA) using a Hex wrench (DD). Do not tighten all bolts in this step for later adjustment.
Assembly (continued) 7 Attaching the small shelf Place the Shelf pins (JJ) into the holes of the Lower side panel (G) and Left and Right partition (H&I) at the middle row. (You may choose the upper or lower row according to your needs, but the height of both Small shelves (K) should be consistent). Then, place the Small shelf (K) carefully into the mantel with the smooth side facing the front of the mantel.
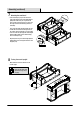
Assembly (continued) 9 Installing the back panel Attach the Top back panel (D) and Bottom back panel (E) to the back of the mantel by using Round head screws (GG) and a screwdriver (not provided). Make sure the smooth side of the back panels face the front of the fireplace. Note: If the fireplace mantel is sloping, it is normal. Please move the mantel straight (90 degree angle) when installing back panels.
Assembly (continued) 11 Attaching the knob With assistance from other adults, support the Door (L). Attach the Knob (FF) onto the Door (L) with Small bolts (EE) using a screwdriver (not provided) and tighten all bolts. 12 Attaching the door With assistance from other adults, align the holes on the Door hinges (LL) with the punctures on the Lower side panel (G). A C G I Attach the Doors (L) to the Lower side panel (G) using Flat head screws (II) and a screwdriver (not provided).
Assembly (continued) 13 Attaching the electric fireplace insert Place the Electric fireplace insert (M) into the mantel from the back and gently push forward to the proper position and place it at the center. Attach the Electric fireplace insert (M) with Bracket (KK) and Round head screw (HH) using a screwdriver (not provided). M 14 Installing the remote control battery Remove the battery holder from the remote control (N). Place the battery (O) into the battery holder with the "+" facing up.
Operation Control Panel on electric fireplace insert (M) Remote Control (N) WARNING-The fireplace must be properly installed before it is used. < > Turns the flame and logs On/Off. < or BRIGHTNESS> Controls the brightness of the flame and logs. Controls the functions of the heater. Press the button once to set the heater to HIGH (1,500 watts/hour). Press the button twice to set the heater to LOW (750 watts/hour). Press the button three times to turn the heater OFF.
Operation (continued) Other Important Features Children Lock Press and hold the [UP] and [DOWN] buttons on the control panel at the same time for more than 2 seconds to lock the fireplace. This prevents misuse by children and interference by other remote controls of other home devices. Also, the remote control function of this electric fireplace will be locked. The digital display flashes "L" five times before re-displaying the environmental temperature.
FCC Information NOTE: This equipment has been tested and found to comply with the limits for a Class B digital device, pursuant to part 15 of the FCC Rules. These limits are designed to provide reasonable protection against harmful interference in a residential installation. This equipment generates, uses, and can radiate radio frequency energy and, if not installed and used in accordance with the instructions, may cause harmful interference to radio communications.
Troubleshooting If you have any questions regarding the product, please call Home Decorators Collection Customer Service, 1-800-986-3460, 8 a.m. -7 p.m. EST, Monday - Friday, 9 a.m. - 6 p.m., EST, Saturday. Problem There is no power. The unit or lights do not turn on. Possible Cause Solution Unit is not plugged into a standard 120-volt outlet. Verify unit is plugged into a standard 120-volt outlet.
Service Parts A B C D F G E J H I K M N L PART PART DESCRIPTION DESCRIPTION A Top I Right Partition B Base J Rail C Big Shelf K Small Shelf D Top Back Panel L Door E Bottom Back Panel M Electric Fireplace Insert F Upper Side Panel N Remote Control G Lower Side Panel H Left Partition 18
HOME DECORATORS COLLECTION Questions, problems, missing parts? Before returning to the store, call Home Decorators Collection Customer Service 8 a.m. - 7 p.m., EST, Monday-Friday, 9 a.m. - 6 p.m., EST, Saturday 1-800-986-3460 HOMEDEPOT.COM/HOMEDECORATORS Retain this manual for future use.