Item #1007 798 834 Model # FZA60589-ST1T USE AND CARE GUIDE WAKEFIELD ALUMINUM RECTANGULAR DINING TABLE Questions, problems, missing parts? Before returning to the store, call Home Decorators Collection Customer Service. 8 a.m. - 7 p.m., EST, Monday - Friday, 9 a.m. - 6 p.m., EST, Saturday 1-800-986-3460 HOMEDEPOT.COM/HOMEDECORATORS THANK YOU We appreciate the trust and confidence you have placed in Home Decorators Collection through the purchase of this table.
Table of Contents Table of Contents ......................................................... 2 Pre-Assembly ............................................................... 3 Planning Assembly .................................................................. 3 Hardware Included ................................................................ 3 Package Contents ................................................................... 4 Important Safety Instructions ...................................
Warranty 5 YEAR FRAME WARRANTY WHAT IS COVERED We warrant the frame to be free of manufacturing defects to the original purchaser for five years. WHAT IS NOT COVERED It remains the customer’s responsibility for freight and packaging charges to and from our service center. This warranty does not cover commercial use, hardware, acts of nature, fire, freezing, and abusive use. In addition, purchased parts are not covered under this warranty.
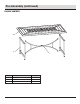
Pre-Assembly (continued) PACKAGE CONTENTS A B C Part Description Quantity A Table Top 1 B Table Leg Leg Connector 2 C 1 4
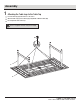
Assembly 1 Attaching the Table Legs to the Table Top Place the table top (A) upside down on a soft surface. Attach the table legs (B) to the table top (A) using M6x20 combination bolts (AA). Do not tighten the bolts at this step. NOTE: Loosely tighten all the bolts using hex wrench (BB). AA B A 5 HOMEDEPOT.COM/HOMEDECORATORS Please contact 1-800-986-3460 for further assistance.
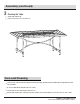
Assembly (continued) 2 Attaching the Leg Connector to the Table Legs Attach the leg connector (C) to the table legs (B) using M6x20 combination bolts (AA). Once all of the bolts are in place, fully tighten all the bolts using the hex wrench (BB).
Assembly (continued) 3 Checking the Table Turn the table right side up. Ensure all connections are secure before use. Care and Cleaning For best results, clean the table with a damp cloth and dry thoroughly. This will help prevent mildew by removing dirt particles that may accumulate. Do not clean with abrasive materials, bleach, or solvents. Store the table in a dry, sheltered place when not in use.
Questions, problems, missing parts? Before returning to the store, call Home Decorators Collection Customer Service. 8 a.m. - 7 p.m., EST, Monday - Friday, 9 a.m. - 6 p.m., EST, Saturday 1-800-986-3460 HOMEDEPOT.COM/HOMEDECORATORS Retain this manual for future use.
Item #1007 790 879 Model # FZA60589-ST1C USE AND CARE GUIDE WAKEFIELD ALUMINUM 6PK DINING CHAIR Questions, problems, missing parts? Before returning to the store, call Home Decorators Collection Customer Service. 8 a.m. - 7 p.m., EST, Monday - Friday, 9 a.m. - 6 p.m., EST, Saturday 1-800-986-3460 HOMEDEPOT.COM/HOMEDECORATORS THANK YOU We appreciate the trust and confidence you have placed in Home Decorators Collection through the purchase of this set.
Table of Contents Table of Contents. . . . . . . . . . . . . . . . . . . . . . . . . . . . . . . . . . . . 2 Important Safety Instructions . . . . . . . . . . . . . . . . . . . . . . . . . . 2 Save These Instructions. . . . . . . . . . . . . . . . . . . . . . . . . . . . . . 2 Read All Instructions before Use . . . . . . . . . . . . . . . . . . . . . . . 2 Warranty . . . . . . . . . . . . . . . . . . . . . . . . . . . . . . . . . . . . . . . . . . 3 What is covered . . . . . . . . . . . . . . . . . . . . .
Warranty 5 YEAR FRAME AND FABRIC LIMITED WARRANTY WHAT IS COVERED We warrant the frame and fabric to be free of manufacturing defects to the original purchaser for five years. WHAT IS NOT COVERED It remains the customer’s responsibility for freight and packaging charges to and from our service center. This warranty does not cover commercial use, hardware, acts of nature, fire, freezing and abusive use. In addition, purchased parts are not covered under this warranty.
Pre-assembly (continued) HARDWARE INCLUDED NOTE: Hardware not shown to actual size.
Pre-assembly (continued) SWIVEL CHAIR PACKAGE CONTENTS E F G I H J K L Part E F G H I Description Back Cushion Seat Cushion Swivel Chair Back Swivel Chair Right Arm J K Swivel Chair Left Arm Swivel Chair Seat Support Tube L Swivel Base Quantity 2 2 2 2 2 2 2 2 5 HOMEDEPOT.COM/HOMEDECORATORS Please contact 1-800-986-3460 for further assistance.
Stationary Chair Assembly 1 Attaching the Stationary Chair Seat to the Stationary Chair Back Place the stationary chair back (A) and stationary chair seat (D) on a soft surface. Attach the stationary chair seat (D) to the stationary chair back (A) using M6x20 combination bolts (AA). Do not tighten all bolts at this step. NOTE: Loosely tighten all bolts using the hex wrench (CC).
Stationary Chair Assembly (continued) 2 Attaching the Stationary Chair Seat to the Stationary Chair Right Arm Attach the stationary chair seat (D) to the stationary chair right arm (B) using M6x20 combination bolts (AA). Do not tighten all bolts at this step. NOTE: Loosely tighten all bolts using the hex wrench (CC). D AA AA B 7 HOMEDEPOT.COM/HOMEDECORATORS Please contact 1-800-986-3460 for further assistance.
Stationary Chair Assembly (continued) 3 Attaching the Stationary Chair Seat to the Stationary Chair Left Arm Attach the stationary chair seat (D) to the stationary chair left arm (C) using M6x20 combination bolts (AA). Do not tighten all bolts at this step.
Stationary Chair Assembly (continued) 4 Connecting the Stationary Chair Left Arm and Right Arm to the Stationary Chair Back Turn the stationary chair right side up. Connect the stationary chair left arm (C) and stationary chair right arm (B) to the stationary chair back (A) using M6x20 combination bolts (AA). Once all of the bolts are in place, fully tighten all the bolts using the hex wrench (CC). AA A B C 9 HOMEDEPOT.COM/HOMEDECORATORS Please contact 1-800-986-3460 for further assistance.
Stationary Chair Assembly (continued) 5 Placing the Seat Cushion and Back Cushion on the Stationary Chair Place the seat cushion (F) and back cushion (E) on the stationary chair. Ensure all connections are secure before use.
Swivel Chair Assembly 1 Attaching the Swivel Chair Seat to the Swivel Chair Back Place the swivel chair back (G) and swivel chair seat (J) on a soft surface. Attach the swivel chair seat (J) to the swivel chair back (G) using M6x20 combination bolts (AA). Do not tighten all bolts at this step. NOTE: Loosely tighten all bolts using the hex wrench (CC). AA AA G J 11 HOMEDEPOT.COM/HOMEDECORATORS Please contact 1-800-986-3460 for further assistance.
Swivel Chair Assembly (continued) 2 Attaching the Swivel Chair Seat to the Swivel Chair Right Arm Attach the swivel chair seat (J) to the swivel chair right arm (H) using M6x20 combination bolts (AA). Do not tighten all bolts at this step. NOTE: Loosely tighten all bolts using the hex wrench (CC).
Swivel Chair Assembly (continued) 3 Attaching the Swivel Chair Seat to the Swivel Chair Left Arm Attach the swivel chair seat (J) to the swivel chair left arm (I) using M6x20 combination bolts (AA). Do not tighten all bolts at this step. NOTE: Loosely tighten all bolts using the hex wrench (CC). AA AA J I 13 HOMEDEPOT.COM/HOMEDECORATORS Please contact 1-800-986-3460 for further assistance.
Swivel Chair Assembly (continued) 4 Connecting the Swivel Chair Left Arm and Right Arm to the Swivel Chair Back Turn the swivel chair right side up. Attach the swivel chair left arm (I) and swivel chair right arm (H) to the swivel chair back (G) using M6x20 combination bolts (AA). Once all of the bolts are in place, fully tighten all the bolts using the hex wrench (CC).
Swivel Chair Assembly (continued) 5 Attaching the Support Tube to the Swivel Chair Seat Place the swivel chair upside down on a soft surface. Attach the support tube (K) to the swivel chair seat (J) using M8x20 combination bolts (BB). Fully tighten the bolts using the wrench (DD). BB BB K J 15 HOMEDEPOT.COM/HOMEDECORATORS Please contact 1-800-986-3460 for further assistance.
Swivel Chair Assembly (continued) 6 Inserting the Support Tube to the Swivel Base Insert the support tube (K) to the swivel base (L).
Swivel Chair Assembly (continued) 7 Placing the Seat Cushion and Back Cushion on the Swivel Chair Place the seat cushion (F) and back cushion (E) on the swivel chair. Ensure all connections are secure before use. E F Care and Cleaning For best results, clean the chair with a damp cloth and dry thoroughly. This will help prevent mildew by removing dirt particles that may accumulate. Do not clean with abrasive materials, bleach, or solvents. Store the chair in a dry, sheltered place when not in use.
Questions, problems, missing parts? Before returning to the store, call Home Decorators Collection Customer Service. 8 a.m. - 7 p.m., EST, Monday - Friday, 9 a.m. - 6 p.m., EST, Saturday 1-800-986-3460 HOMEDEPOT.COM/HOMEDECORATORS Retain this manual for future use.