
Instructions / Assembly


Installation
5
HOMEDEPOT.COM/HOMEDECORATORS
Please contact 1-800-986-3460 for further assistance.
□
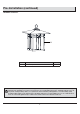
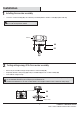
Installing the crossbar assembly
AA
BB
1
2
AA
EE
□
□
□
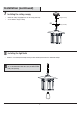
NOTE: If the ceiling canopy is not snug against the ceiling, remove it from the crossbar assembly and adjust the length of the
pre-assembled threaded tube by unscrewing the pre-assembled hex nut.
Screw the threaded tube in or out of the crossbar until the correct length is achieved. Then, re-attach the ceiling canopy.
Canopy lock ring
Secure the crossbar assembly (AA) to the outlet box (not included) with the outlet box screws (BB). Tighten until snug.
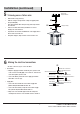
Testing ceiling canopy t to the crossbar assembly
Remove the pre-assembled canopy lock ring from the crossbar assembly (AA).
Temporarily attach the ceiling canopy (EE) to the pre-assembled nipple on the crossbar assembly (AA).
Secure with the canopy lock ring.
Outlet box
NOTE: The preassembled mounting threaded tube on
the crossbar should protrude outward.