
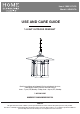
Instructions / Assembly


Installation (continued)
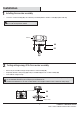
6
DD
AA
DD
A
FF
NOTE: You may need to use pliers (not included) to open
the links of xture chain. If so, put a cloth over the xture
chain to protect the nish from the pliers.
□
□
□
□
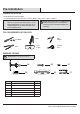
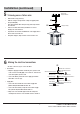
Installing the xture chain
3
4
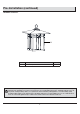
Pulling the supply wires
□
□
NOTE: To make the next step easier, cut the supply wire
and ground wire 24 inches longer than the distance from
the xture loop to the ceiling.
Important: Please pay attention to the polarity (wire labels L
& N) when cutting wires. Wire identication will be needed
in Step 5.
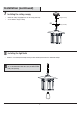
Choose desired hanging length for the light xture. Suggested mounting
height over a table or island is 30 inches from the table/island top to the
bottom of the xture.
Adjust the xture chain (FF) to the desired length, removing links if
needed.
Connect one end of the xture chain (FF) to the canopy chain loop
preassembled to the crossbar assembly (AA) with one quick link (DD)
and close the quick link (DD).
Connect the other end of the xture chain (FF) to the xture body (A) with
the remaining quick link (DD) and close the quick link (DD).
Pull the supply wires and ground wire up through the xture
chain alternating links.
Push the ends of the supply wires and ground wire up through
the canopy chain loop and into the outlet box. The remaining
slack wire will be inserted into the outlet box in Step 6.
Supply wire
and ground wire
Canopy chain loop